Finding the best layout for a camper van bedroom can be tough. On one hand, beds that run lengthwise give you lots of space for sleeping but take up more than 50% of your living area. On the other hand, horizontal beds won’t fit without flares to gain extra width in the walls.
*This post may contain affiliate links, as a result, we may receive a small commission (at no extra cost to you) on any bookings/purchases you make through the links in this post. As an Amazon Associate, we earn from qualifying purchases. Read our full disclosure
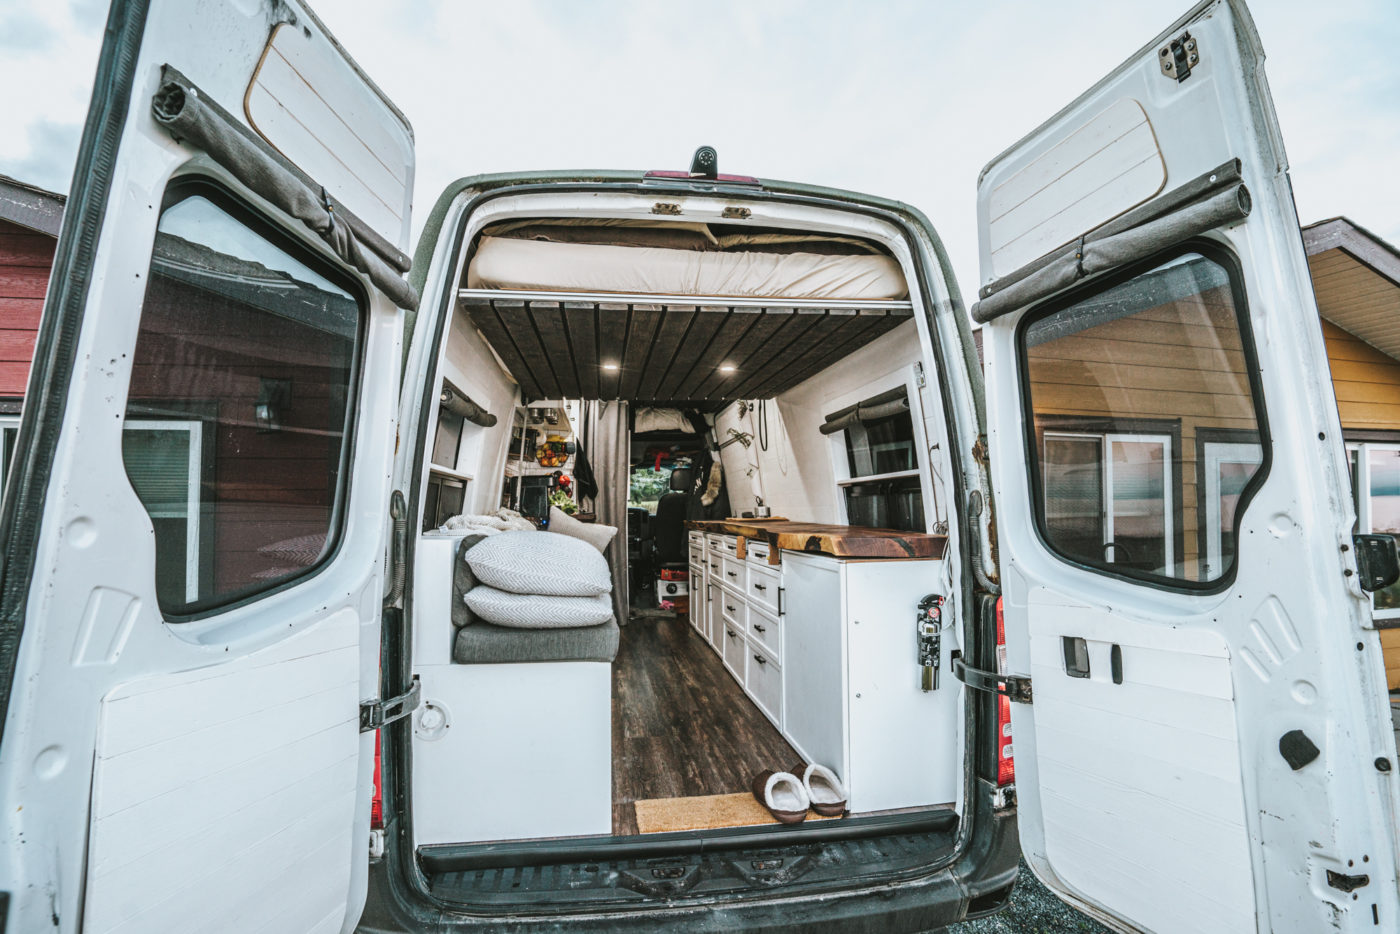
Living in a tiny house requires clever ideas to maximize your storage space and living area. We knew we wanted a non-permanent bed that didn’t need to be set up every day.
Our solution? An elevator bed.
Traveling Soon? Here is a list of our favourite travel providers and accessories to help get you ready for your upcoming trip!
Don’t leave your home without Travel Insurance!
From the US? We recommend Allianz Travel Insurance, a world leader in travel protection and our trusted Travel Insurance partner for the last 5 years. Allianz offers Single Trip and Annual Travel Insurance Policies that include medical coverage, trip cancellation, rental car insurance and more! (Benefits vary by state and by plan, so read your policy carefully!)
Not a US resident? Consider Safety Wing, a budget friendly travel insurance provider with travel insurance plans for Digital Nomads and travelers from all around the world.
Why Choose An Elevator Bed For A Van Or Tiny House
Considering that tiny houses give you about 225 square feet to work with and even less for vans (and that includes bathroom space!), elevator beds are a great space-saving solution. They allow you to double up on space and have a living room and bedroom in the same area. Unlike a loft bed, you can change the position of the elevator bed as you need it. You’re not committed to one layout since you can lift your bed out of the way for a more open feel.
Having no permanent bed means you have more room for storage and more flexibility in how you use your space. Plus, you don’t have to worry about making up the bed every day. If you’ve ever lived in a tiny house, you know that this is a major perk!
Elevator Bed Vs Murphy Bed
A common solution to the permanent bed conundrum is a wall bed called a Murphy bed. While these are a great way to have periodic access to the bed, the design can be complicated. Most people’s plans include a Murphy bed kit to bring the idea to life.
Murphy beds for vans create a ton of open floor space when they’re up. But, you won’t be able to have a permanent couch or table in that area. They’re perfect for transporting gear around, but ultimately, they’re probably better suited for a tiny house.
On the flip side, elevator beds for campervans free up living space while allowing you to have a couch or table permanently on-site. Elevator bed hardware is relatively easy to find and doesn’t require special kits like an RV overhead bed kit. The only drawback is sacrificing the ceiling height that you lose when the bed is raised. So this might not work for a minivan bed platform, but it works great in a Sprinter van.
Why We Chose An Elevator Bed For Our Tiny Home On Wheels
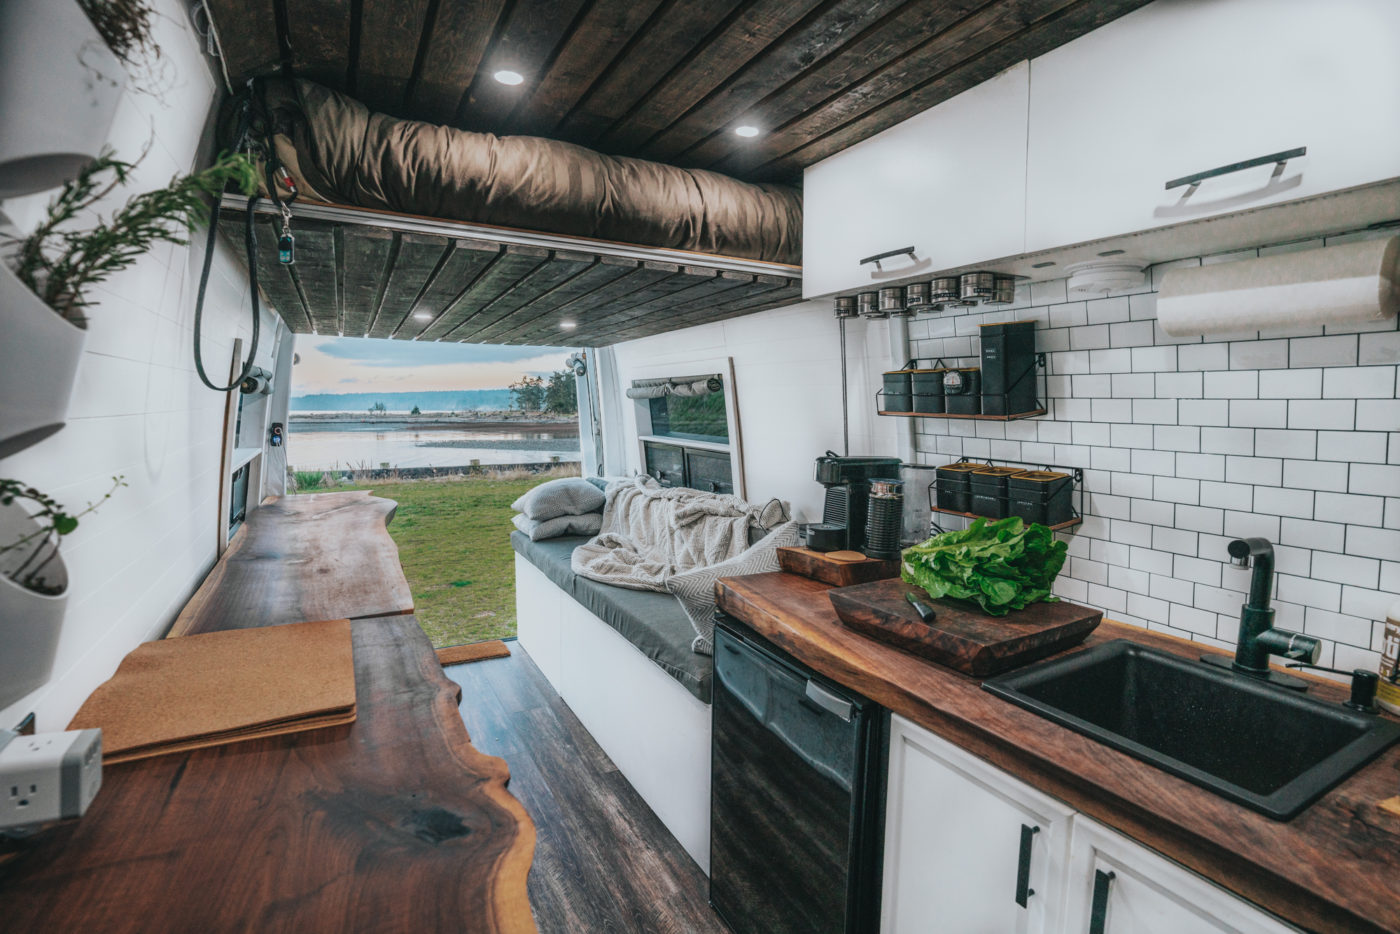
In our van build, we decided to give up the extra ceiling height to maintain our panoramic 270° views. This way, we were able to have a larger queen-size bed frame that raises and lowers without covering up our windows. We always get lots of light, whether we lift the position of the bed or not. A Murphy bed would have only accommodated a twin bed and covered up a whole wall of windows. Our elevator bed DIY is the perfect compromise!
Check out our elevator bed in action in our van tour video
How We Built Our Campervan Elevator Bed
We created our own elevator bed kit with the following materials.
Materials Used
- 1 x Harken 16mm Airblock Double
- 2 x Harken Micro Upright Lead Block
- 1 x Harken 16mm Airblock Single
- 2 x Harken 16mm Airblock Cheek
- 1 x Synthetic winch rope
- ATV 3,500lb Winch
- 6-8 x 80/20 aluminum extrusion (depending on the size of the bed you are building)
- 1 x set Aluminum profile connectors
- Lauan Plywood (get at your local hardware store)
- Pine Slats (or another alternative for under the bed)
- Pegboard
- L track
- T-Slot Hammer Head Nuts and bolts
- Stainless Steel Threaded Eye Bolts + nuts
- 4 x Stainless Steel Hook & Eye Turnbuckle
- 2 x Tie-down straps
- 2 x Heavy-duty carabiners
Step-By-Step DIY Elevator Bed Build Instructions
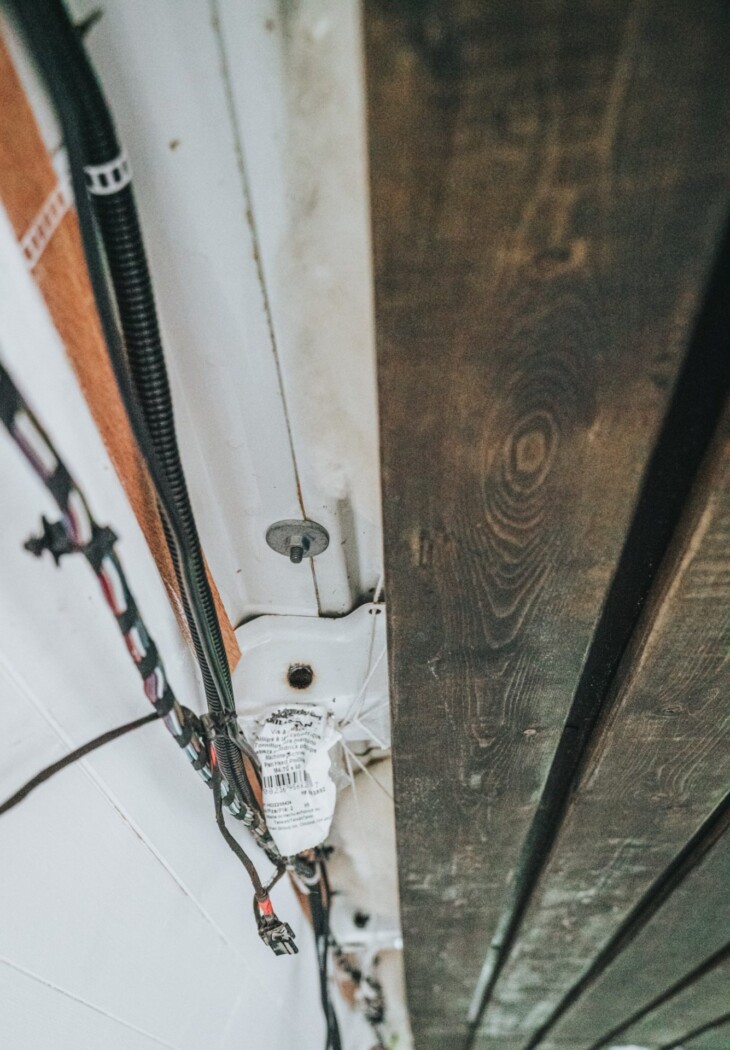
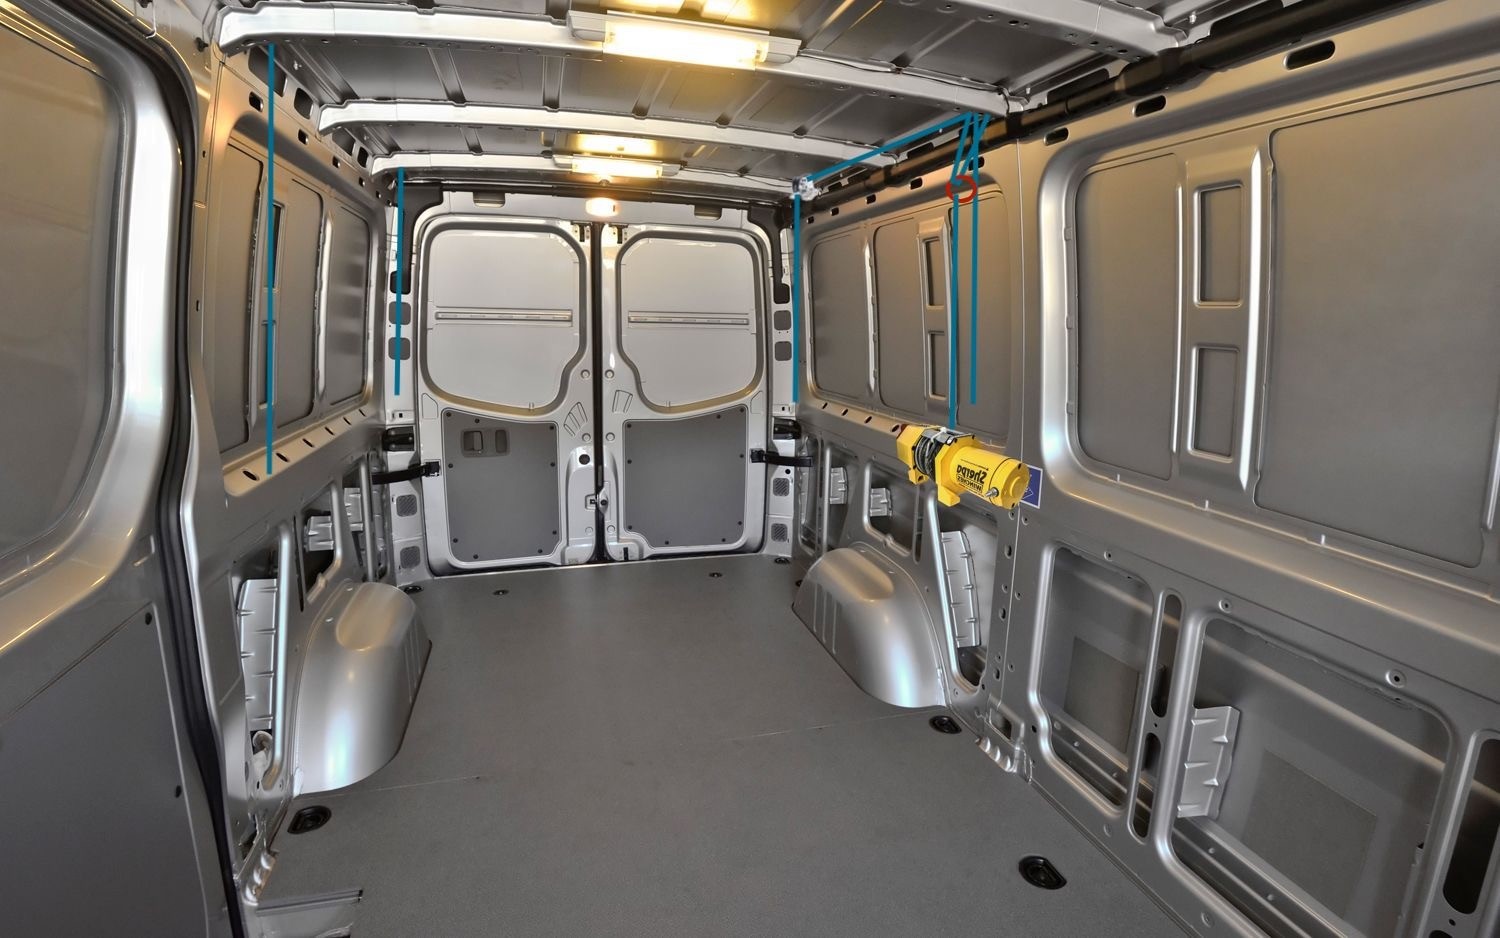
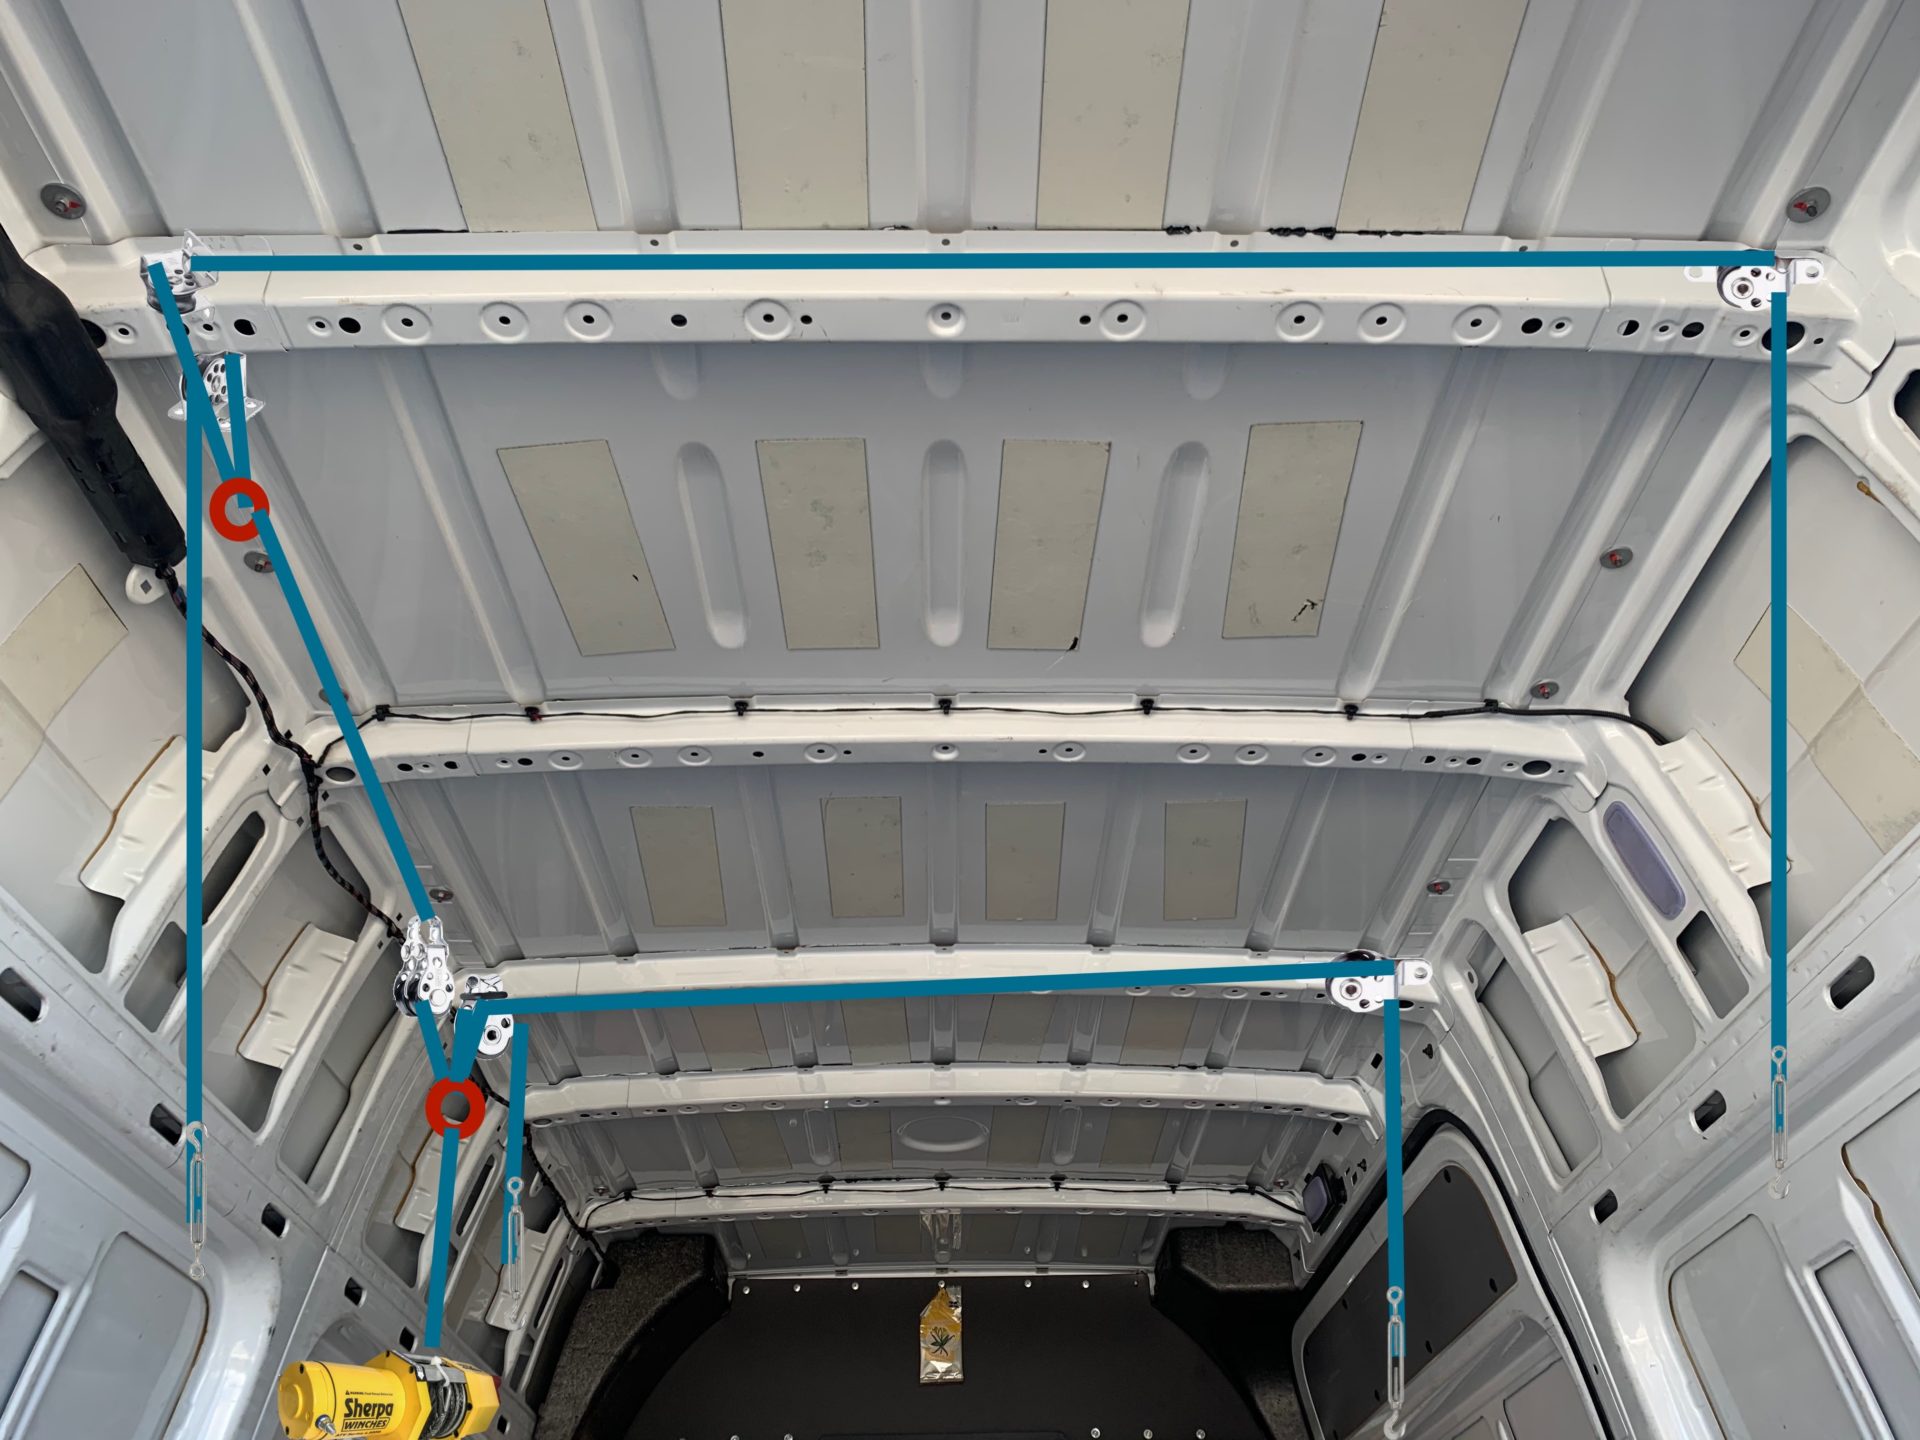
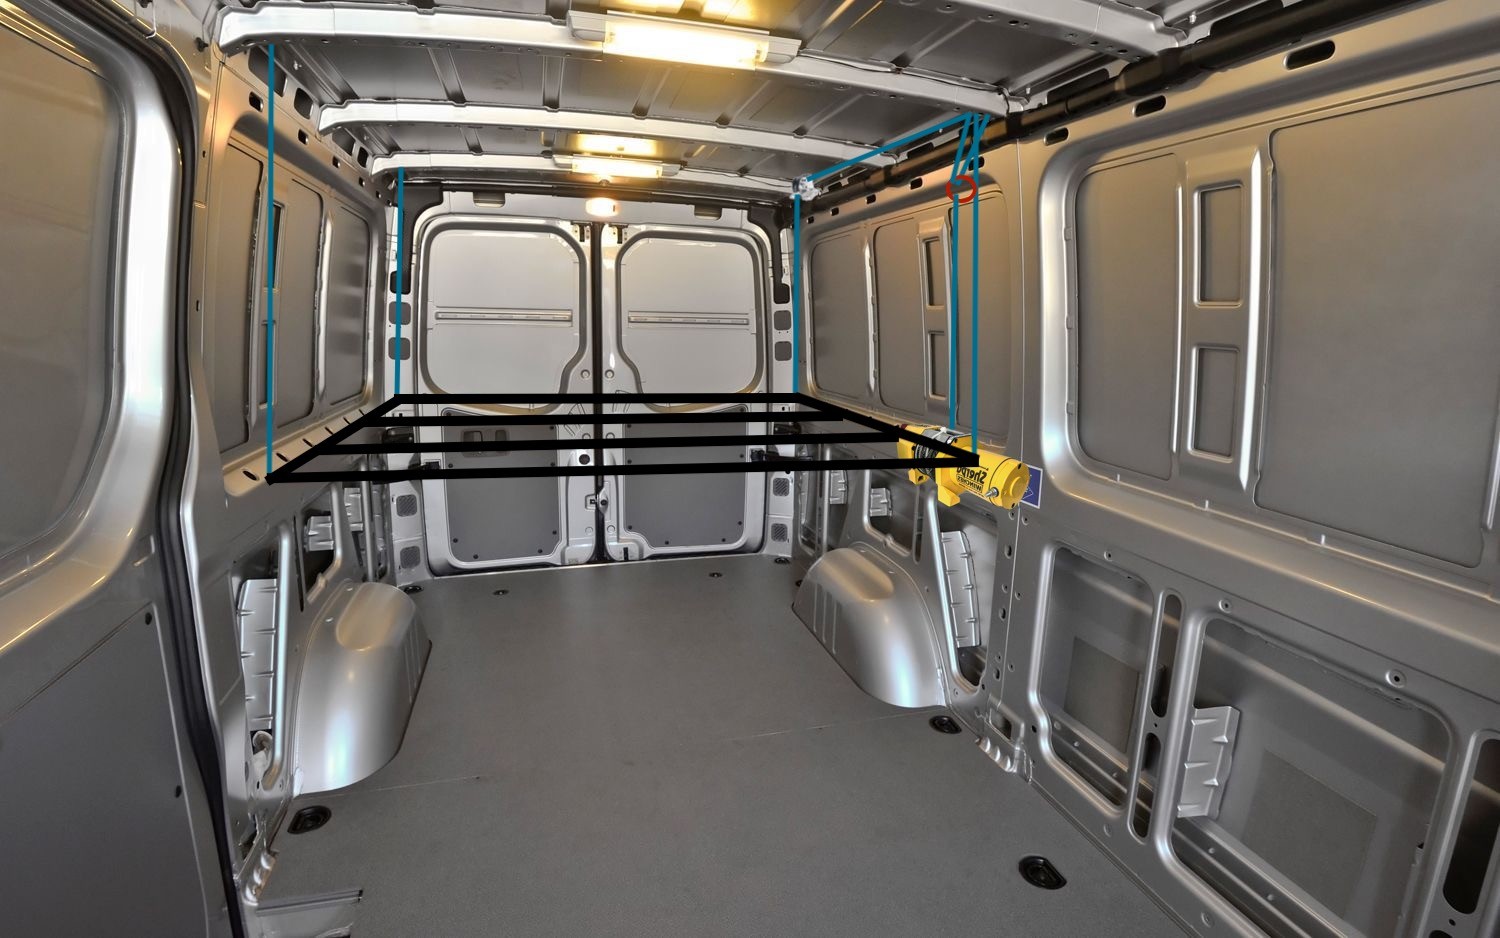
1. Install The Pulleys
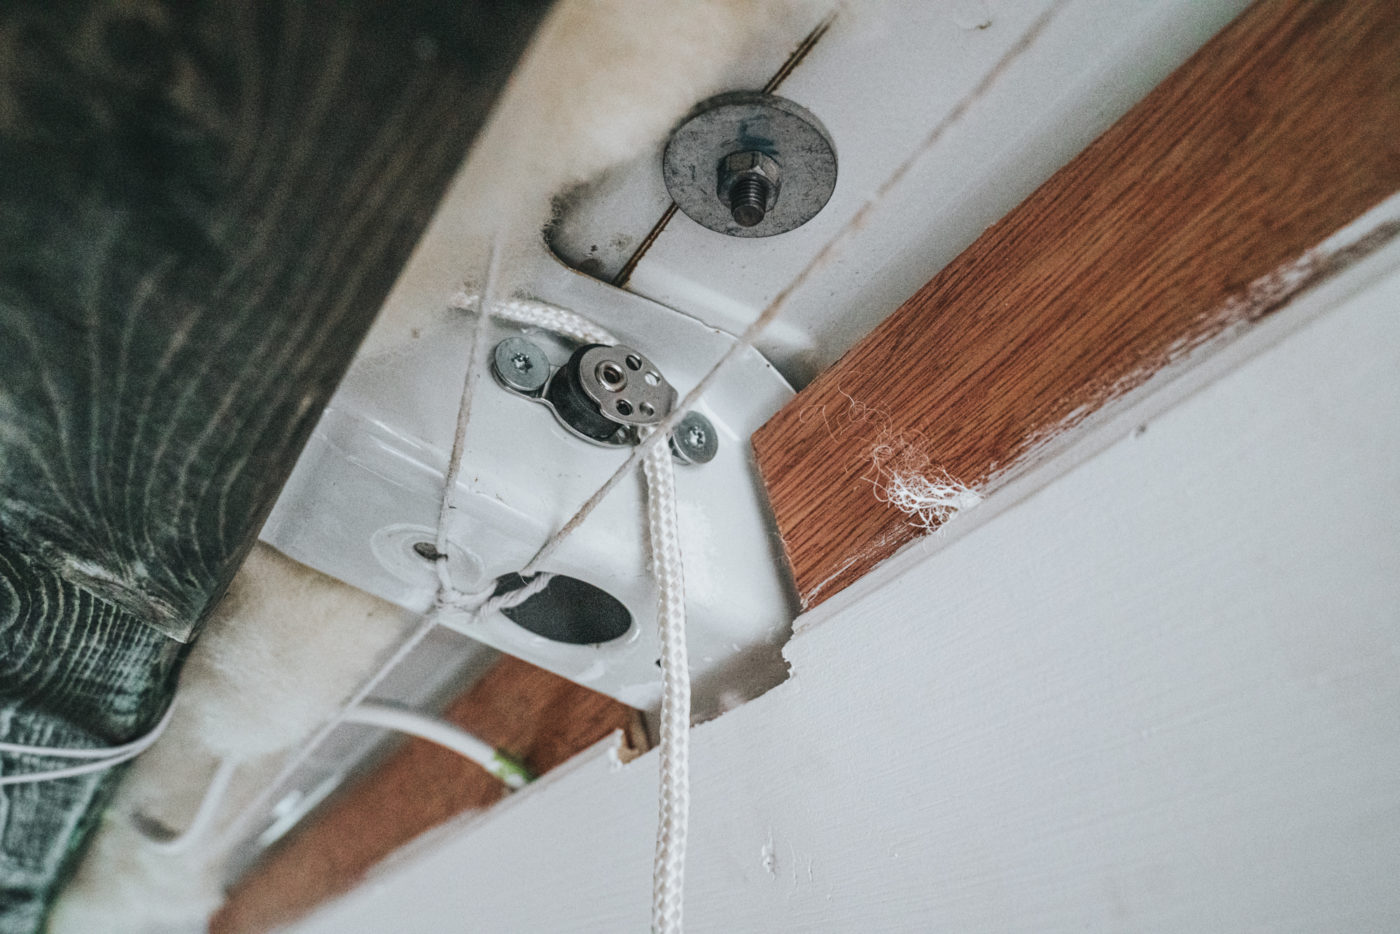
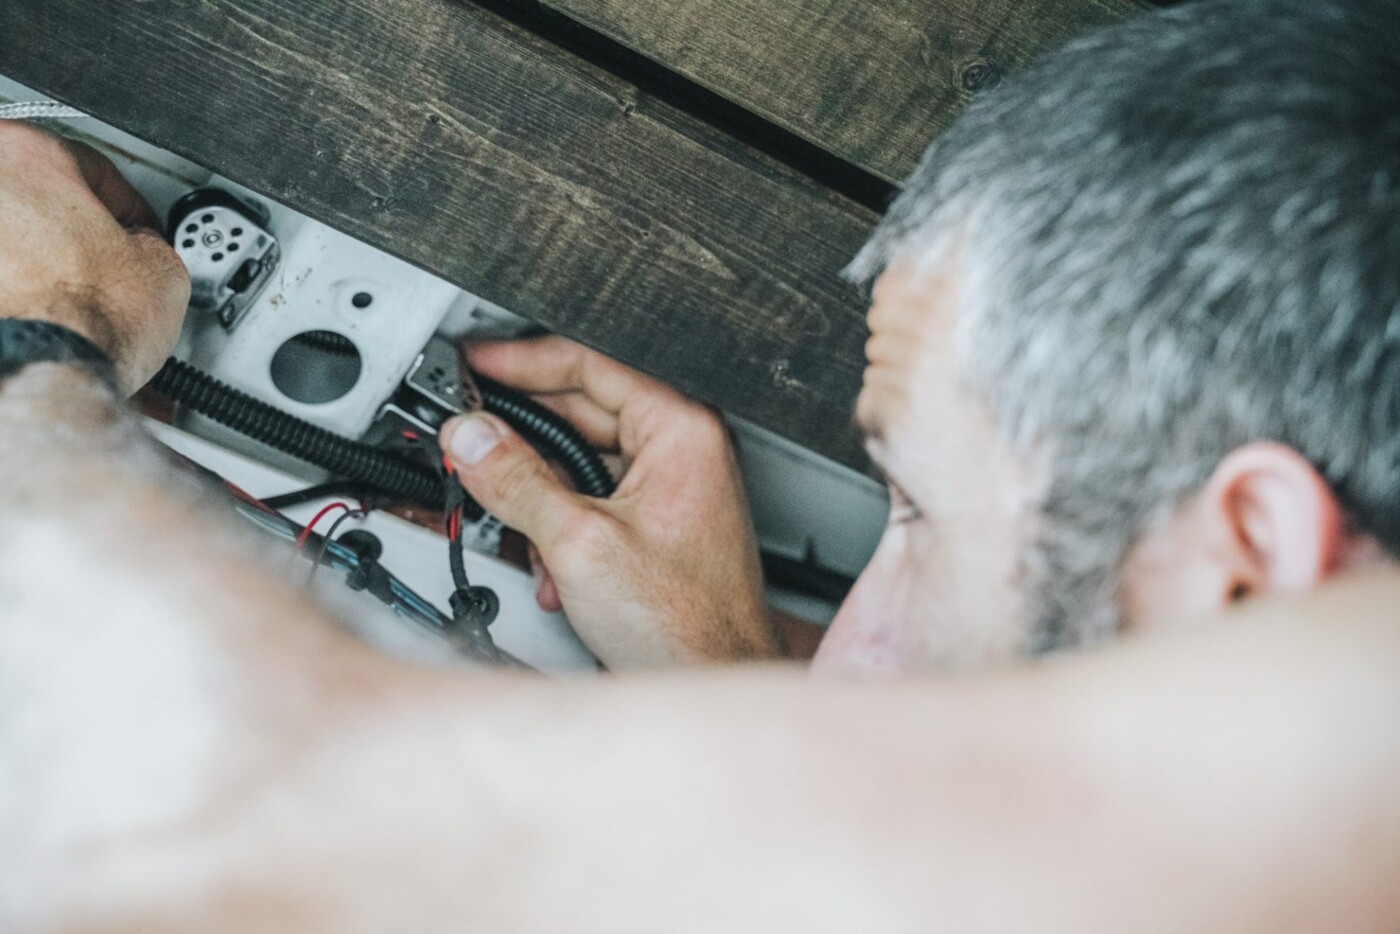
Attach all pulleys to the beams of the Sprinter van ceiling. We bolted 2x Harken 16mm Airblock Cheek pulleys to the cross beams on the driver side of our Sprinter ceiling, 2 x Harken Micro Upright Lead Blocks, as well as the Harken 16mm Airblock Double and Harken 16mm Airblock Single on the passenger side of the beams.
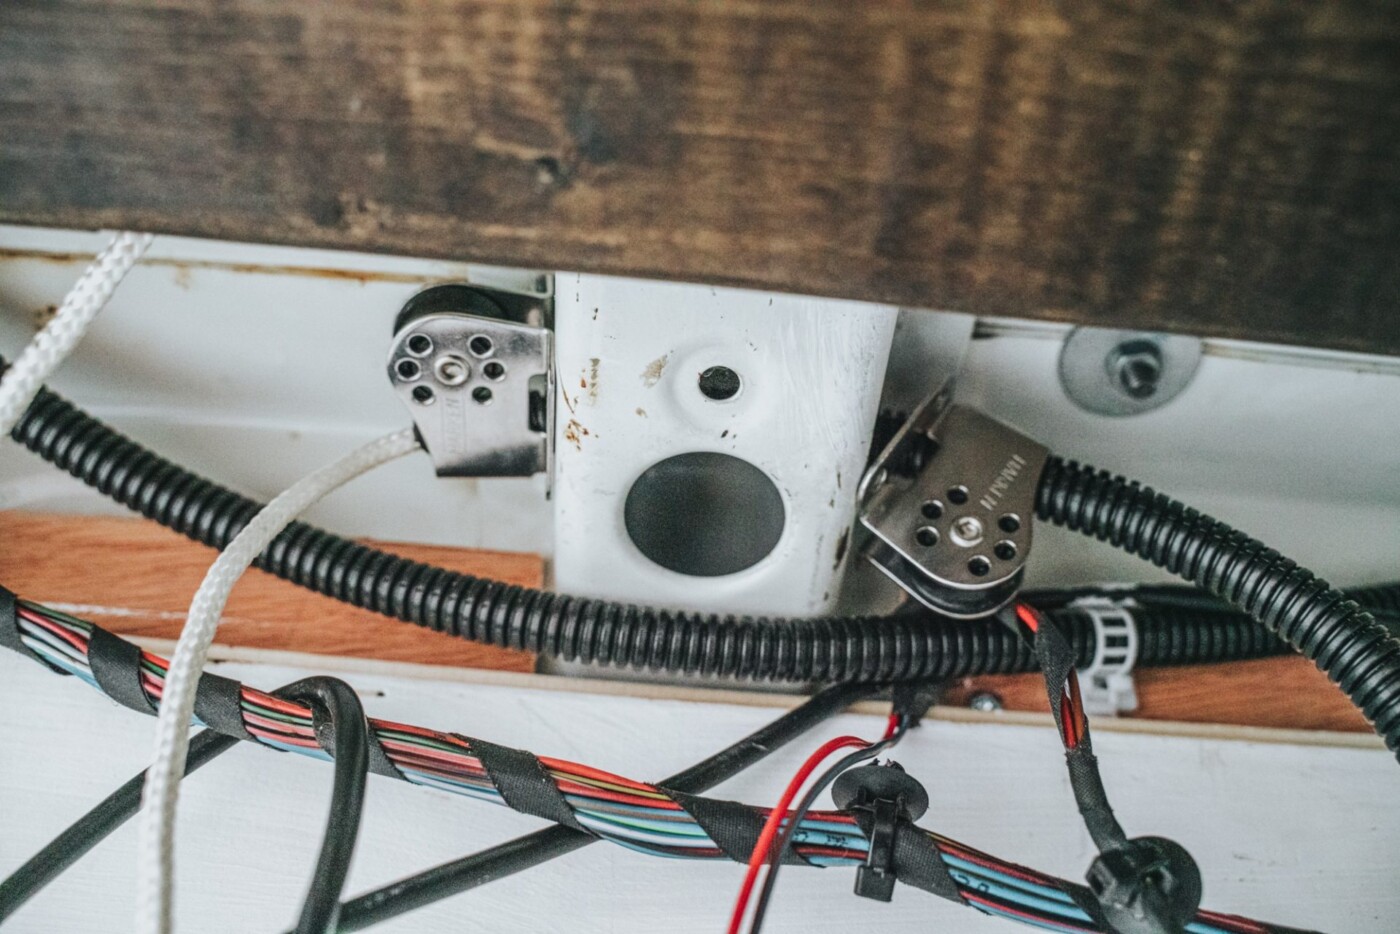
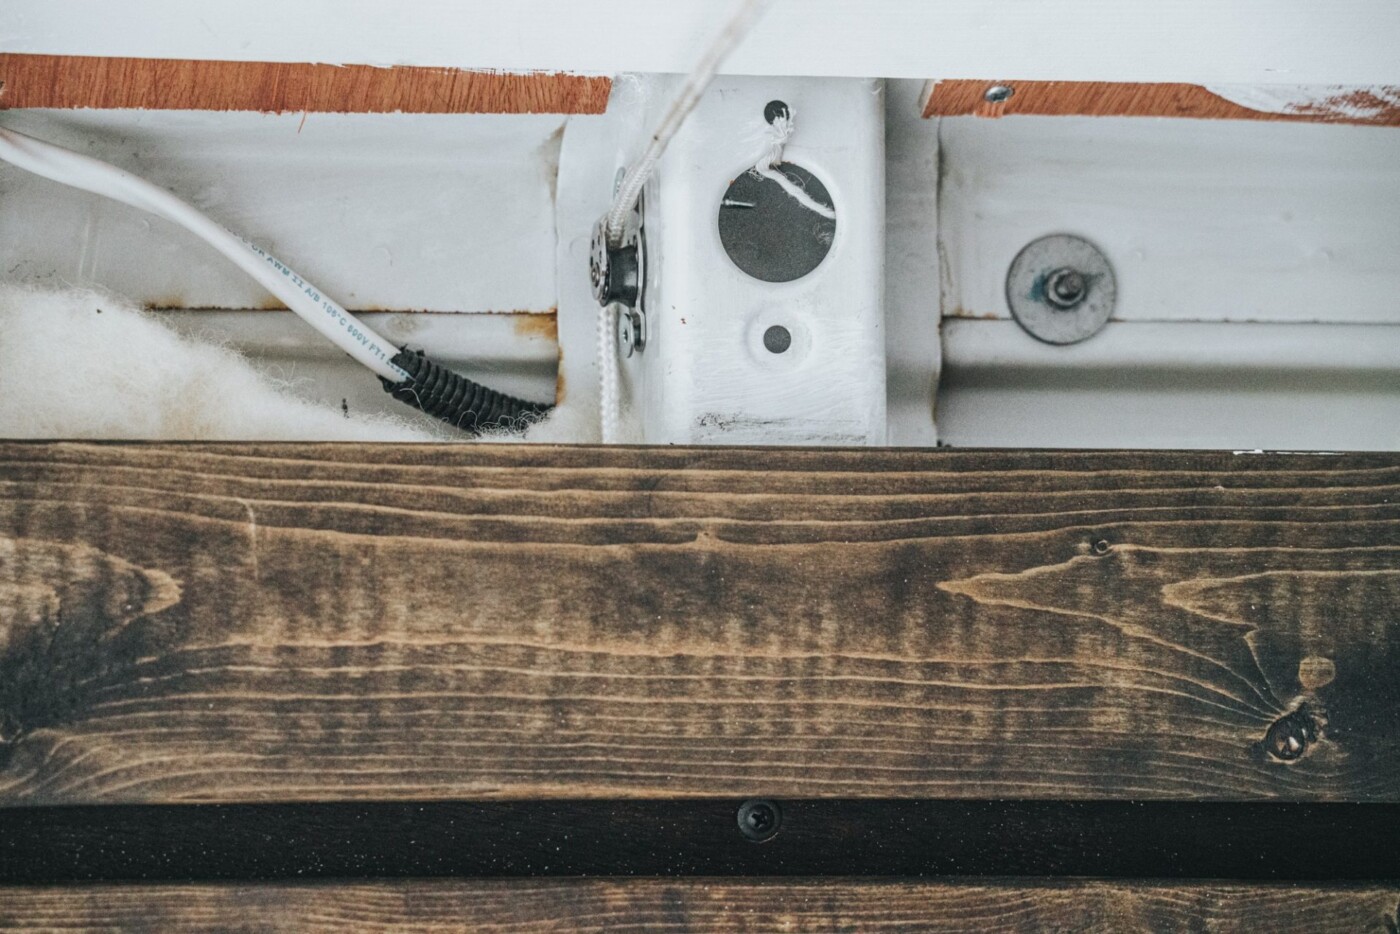
2. Attach The Ropes
Pull the ropes through the pulleys and connect them to one another. The red circles in the photo indicate where the ropes are connected. You can do this by lock stitching or with an attachment ring.
Next, attach a turnbuckle at the end of each rope in all four corners of the bed. Note that you can always skip this step and attach the ropes directly to the bed frame. But, we wanted to be able to disconnect the bed from the winch when it’s down as a safety feature. This way, if the winch motor ever decides to come to life in the night, our bed won’t lift with it.
*Note: We recommend pulling the ropes through before installing the ceiling. Pulling them through from one side of the van to the other becomes harder once the ceiling is in place. But not impossible—use a cable snake if needed.
READ NEXT: Best Portable Camping Air Conditioner
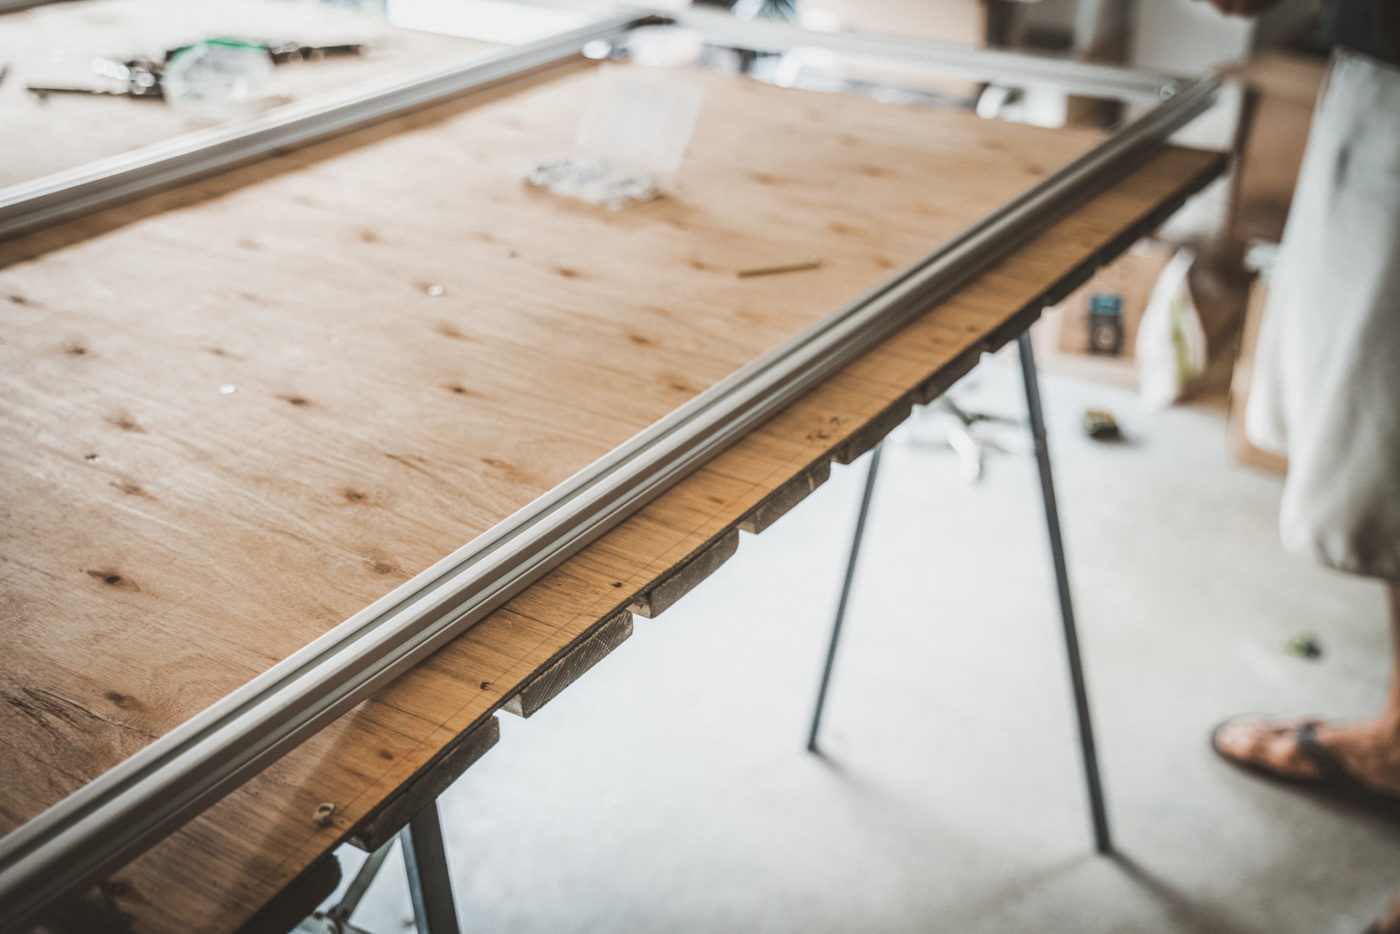
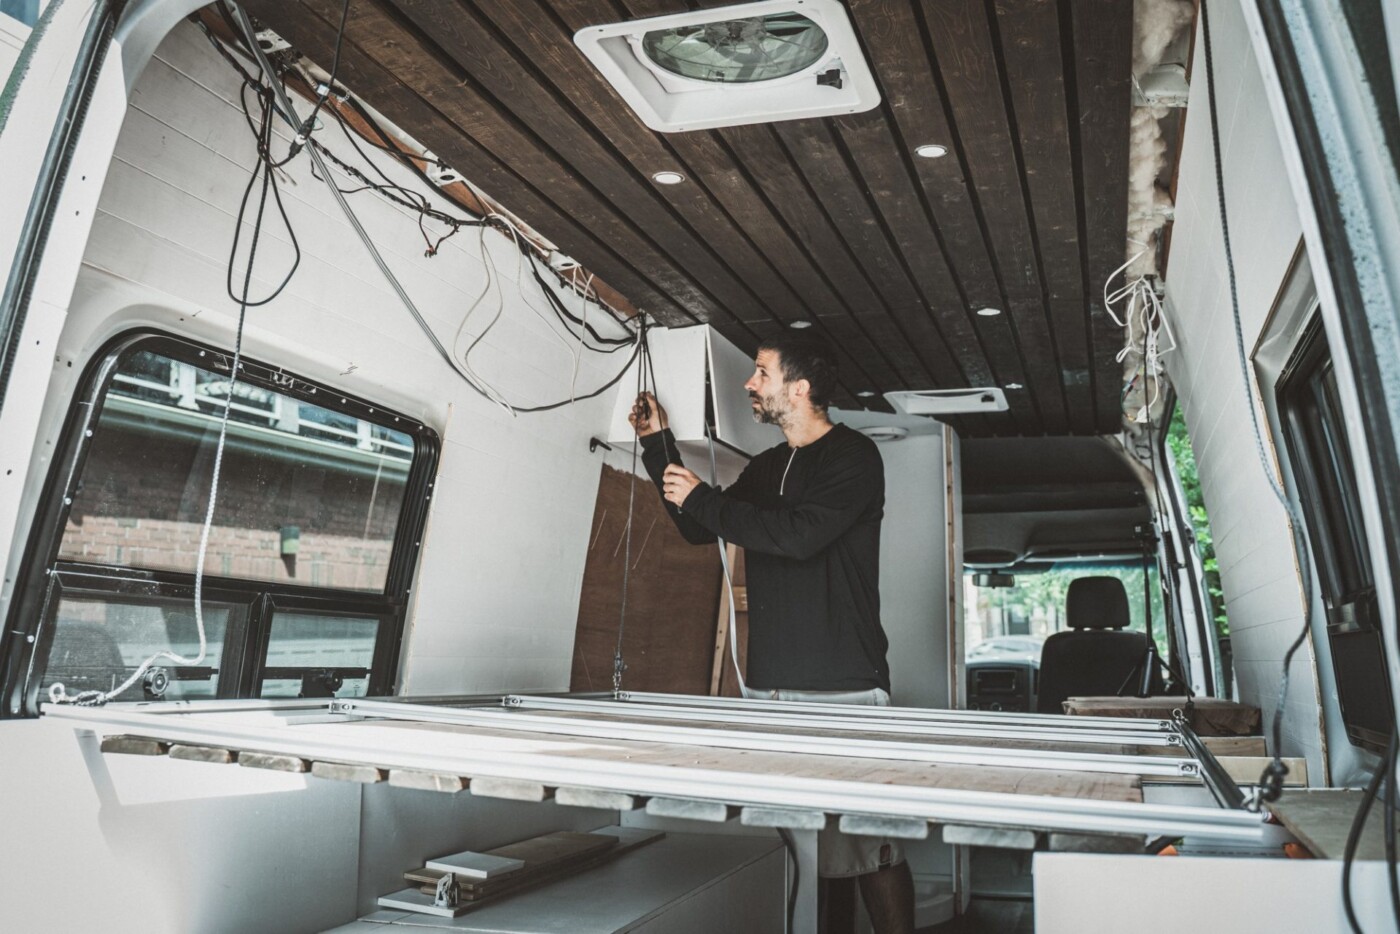
3. Build The Frame
Using 80/20 aluminum, we built a bed frame with 4 horizontal bars. In hindsight, it would have been a better idea to use 6-8 horizontal bars to improve structural integrity and weight distribution.
On the underside of the frame, we attached a sheet of plywood and the same planks we used on our ceiling. We used 1×4 pine slats on the ceiling of the rest of our van, so we continued the design here.
On the top of the frame, we attached a sheet of pegboard. The pegboard is lightweight, and the pre-drilled holes allow for air circulation under our mattress. We used t-slot nuts to attach the pegboard to the bed frame. They fit perfectly into the 80/20 aluminum.
Finally, we attached the eye bolts to the frame where the turnbuckles will connect with the bed.
4. Install The Winch
We bolted an ATV winch as our electric bed lift to the side of the van’s wall using our existing L track system. If you don’t already have an L track system, you’ll need to install one. Then, taking note of the fuses and wire gauge you’ll need, hook the winch up to your electrical setup. If you don’t want to bring electricity into the mix, you can always use a manual hand crank.
READ NEXT: 12 Best Van Conversion Companies That Will Build Your Van for You
5. Test The Build
Take your elevator bed mechanism for a spin and push the up/down button on your winch. In the event of power failure, checking all the fuses on your winch is a good place to start. Once the motorized bed lifts are up and running, play around with the turnbuckle/eye bolt placement so the bed position is centred. Make sure it’s not swinging to one side or another when you lift and lower it.
6. Secure The Bed
Once testing is complete, your retractable ceiling bed is good to go! For additional security, we added more rope to ease the strain on the winch and to further protect the bed during bumpy rides. We looped tie-down straps through the beams of the van and attached heavy-duty carabiners to the ends. When the bed is up, we secure it by looping the carabiners through.
Tips For A Successful Van Conversion Elevator Bed Build
- Choose a winch with a synthetic rope to minimize the noise when raising and lowering the bed.
- Some winches can be very noisy. We built a soundproof box with pine plywood and soundproofing foam to muffle the noise.
- Install the rope mechanism before you finish the ceiling.
- Make your bed a suitable size for the dimensions of your van. Remember that in a Sprinter, the width of the van is smaller at the top than in the middle. This meant that our bed size was limited by the width of our ceiling.
- Ensure that you have built something secure for the bed to rest on when it is lowered down. We recommend cabinets on both sides of the van to create a raised platform bed effect with lots of storage.
How Much Does It Cost To Build A DIY Elevator Bed?
In total, our elevator bed price was CA$692.46 (approximately US$545 for our American friends). See the full cost breakdown below:
Wood
Plywood + wooden slats – $141.00
Pegboard – $33.89
Hardware
Pulleys + screws – $231.94
Turnbuckles + eye hooks – $41.42
Ropes – $83.48
Winch + bolts – $138.74
Soundproofing foam – $21.99
Total – CA$692.46
All in all, we’re super happy with our DIY elevator bed. They’re a great alternative to loft beds that require a ladder or a convertible dinette that needs to be put together every day. Hopefully, this information will help you create the bed elevator of your dreams – perfect for your tiny house!
Update on Durability
We had our DIY elevator bed for 3 years. We used it daily while in the van and had no issues at all. As of 2023, we’ve sold the van, and the new owner only recently had to reinforce the bed as the screws holding the 80/20 to the base rattled loose. To avoid this, we recommend tightening them every week or so as part of maintenance.
READ NEXT: 10 Beautiful Sprinter Van Conversions To Inspire Your Build
FAQs:
What’s the size of your DIY elevator bed?
We had a double bed. There was enough room for us to sleep comfortably, considering we’re both tall (5’10 and 6’).
How are the ropes attached to the bed?
The ropes use a turnbuckle with a hook on one side and an eye on the other. This allows for a quick disconnect if needed. If you’re having trouble with the build or want to know more details and specifics, just shoot an email to our general site address, and we’ll get back to you ASAP.
Can you manually lower the hanging system to level the bed?
The hanging system lowers the entire bed at the same time, so you can’t lower it more on one side and less on the other. If you’re parking somewhere that isn’t level, you can put something under 1 or 2 of the corners of the bed to level it out or invest in bed-leveling bricks for your van.

This is fantastic. I need to do a little more research but I think I am going to try adopting what you’ve done here. Thanks for the walk through. I’ll be sure to use your links when I order. Happy trails!
Hello guys, my name is Gino and I am writing to you from Italy, from the photos I can’t quite understand which is the exact path I have to take on the ropes. Could you explain me the exact dynamics. Thank you.
Do you have more information on how to install the cables and the location of the winch? I have been trying to figure this out and the system you have created is what I have been thinking in my mind but haven’t been able to figure it out logistically.
We installed our winch under the seat, attached onto the L-track of the van and hooked up to our fuse box in the cabinets above. Everyone’s set up is different so unfortunately, I don’t think there is much more guidance we can offer you unless you decide to copy our layout complelete…which you are welcome to do 🙂
Thank you. Does the Outside Bully liner provide an additional R-Factor insulation? We did not notice a grey tank.
No, it does not provide any additional r-value but neither does any other paint.
Our grey tank is mounted under the van.
I’m not sure if it’s just my browser, but the picture showing how the ropes are attached is missing. Is there any way you can send me that?
What do you mean how the ropes are attached? You mean to the bed itself? They use a turnbuckle with a hook on one side and a eye on the other. This allows for the quick disconnect if needed.
I’m trying to understand how the ropes are attached / routed through to the winch point, I think there might be a photo missing. Would it be possible to see a diagram of how you routed this? I have done a lot of research and this is the cleanest install I’ve found.
Thanks!
Hi there
I am trying to build one myself.
I wonder how did you go did you.
Did you find out how to connect the doors?
Hi Michael, sorry to not get back to you on this. Were you able to figure it out?
So far this is the best idea for a lift bed! This blowed my mind and I cant wait to start my diy van with this setup! Thank you so much to share in detail your idea and materials used. I will for sure use your links.
Hey Guys
Amazing Work you did. I very like it and i’m on the way to build something similar. As the Extralong Van has only 1000kg you can put in, can you tell me how much weight the bedsystem/van conversion is in yours?
Best regards
Kilian
The bed itself is actually pretty light, as the frame is built with 80/20 aluminum. What adds to the weight of our bed is the ceiling that we added to the bottom of the bed to match the style of the ceiling in our van. It adds at least 100-200lbs to the build. But if you didn’t do a fancy ceiling like we did, the bed alone would be very light.
When bed is raised to the ceiling what is the height under it? Assuming there is in matching ceiling….
We lose about 10-15 inches in the height of the van when the bed is down. We are tall, 5’10 and 6″0 and we can’t walk under the bed without ducking under when it’s raised, but doesn’t bother us, since we have a desk/couch there so we normally just sit in that area anyway.
This is a great idea! But the route of the rope/ropes is unclear. This is 1, 2, or 3 separate pieces of rope? or (4 if you include the winch rope that seems to be tied to a ring.) Why did you use a double pulley? It doesn’t look like both sides are being used. I Agree with previous comments that something is missing that maybe seems obvious to the creators, but needs to be explained to the class.
Thank you!!!!
Yeah the reality is that it is extremely difficult to describe everything in words, and because it is already assembled, it is hard to break it down to show the individual parts.
Other people have reached out to me personally over email to clarify things that they were struggling with, so if you had a specific question of how something worked I would be glad to help you out. Just shoot an email to our general site email address and I can get back to you.
I have to thank you for not only this article, but for your entire series of blog articles. I have purchased van building courses, blueprints, software for 3D design (do NOT make that mistake!) – and the information you provide is superior to everything I have read, seen or purchased. I especially love the elevator bed, a brilliant idea I saw several years ago in a tiny house by Ana White. I had given up on the idea – not just because the cost was very steep, but it was an extremely complicated build. The difficulties and wait-time to even receive the elevator kits was a huge deterrence.
If you were willing to write out and document in good detail how you constructed your elevator bed – I know you would have willing buyers. I would HAPPILY pay for detailed instructions on how to approach constructing this bed… Please consider it! Contact me for your first sale! 🙂
Cheers and Happy Traveling!
We dont believe in charging people for these types of instructions 😉
We just try to offer it all for people for free.
If you have any further question on it please feel free to reach out to us via email and would be happy to help.
Hello, we are also planning to construct an elevator bed for our Citroën Jumper van in Belgium. I love your setting!!! My question relates to the leveling of the bed. How did you managed to connect the ropes to each others so you can tune their individual length ? Are all the cables (and their connecting system) hidden inside the wood ceiling? Did you ever have to tune the cables length over the time? About the winch, did you place a security so you cannot pull to bed too high and put too much tension on the pulleys? Thank you.
To tell the truth, a retractable ceiling bed is a real innovation and unique invention which stands out with its unusual concept. Of course, retractable ceiling beds have a great deal of advantages and they are so compact, expanding the space in your apartment. I’m so glad that I came across your article because I’m going to buy such a bed in my new flat, but I can’t choose the one that would meet all my needs. After reading your article, i came to the conclusion that all these beds have their own special distinctive features and that there are beds for absolutely different preferences. I really like Smart Ceiling Bed by Bumblebee Spaces because it seems to be really modern and multifunctional. Retractable Ceiling Bed from Bed Up Down can also be a great investment because I think that it combines everything necessary and can provide you with maximum comfort.
Hi All, could I do something similar using tie down strapping?
Thanks Helen
I saw a couple of versions of this at the van expo in hood river, or this last weekend. Several expensive electric options (one had a motor that took up a ton of space) and one manual option that seemed pretty easy to use.
1. What’s the size of your bed? Assuming you sleep east west (sideways).
2. Are you able to use the hanging system to level the bed if you park somewhere that isn’t level? The manual system boasted that.
Impressive!
We had a double bed and no we slept front to back (we are tall 5’10 and 6′). The hanging system lowers the entire bed at the same time so you can’t lower it more on one side and less on the other to balance out the vehicle, but you can put something under 1-2 corners of the bed to level it out, or even bed invest in leveling bricks for your van, you you will have much bigger problems if you are parked unleveled (cooking is a major challenge when the van is slanted).
Hi If possible can you please forward blueprints/ instructions/ pictures of this system as we are in the process of converting and this looks like the best option ofr the lifting bed.
Wow! Thank you for putting this together for everyone. How did the 80/20 frame hold up over time? Any buckling, or softening?
thanks again!
No issues at all! Solid build!
THIS is my dream van!! Why doesn’t everyone use the elevator bed?! Amazing, beautiful space you’ve created. Thank you for the inspiration !