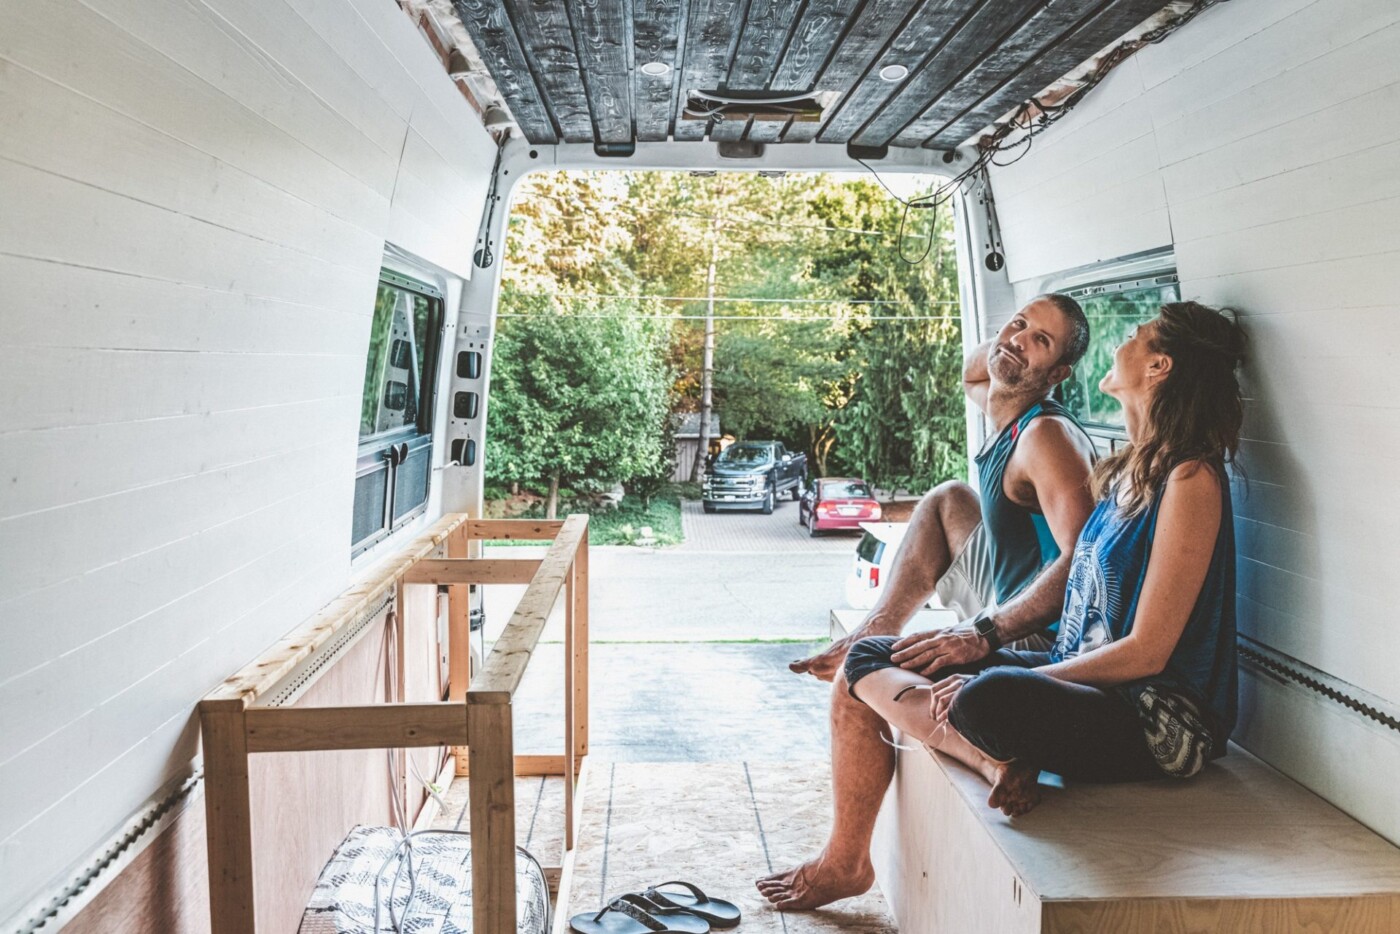
2020 has hardly been the year any of us expected. In March, when the world suddenly went into full lockdown mode and our international travel plans came to a halt, we found ourselves wondering what the rest of the year had in store for us.
*This post may contain affiliate links, as a result, we may receive a small commission (at no extra cost to you) on any bookings/purchases you make through the links in this post. As an Amazon Associate, we earn from qualifying purchases. Read our full disclosure
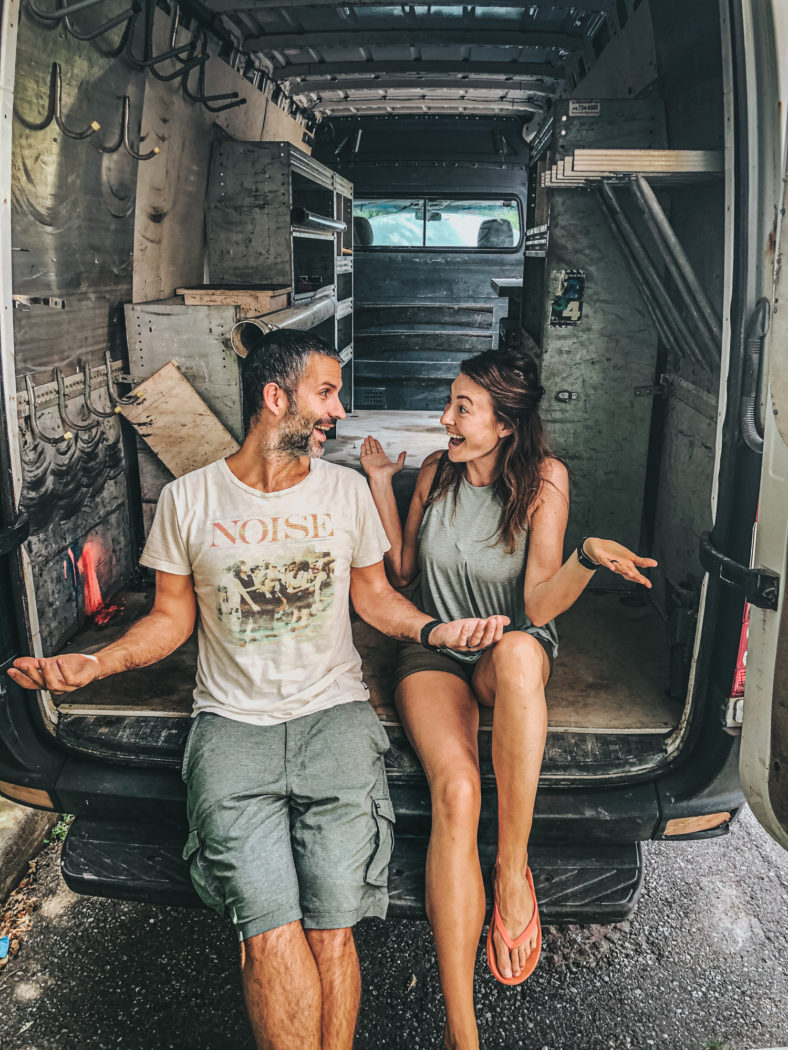
After months in self-isolation, our desire for a new project grew stronger than ever. For nomads like us, the idea of “staying home” was challenging on many levels. We haven’t had a home in over 5 years and within a few months, we felt like we were beginning to overstay our welcome with family.
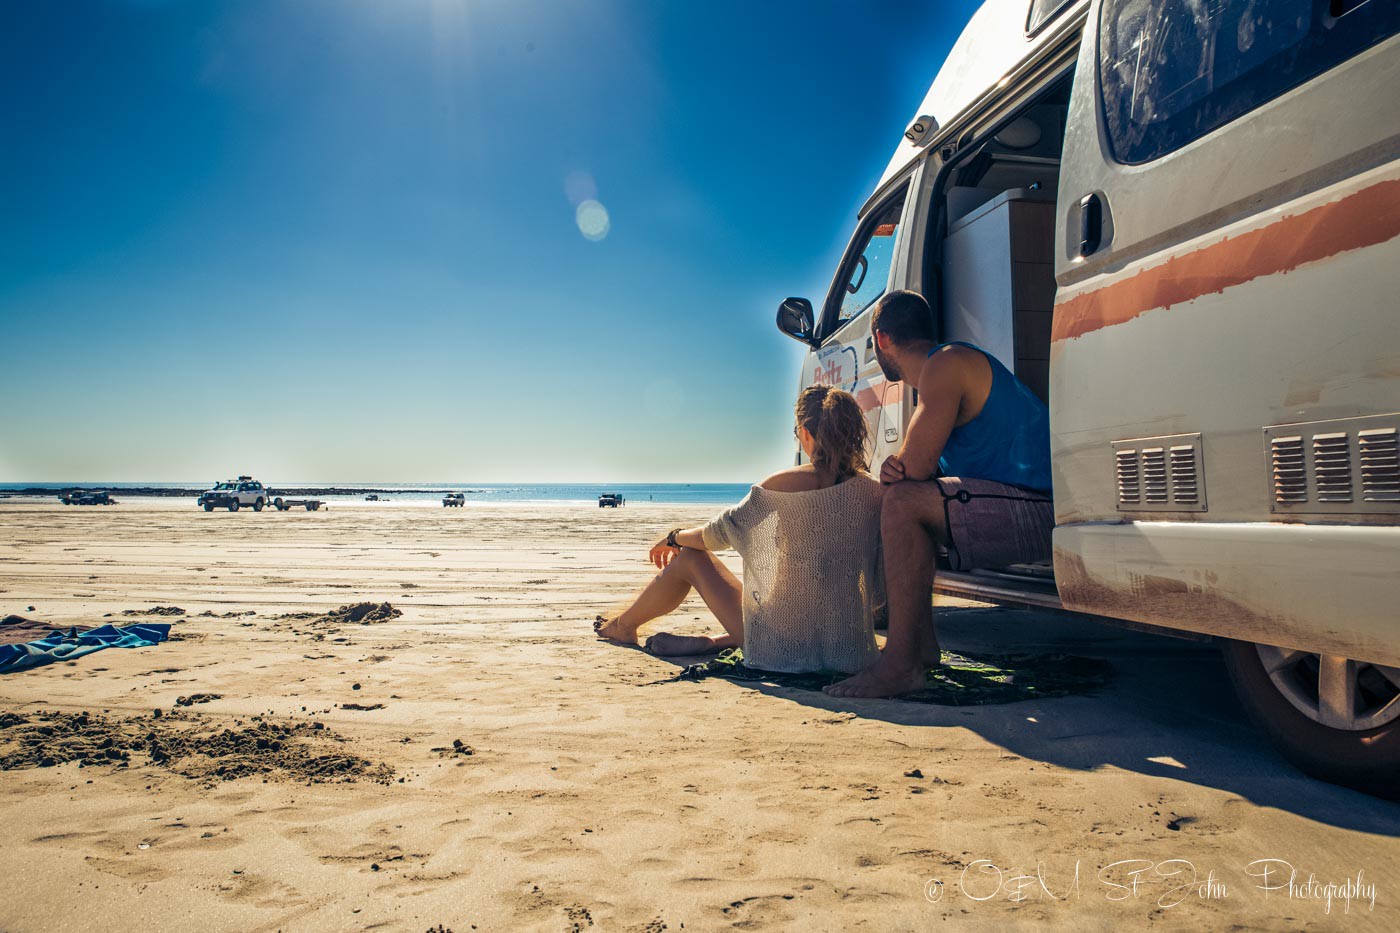
As Canadians, we had always talked about traveling around Canada, exploring our own backyard, one that we have effectively ignored while exploring all corners of the world. We felt like if there was going to be an opportunity for us to travel domestically, THIS would be the year to do it. And what a unique experience it would be to explore Canada with our camper van build.
We’d traveled in campervans before. We’ve taken many trips in Australia, New Zealand, and the USA. We loved the freedom of van life and the opportunities it would offer!
Traveling Soon? Here is a list of our favourite travel providers and accessories to help get you ready for your upcoming trip!
Originally, we didn’t plan on building a van. But after a quick search for campervan rental costs, it became very obvious that building our own would make much better economical sense. Plus, a camper van build conversion sounded like a fun challenge!
So, we jumped into the project head first!
The Prep Work
We spent about a month in research mode for our camper van build project, watching YouTube videos and reading articles in an attempt to find the perfect various van conversion guide. We grabbed ideas from various articles and videos and slowly compiled all the info into our own guide on converting a van into a home.
By the end of our month of research, we had a pretty good understanding of how to convert a van and were ready to start.
Here is what our draft layout looked like before we started this DIY van build. If you read until the end, you’ll notice how much the design/layout changed as we started the van conversion.
The Van Purchase
We searched high and low for the van that would fit our needs, considering any Mercedes Sprinter, Ford Transit, RAM ProMasters and even some unique cargo vans that popped up on the marketplace.
We spent 2 weeks evaluating the available vans for camper van build and compiled all the options into a spreadsheet that rated each van based on the following:
- Vehicle Type: Ford vs Mercedes vs Other
- Size: 144 wheelbase vs 170 wheelbase vs 170 Ext wheelbase
- Year
- KMs driven
- Price
- Location: distance from Toronto, where we were based
- Condition: rust vs no rust
- Extras: navigation cams, extra windows, cruise control, etc
- Type of Seller: Dealer vs Private
We assigned a rating (1-5) for each assessment category and tallied the overall score.
We had over 35 van options on the list which we narrowed down to just 5. Only 2 were worthy of a test drive in the end. We bought our van within a few days of test driving it.
Our Van
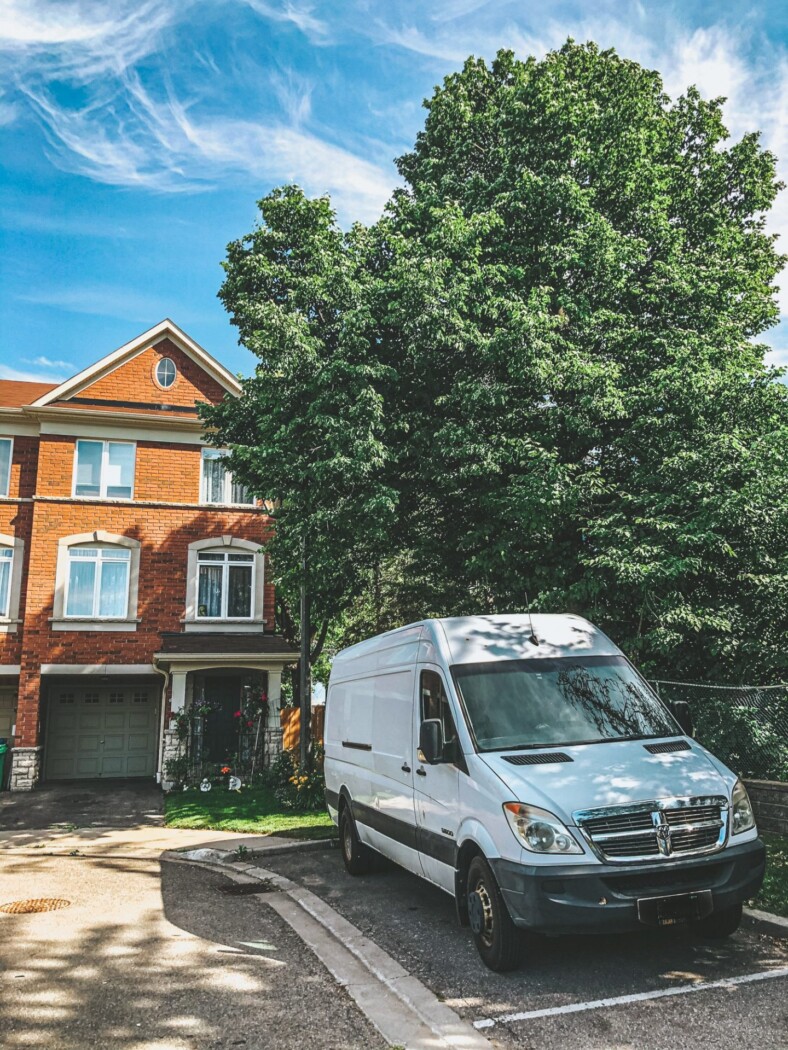
We ended up with a 2008 Dodge Sprinter 170WB 3500 work van, which we purchased for $15,000 CAD.
The van had a bit more rust than we would have liked. But, it also had $10,000 in recent repairs, which we felt was added value.
Van Build Plan
Van Conversion budget: 25K
Timeline: 50 days
Our goal for this DIY Van Conversion was to build out a high end 4 season campervan, suitable for full-time van life. We set up a budget and a timeline and got to work.
It’s worth noting that we spent about a month prior to the van purchase learning as much as we could about the van build process. While we had no previous experience with van conversion, we had watched hundreds of hours of YouTube videos and read dozens of articles on every step of the process.
Before getting to work, we created a day-by-day timeline, compiled an extensive list of materials required for each step of van conversion, and agreed on the van layout.
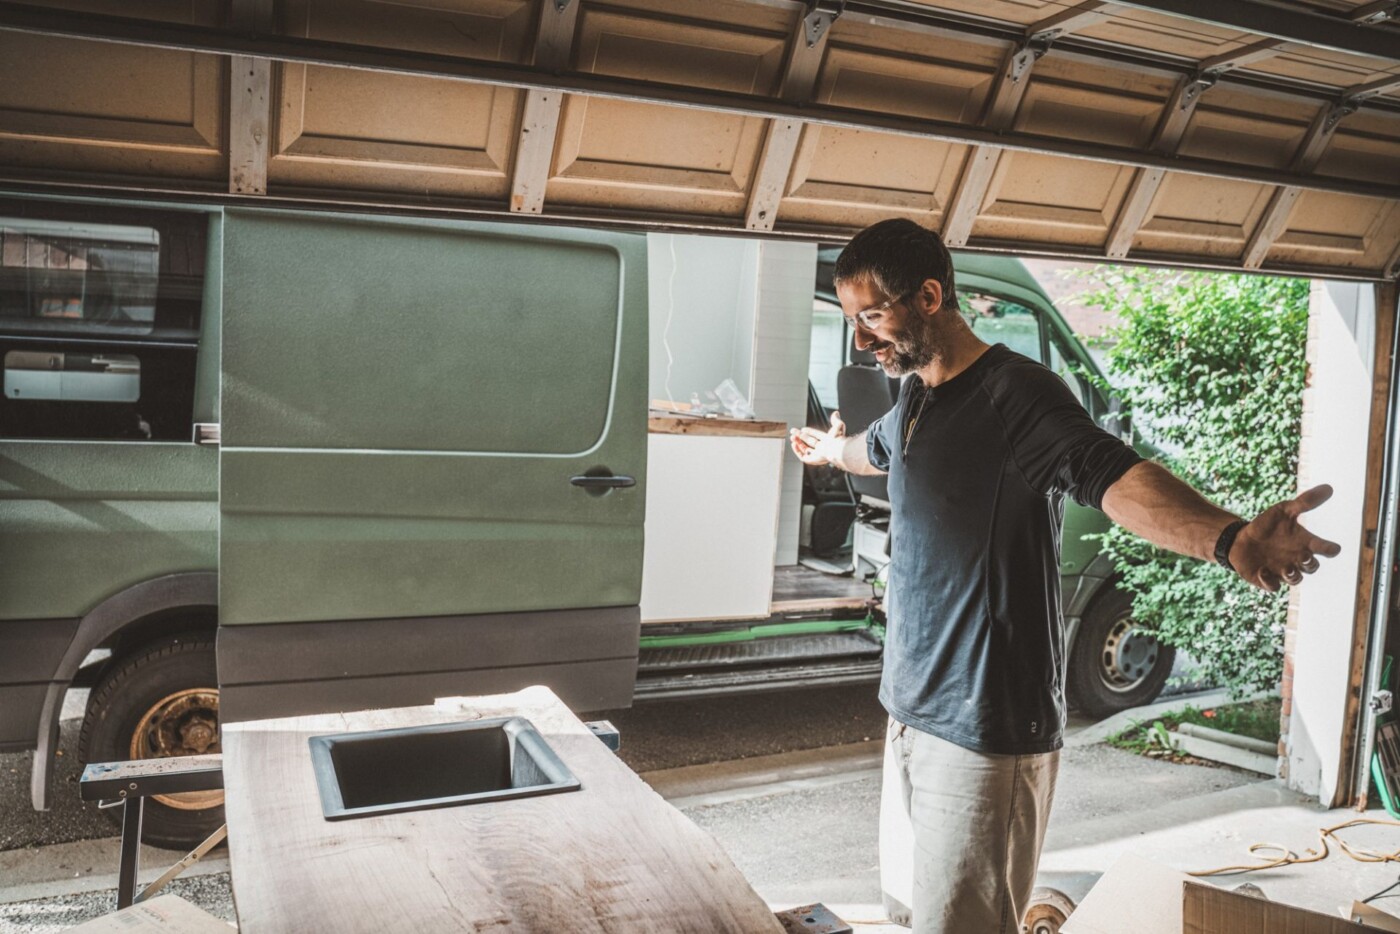
Van Conversion: The Details
Those that followed our camper van build live on Instagram, already know that we ran into a plethora of issues along the way that extended our timeline well beyond the original 50 days. The good news is that we did manage to stay within our van conversion budget.
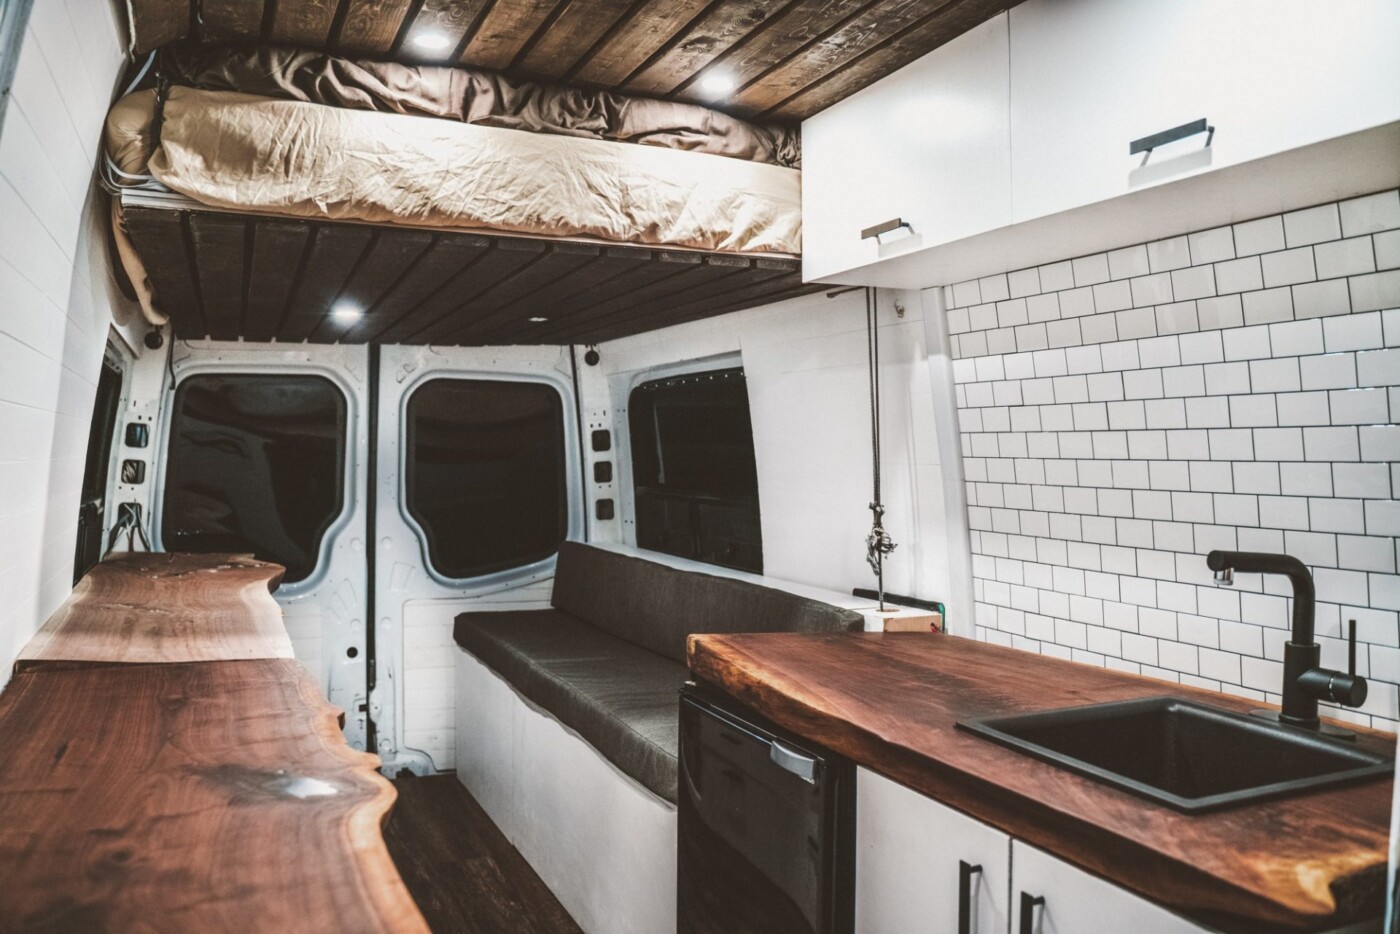
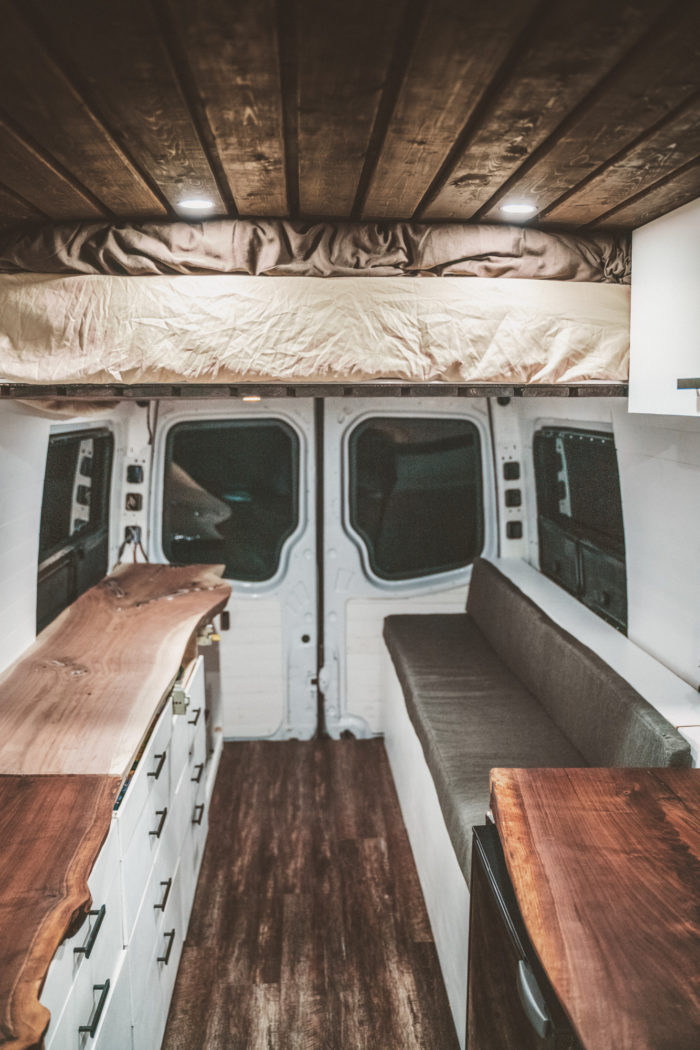
The Layout
Time Spent: weeks leading up to the start of the build
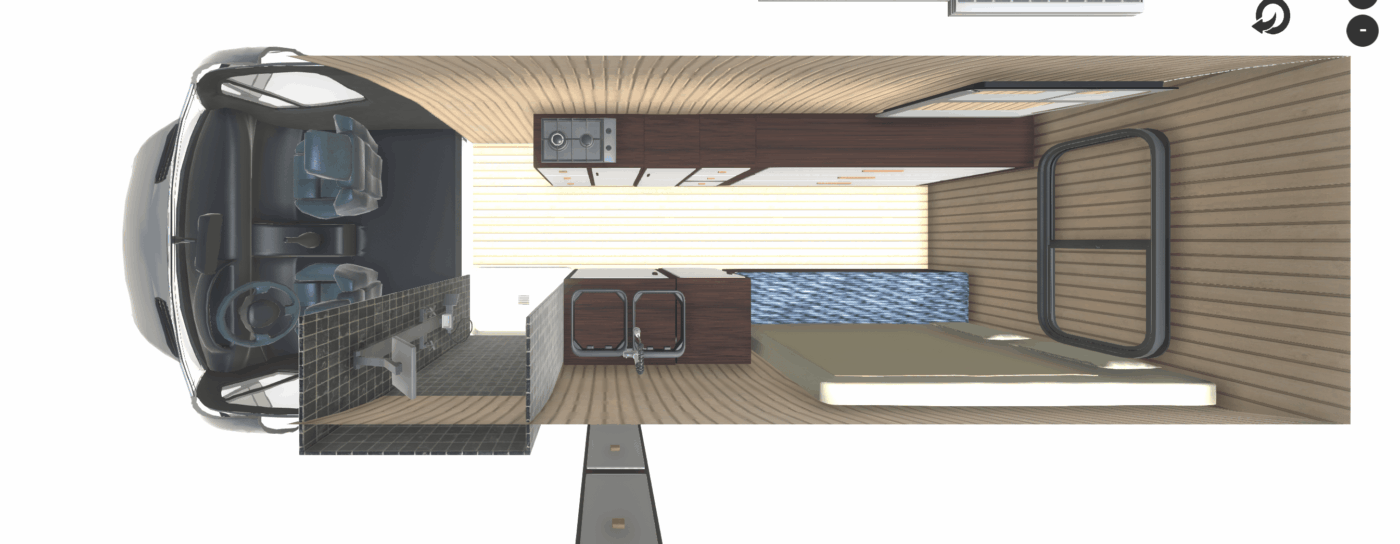
We came up with the layout of the interior of the camper van build project well before we even had a van! With Excel Spreadsheet and VanSpace 3D program, we figured out how every element will fit into our tiny 70sq ft space.
We opted for a very unique Van Layout that accommodated all of our needs. We wanted a design that would:
- Give us lots of fo storage space
- Have a spacious working area
- Have a permanent shower/toilet
- and a bed that we did not have to set up every evening!
Our final layout included:
-
- 10 drawers + 4 cabinets with additional shelves
- Pull out kitchen pantry
- 31”x 31” corner shower/bathroom
- 15”x 15” sink
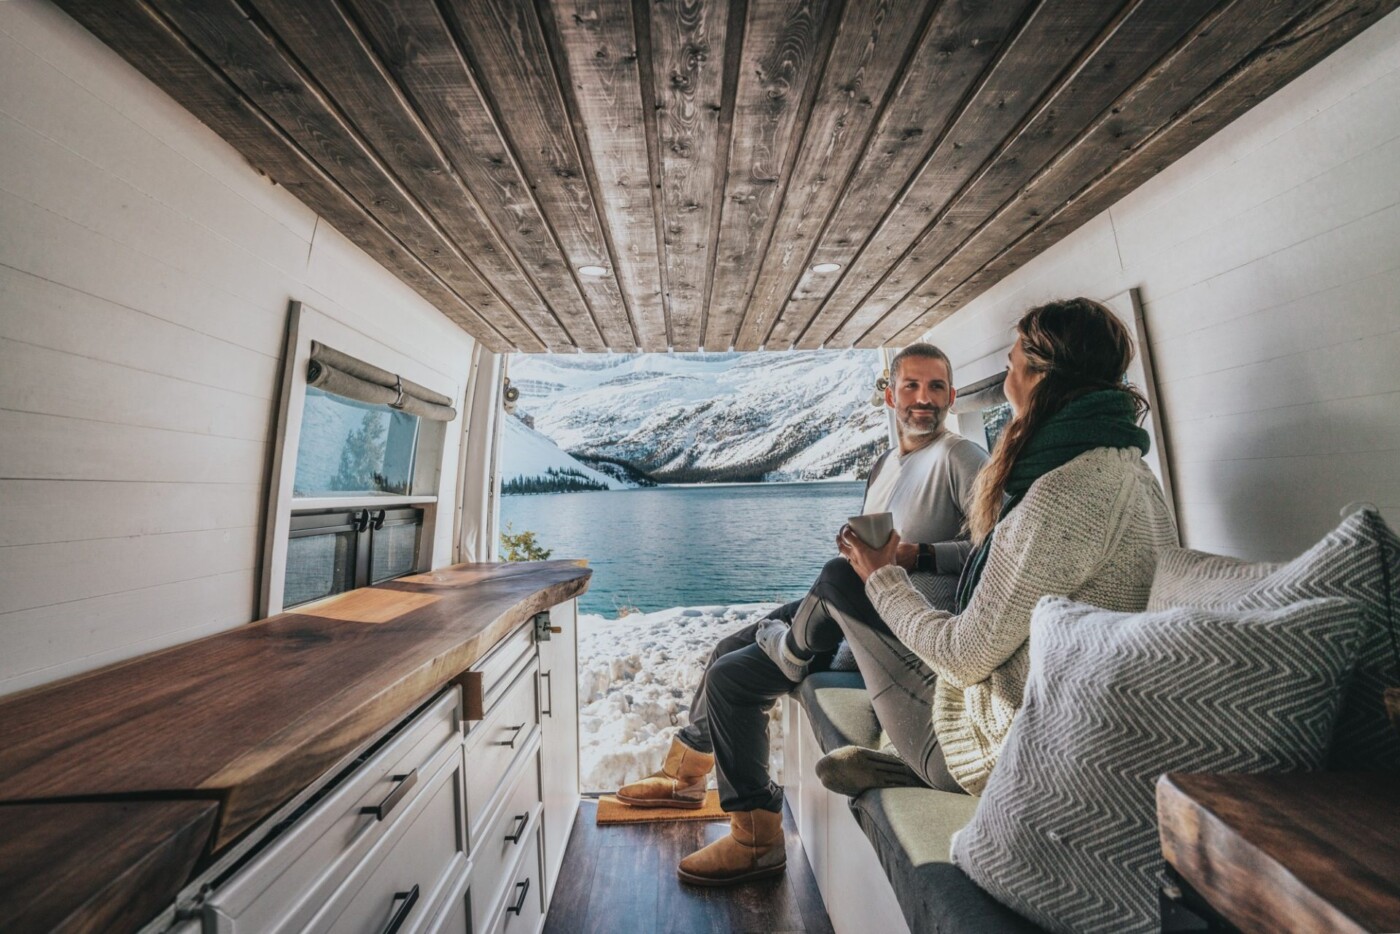
- 80” long couch
- 80” long desk
- Queen Bed
We were pretty pleased with our final layout and although we ran into many issues with making this come to life, we were eventually able to bring this design to life.
Below you’ll find all the nitty-gritty details of the process we followed to convert a van to a camper
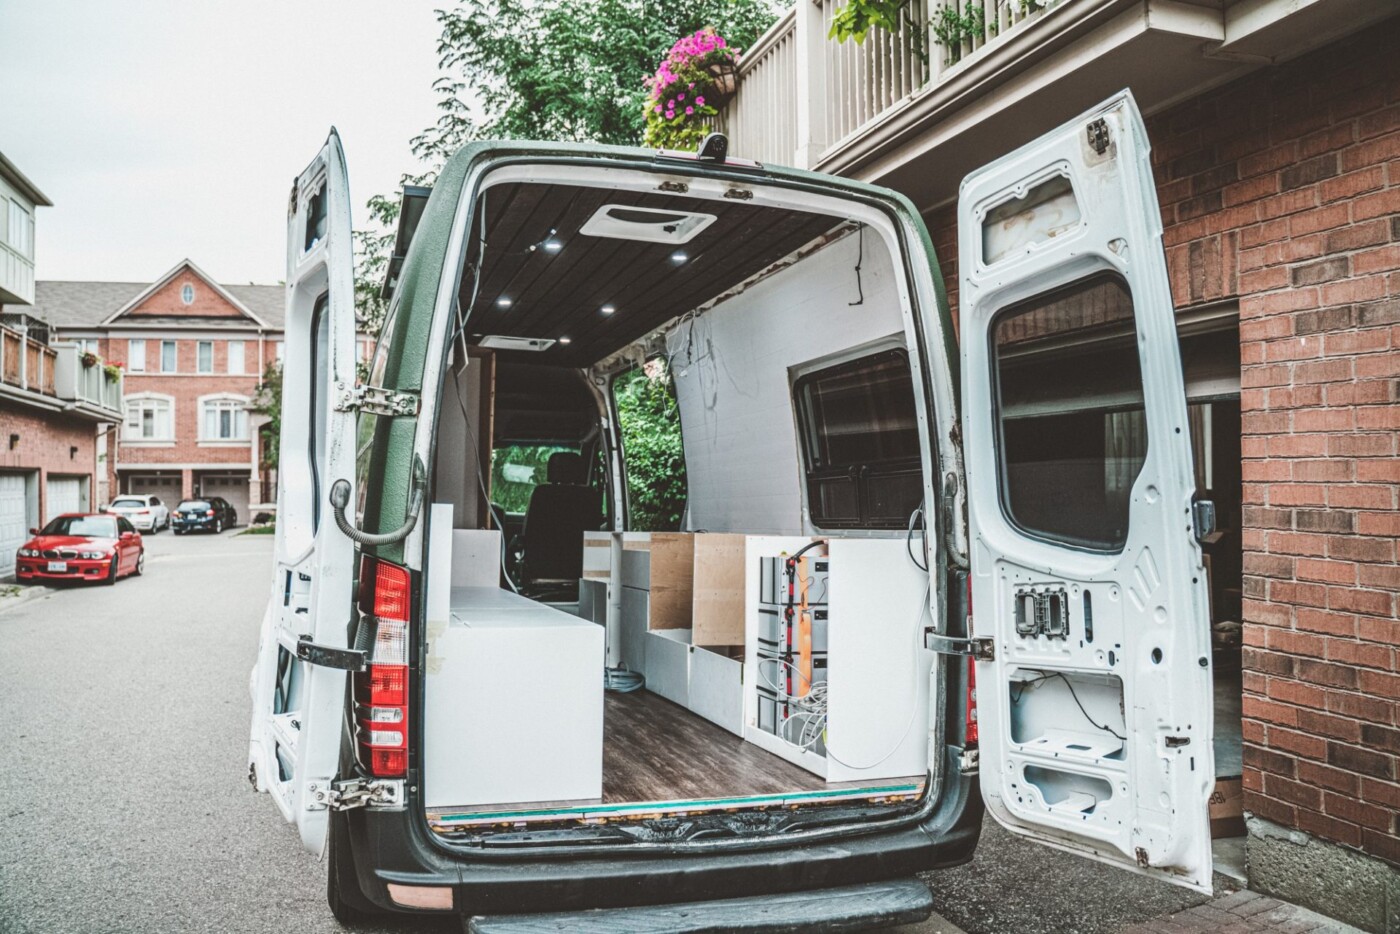
From Sprinter Van to a Camper: Step by Step
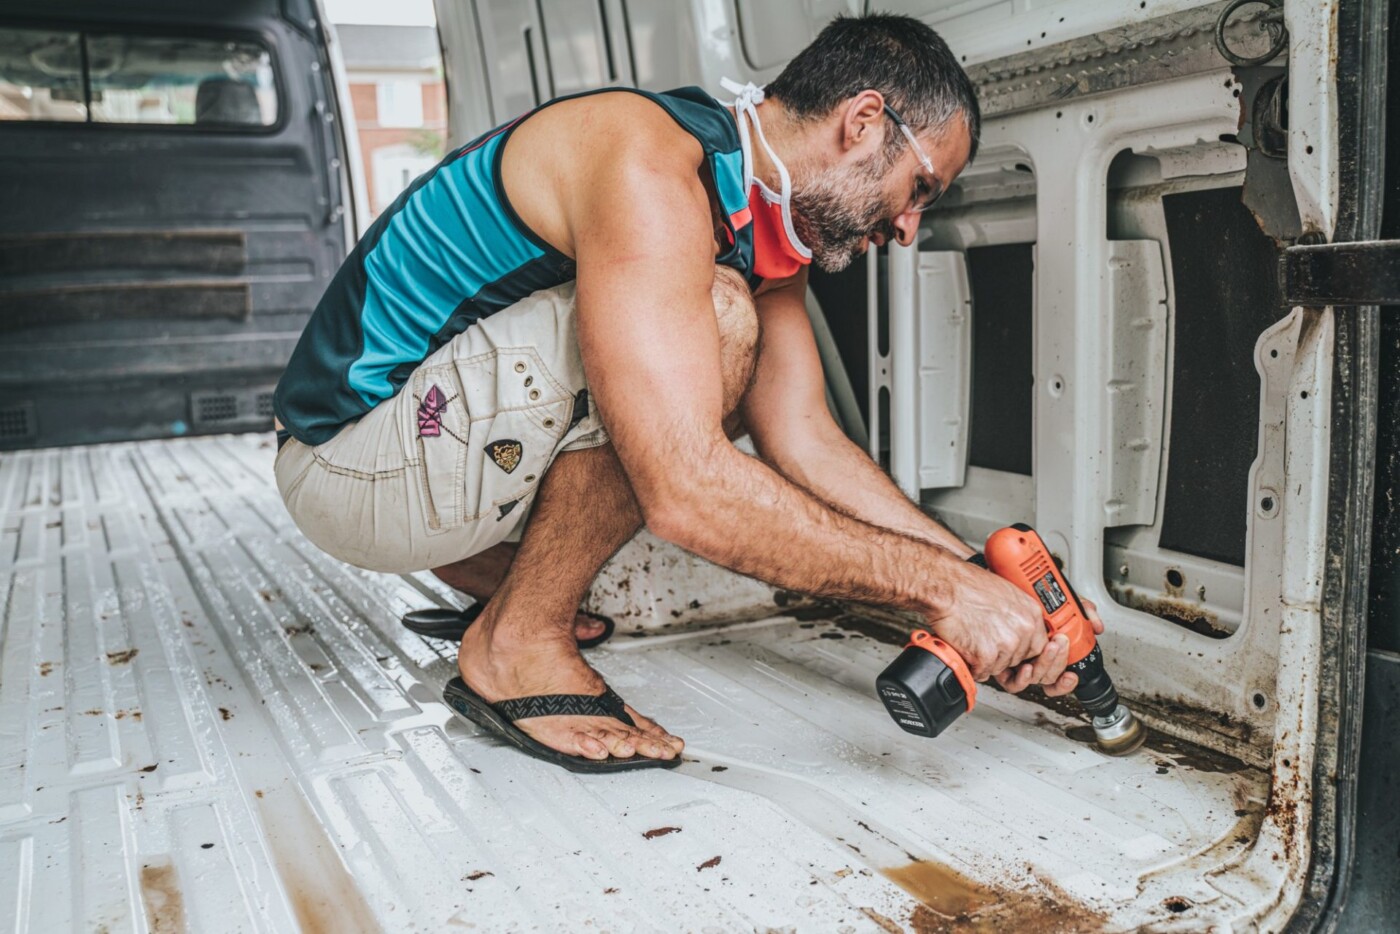
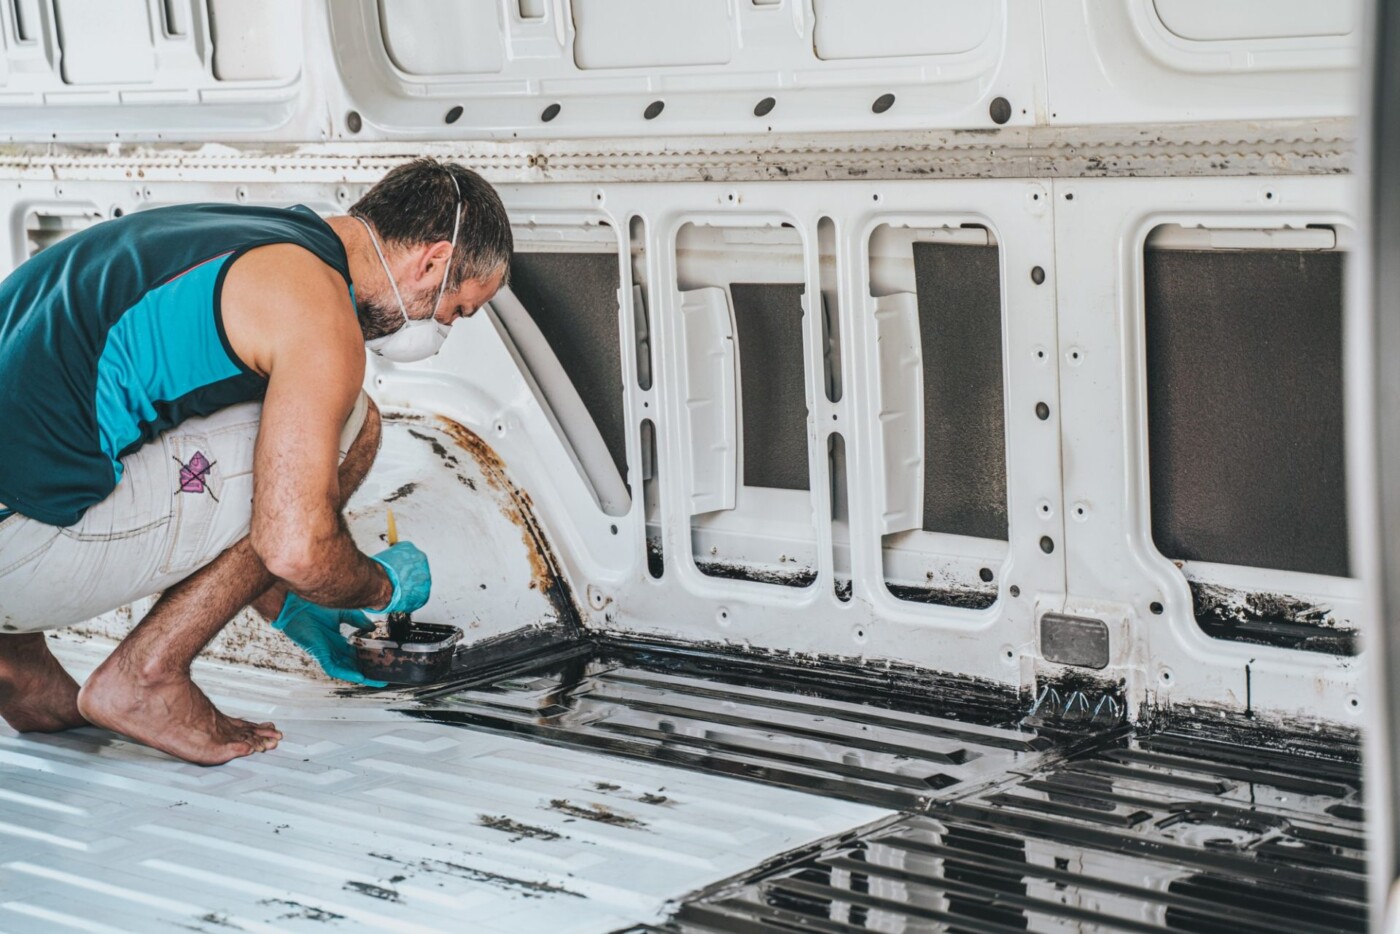
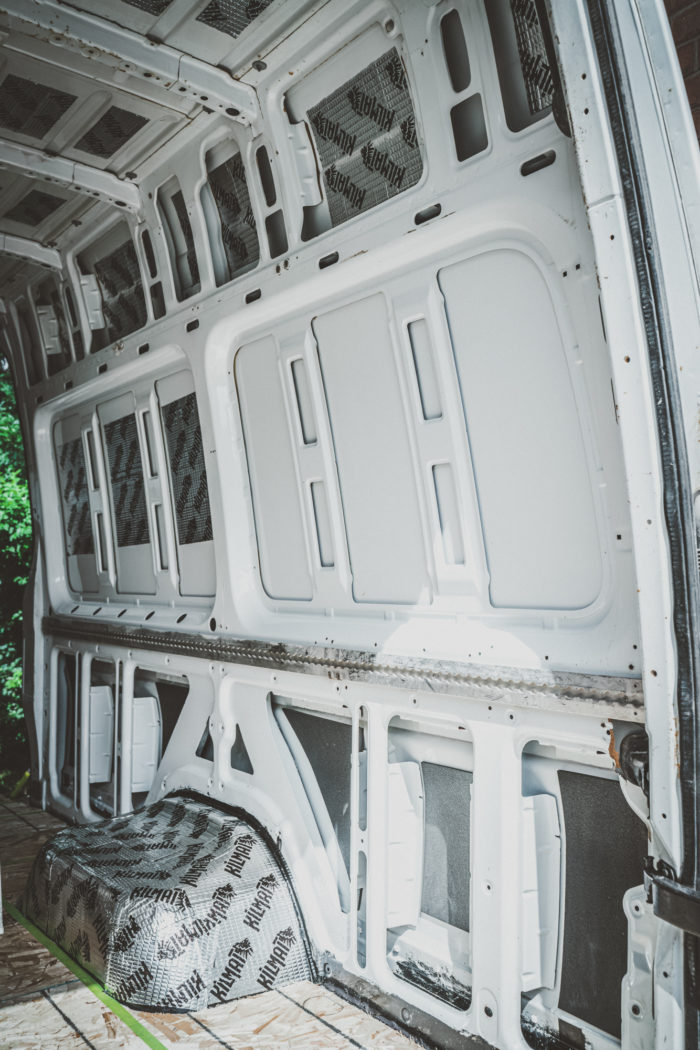
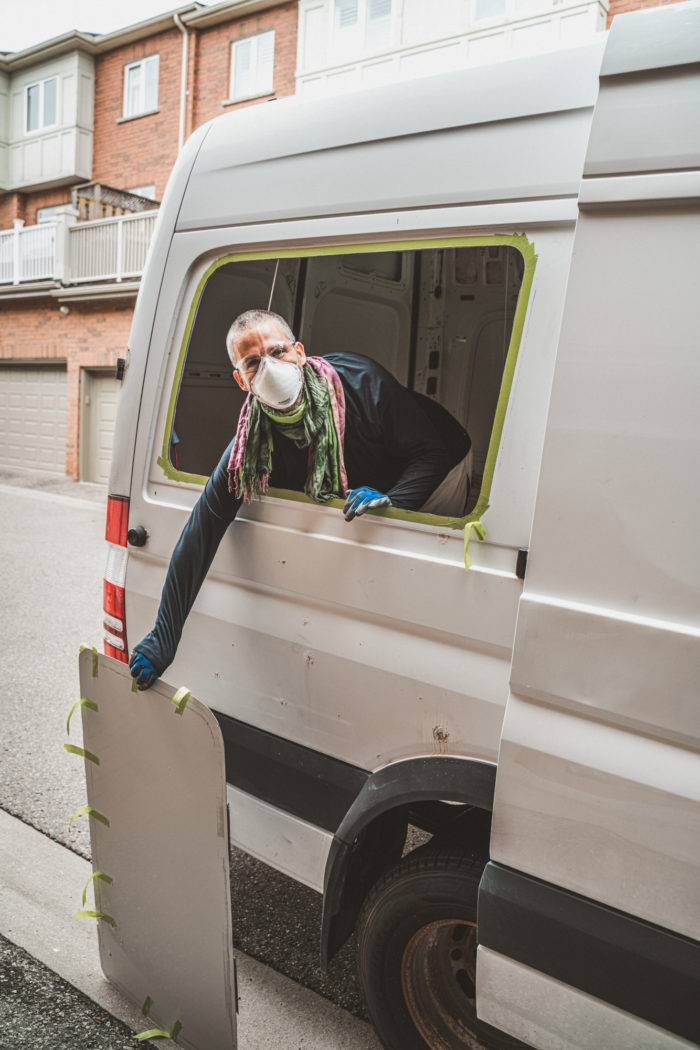
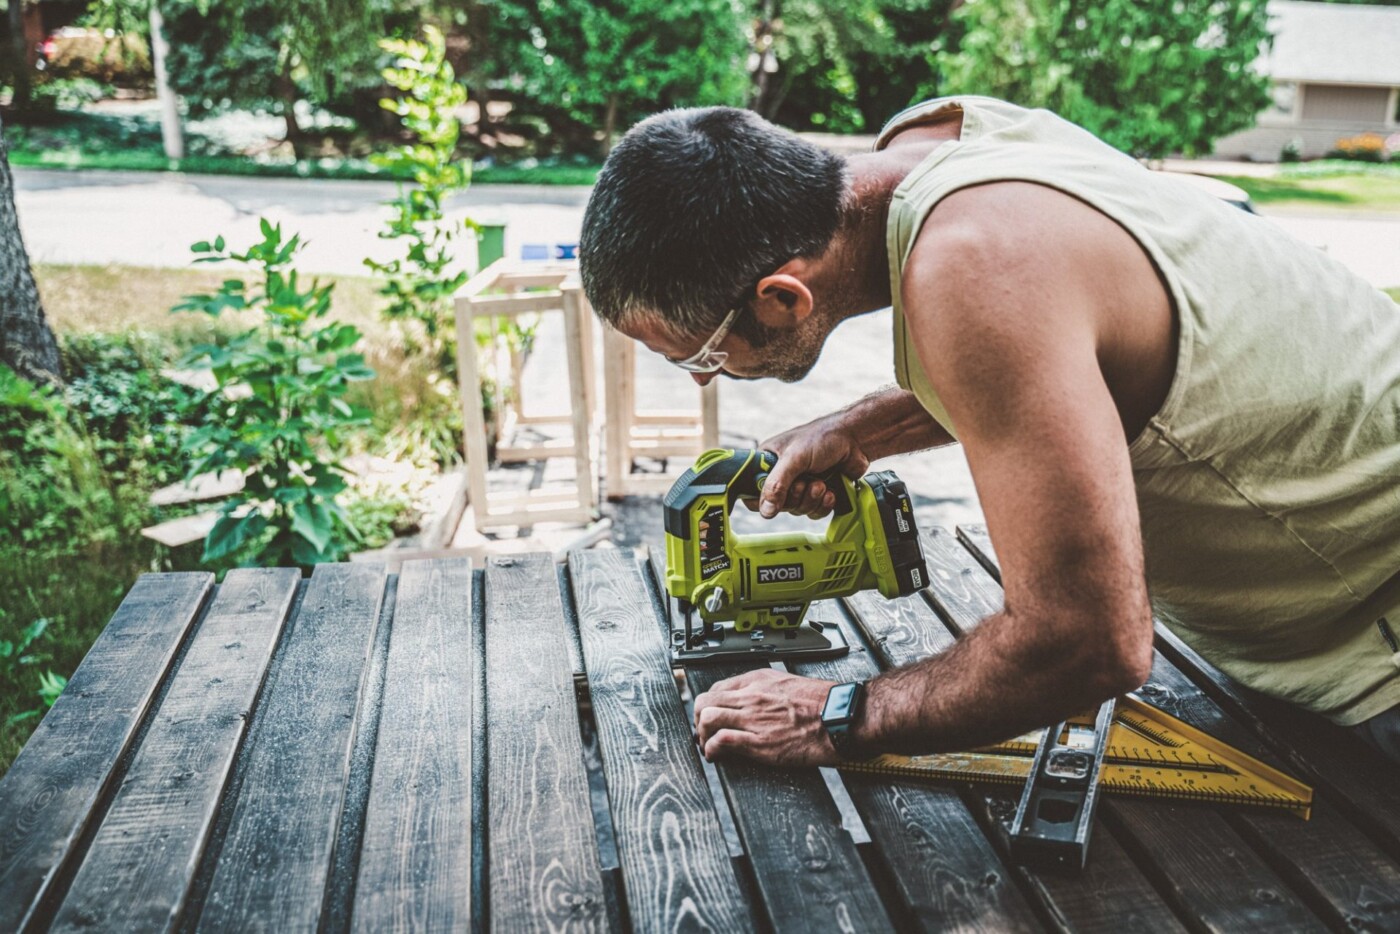
Strip & De-rust
Time Spent: 1 week
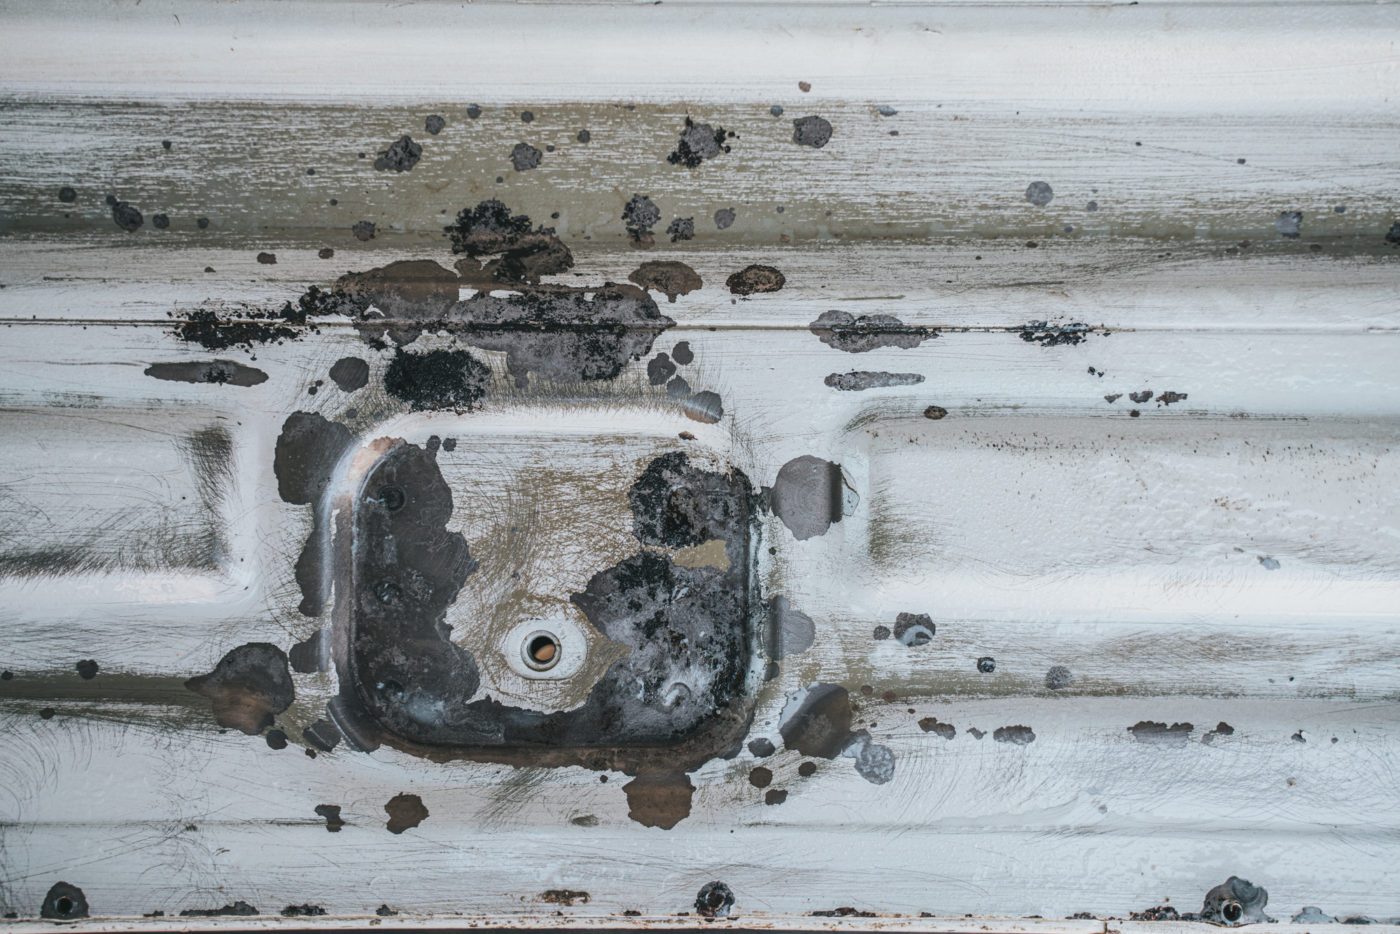
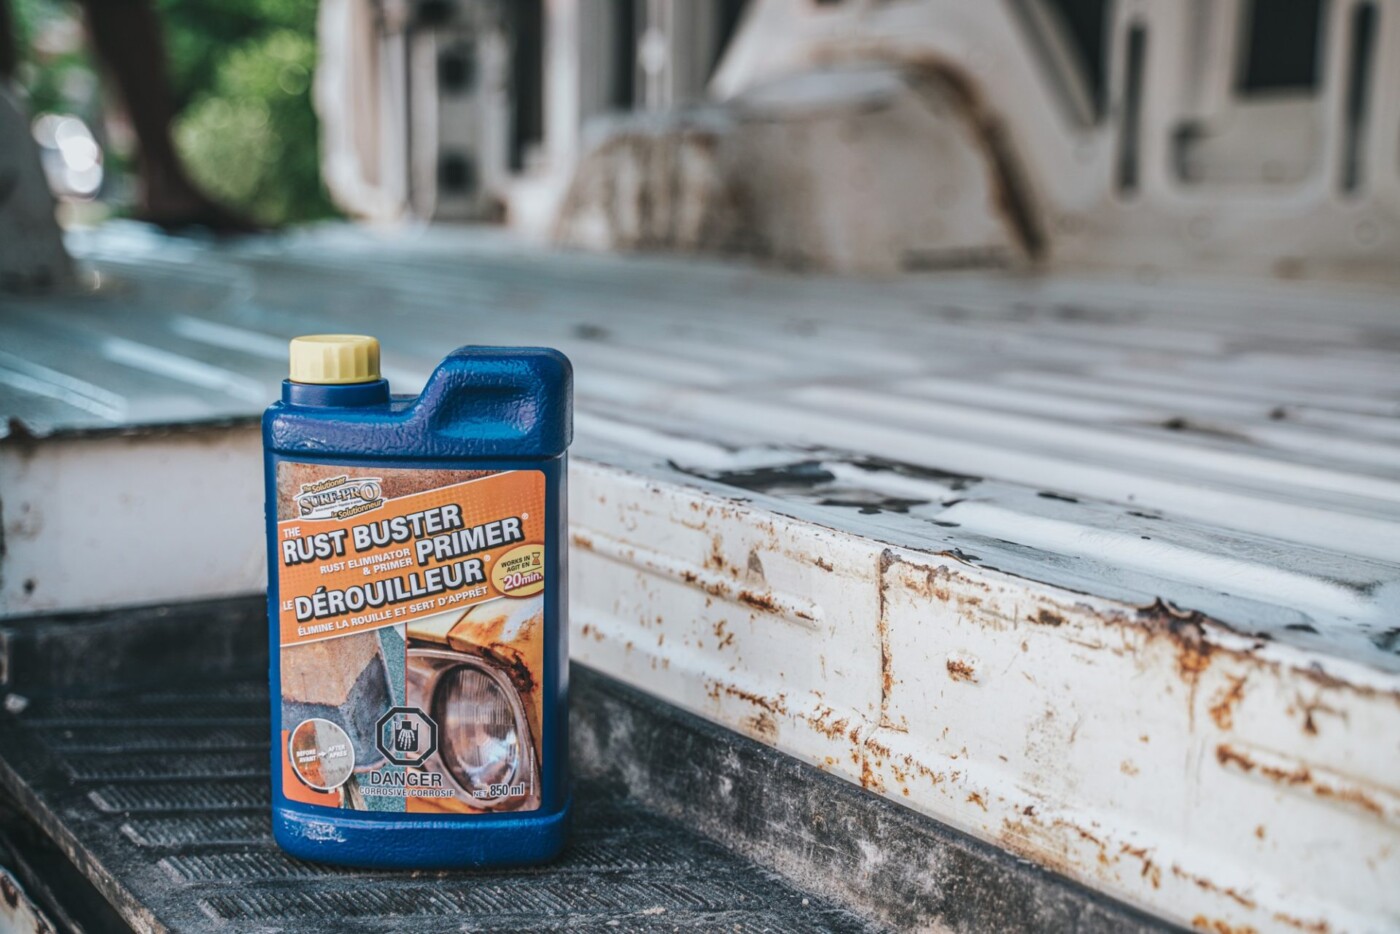
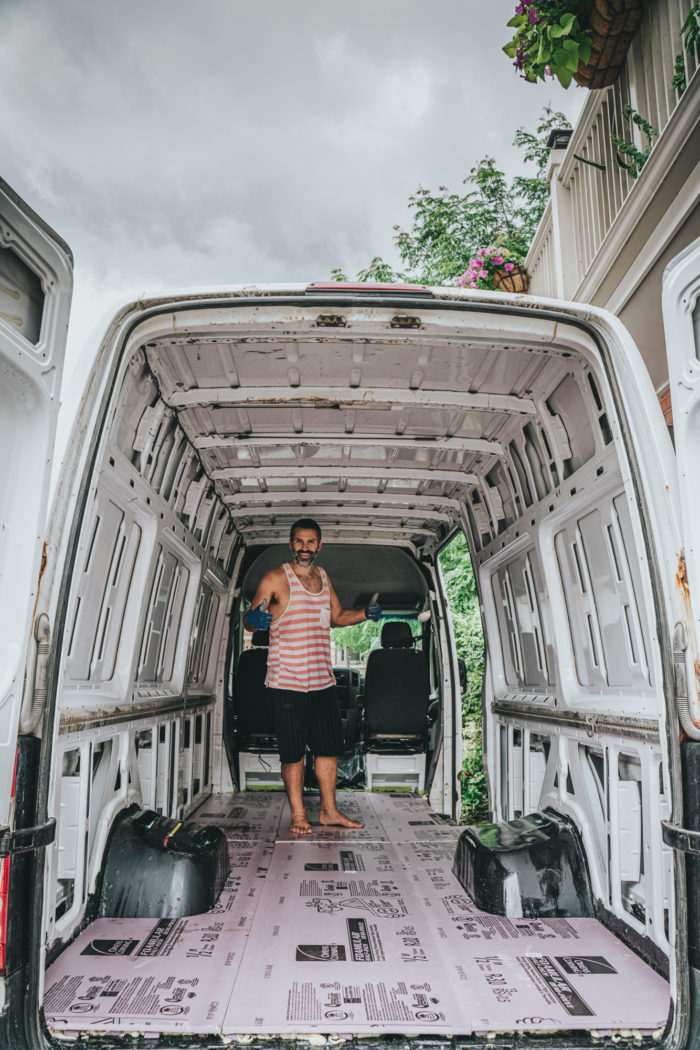
The first step of our DIY Sprinter Van conversion was to strip all the existing fixtures of the van, clean and de-rust the inside and outside of the van.
We used a drill bit to grind out rust spots and Rust Buster primer to treat the spots to prepare the spot for anti-rust treatment. After thoroughly washing the van, we applied black POR 15 Rust Preventative Coating to our floor and sides of the where most of the rust was found.
Also, to prevent new rust from forming, we treated and sealed with silicone and fibreglass any existing holes on the inside and outside of the van.

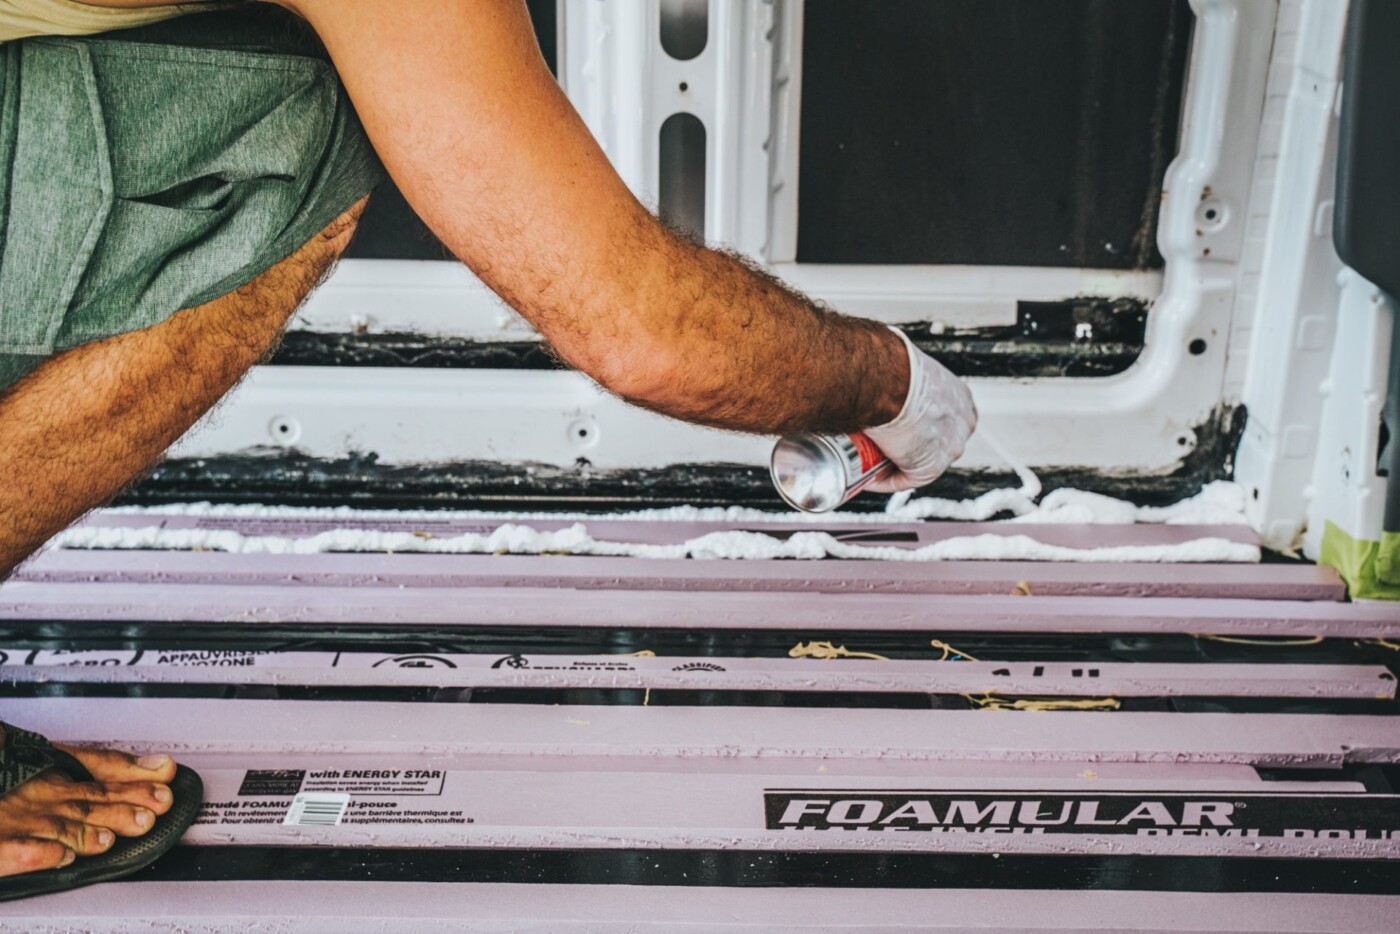
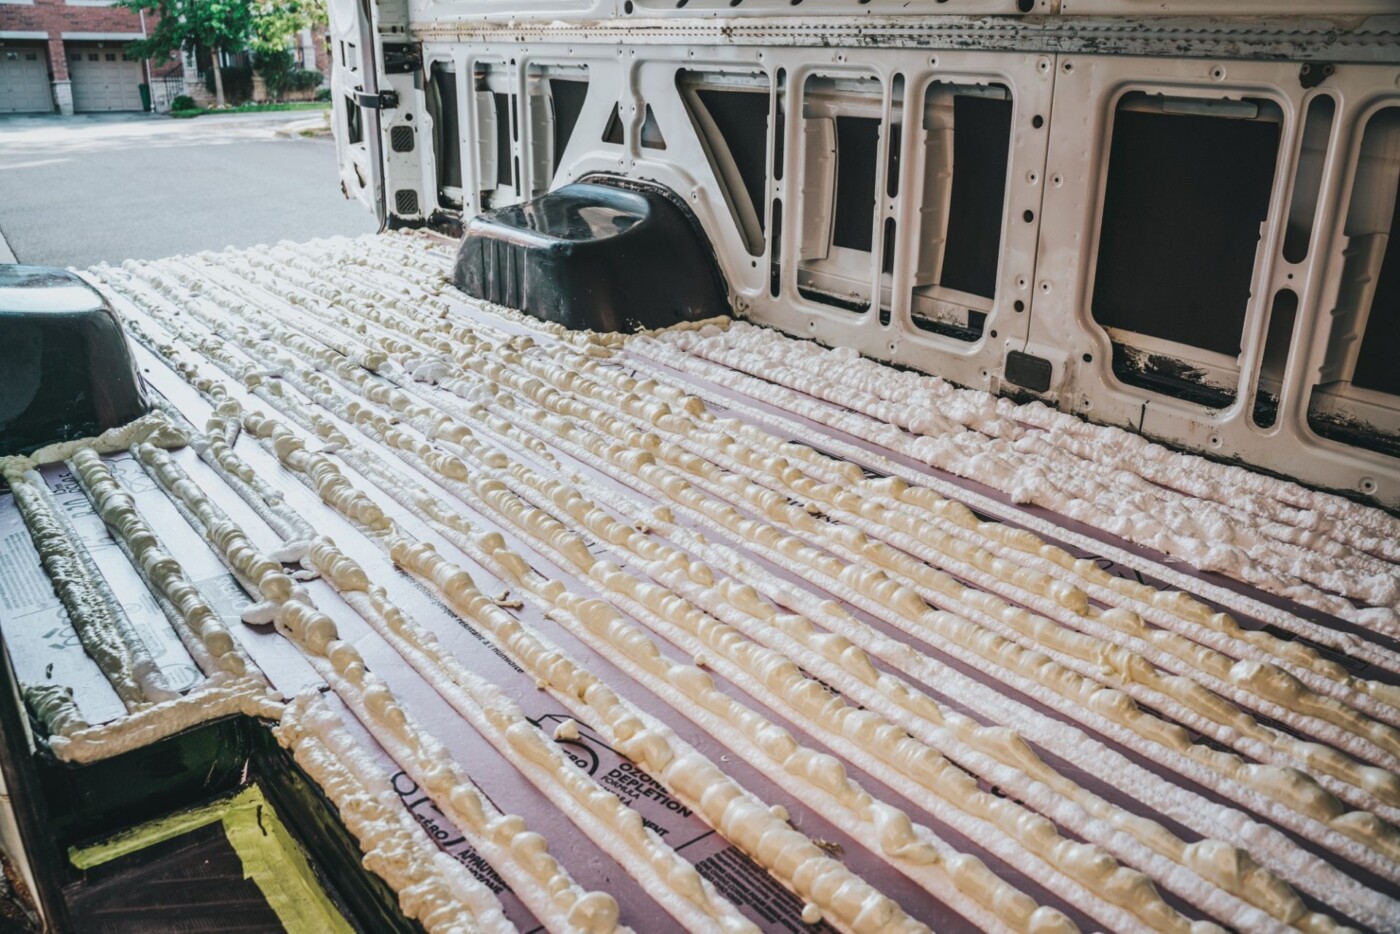
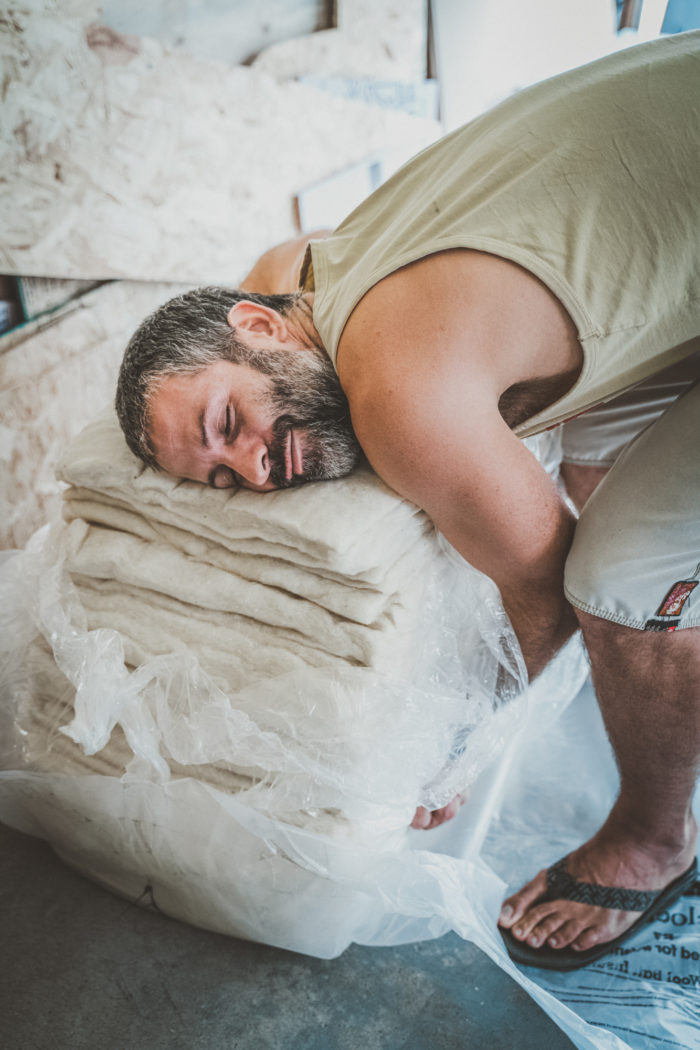
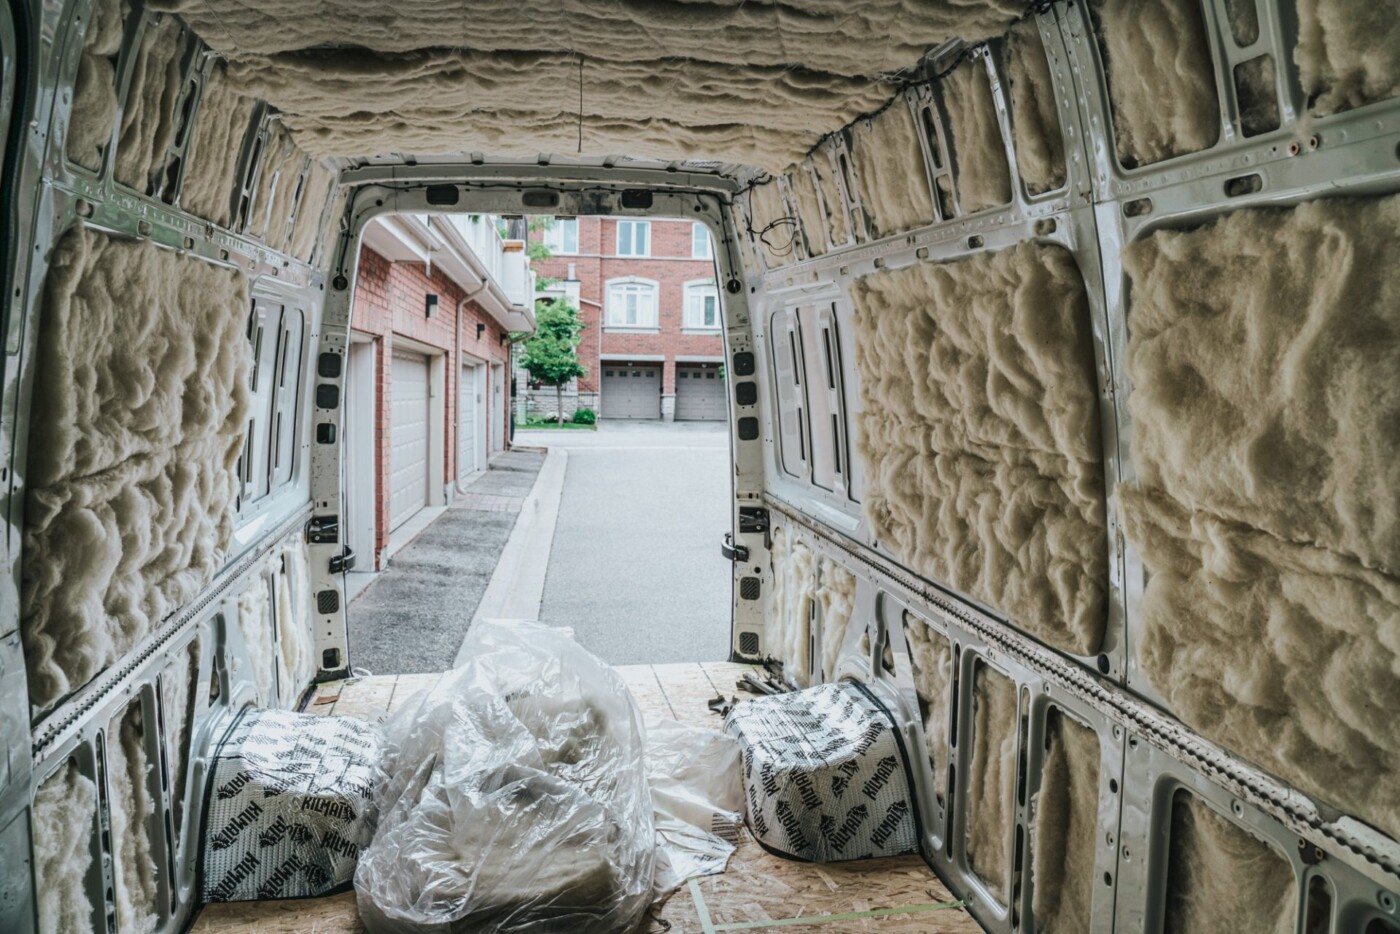
Insulation
Time Spent: 5 days
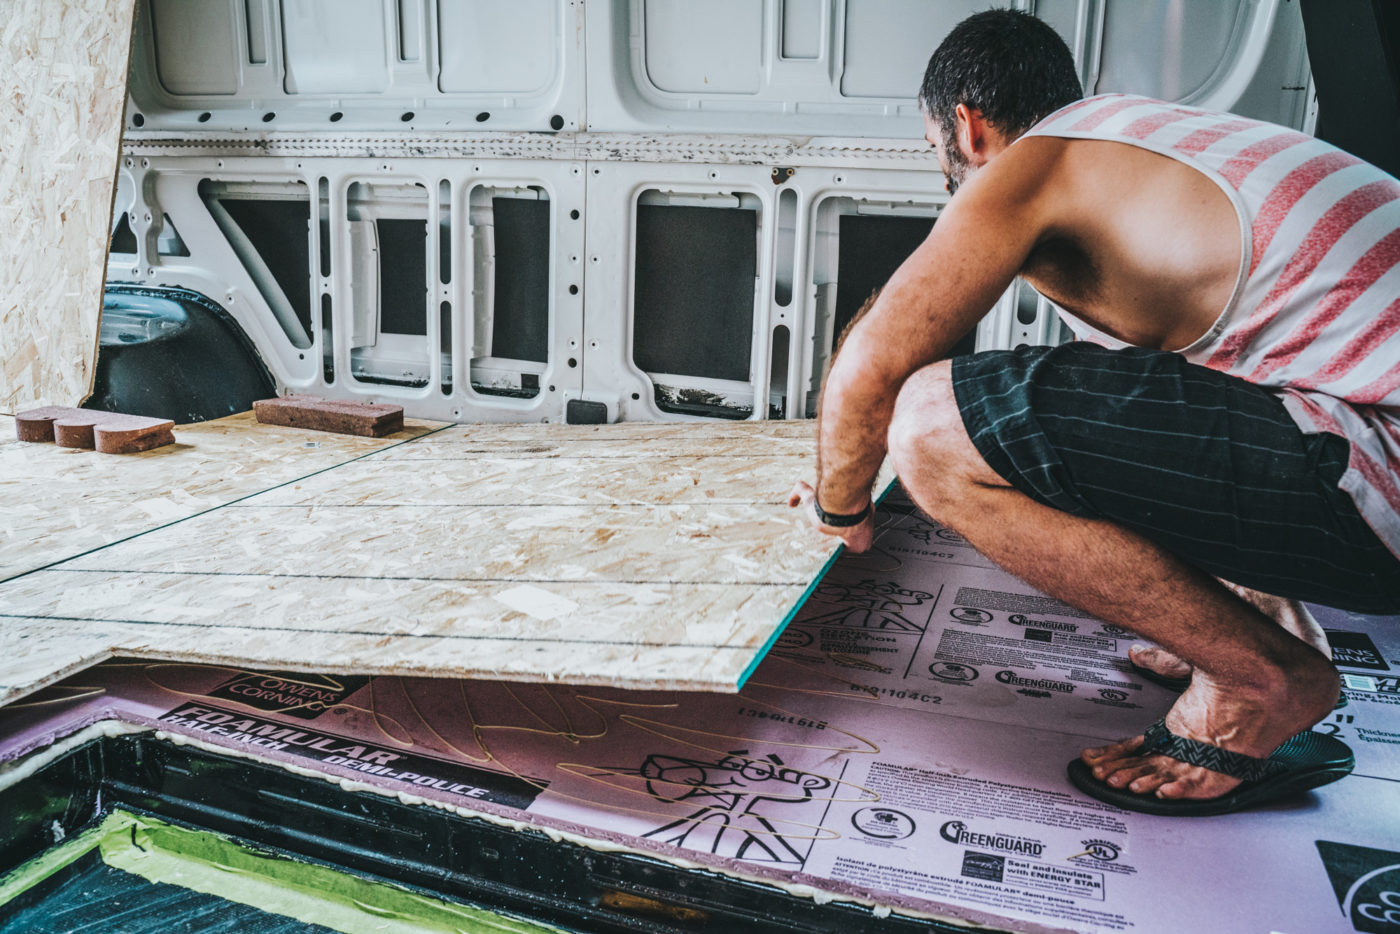
Floor
We laid 3 layers of floor insulation that provided an overall insulation rating of R7, during our van conversion.
-
- Layer 1: ½” Rigid Insulation to fill the ridges of the floor and Great Stuff Spray Foam in between the rigid insulation to cover the entire floor.
- Layer 2: ½” Rigid Insulation on top of the first layer to increase the R-value of the floor insulation.
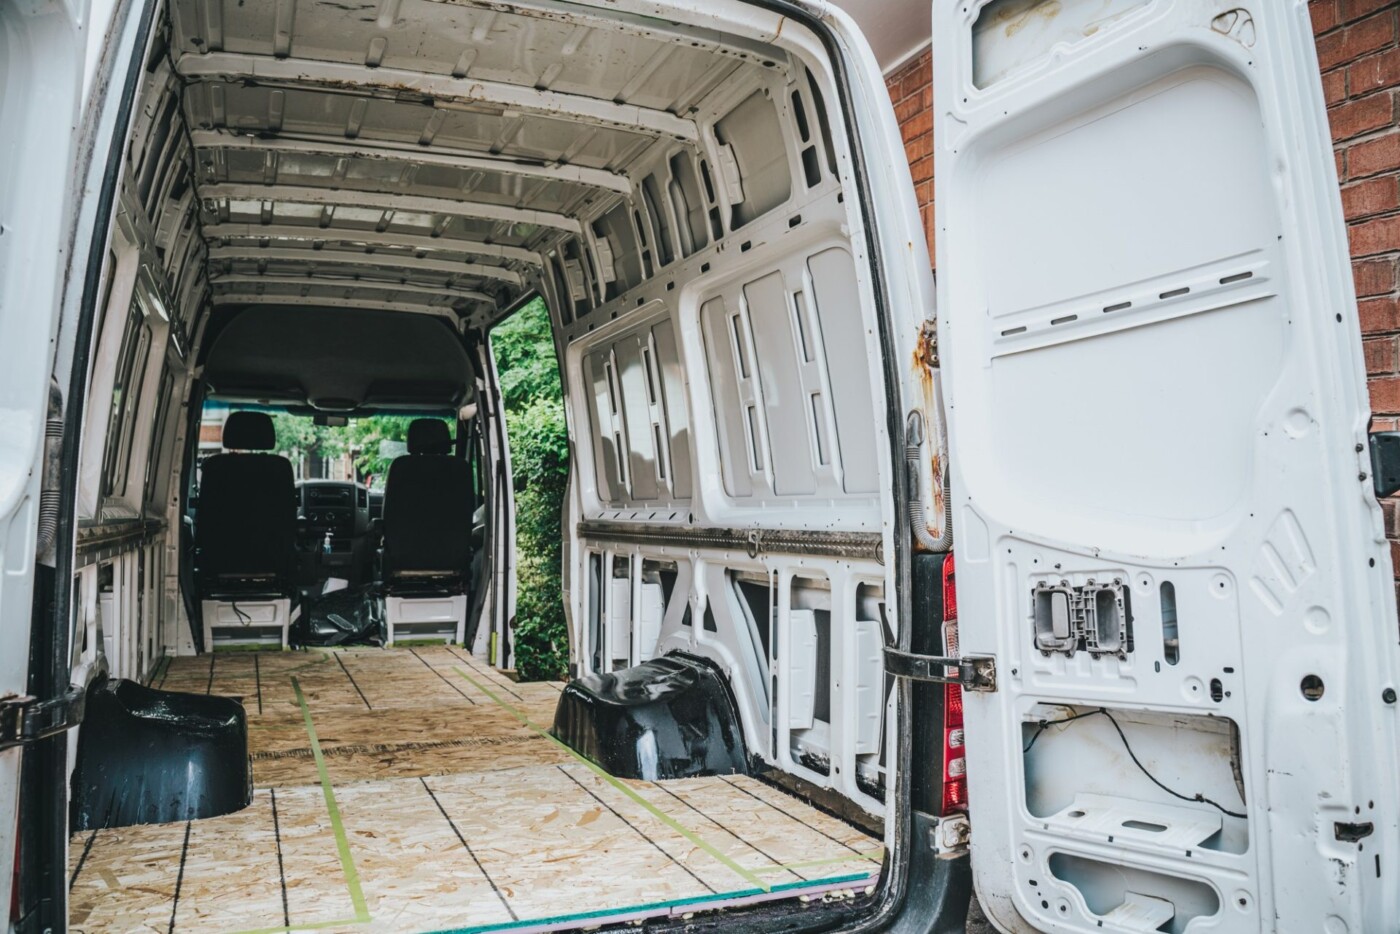
- Layer 3: 7/16 OSB Plywood Subfloor attached to the rigid insulation using rigid board adhesive
- Layer 4: EVP Flooring (more on that below)

Walls/Ceiling
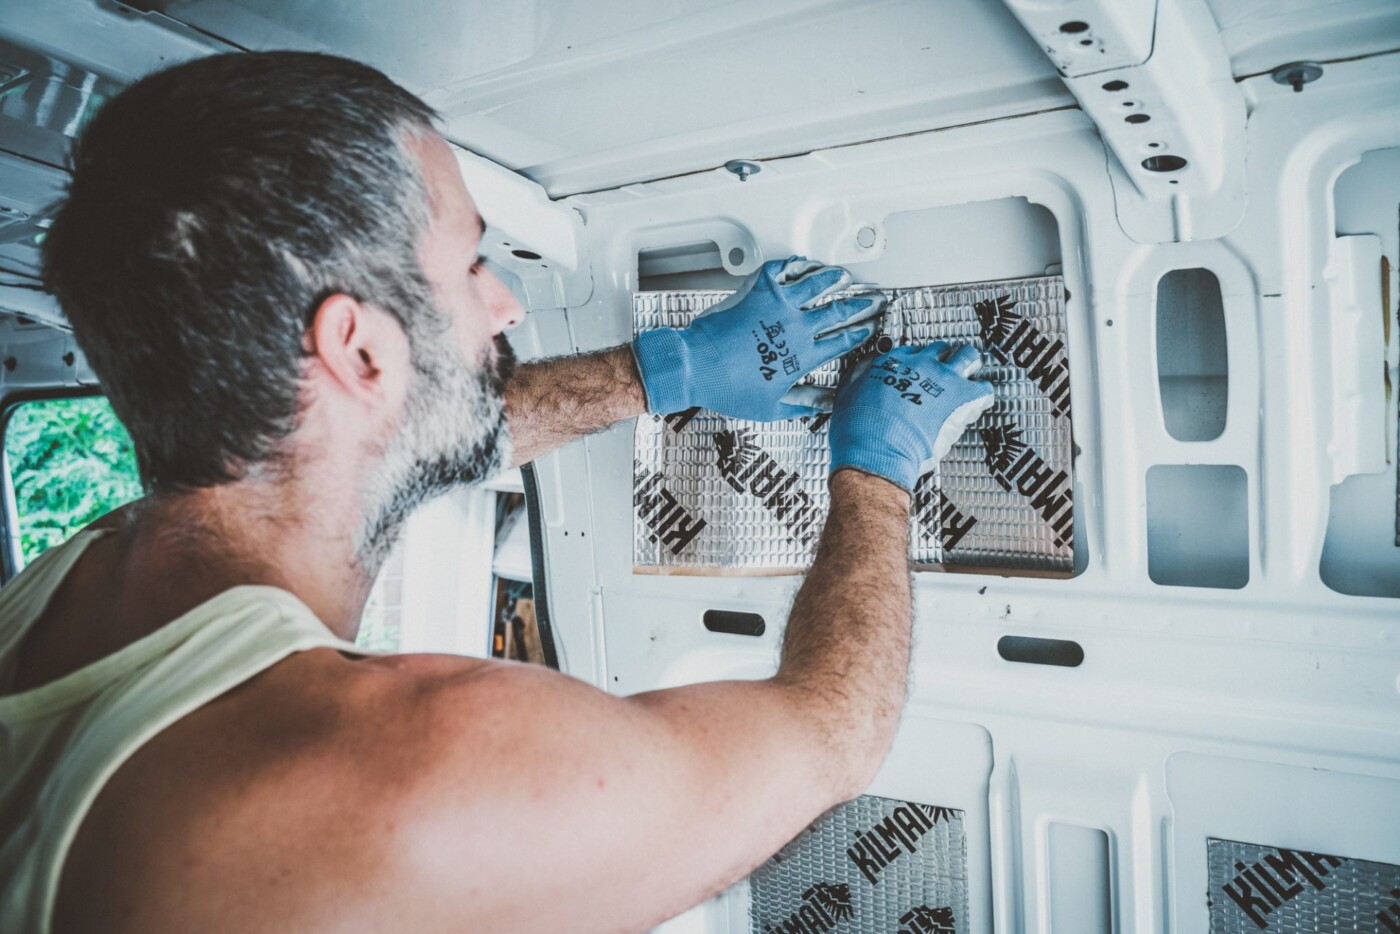
We opted to insulate the walls and ceiling with Havelock Wool, a natural product that offered an insulation rating of R7, had no off-gassing and offered anti-mould, anti-fire, sound-dampening properties.
In addition to Havelock Wool, we added a layer of Killmat Sound Deadening to reduce vibrations and improve soundproofing inside the van.
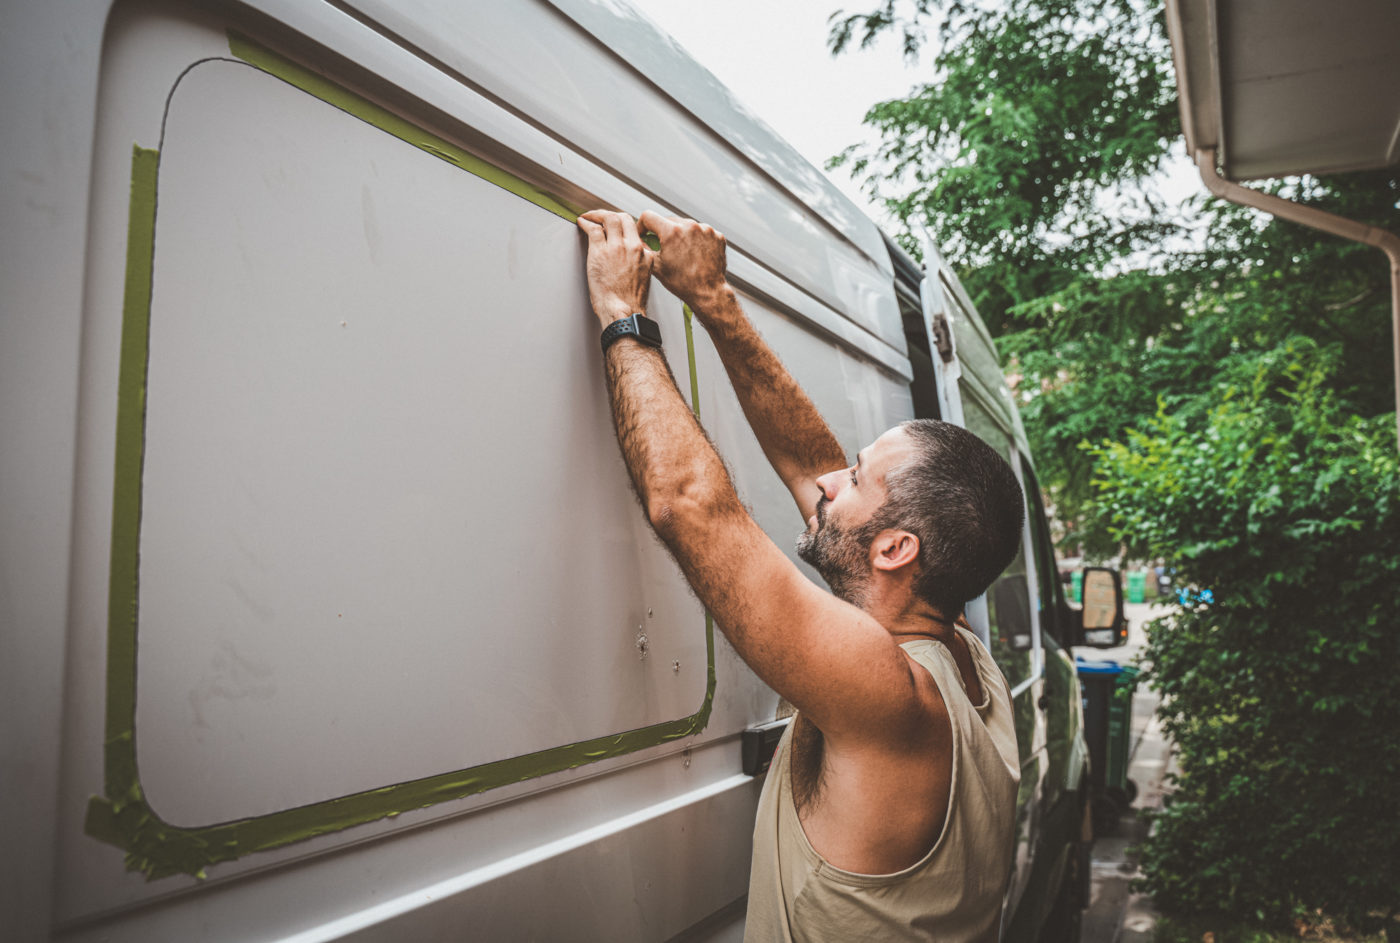
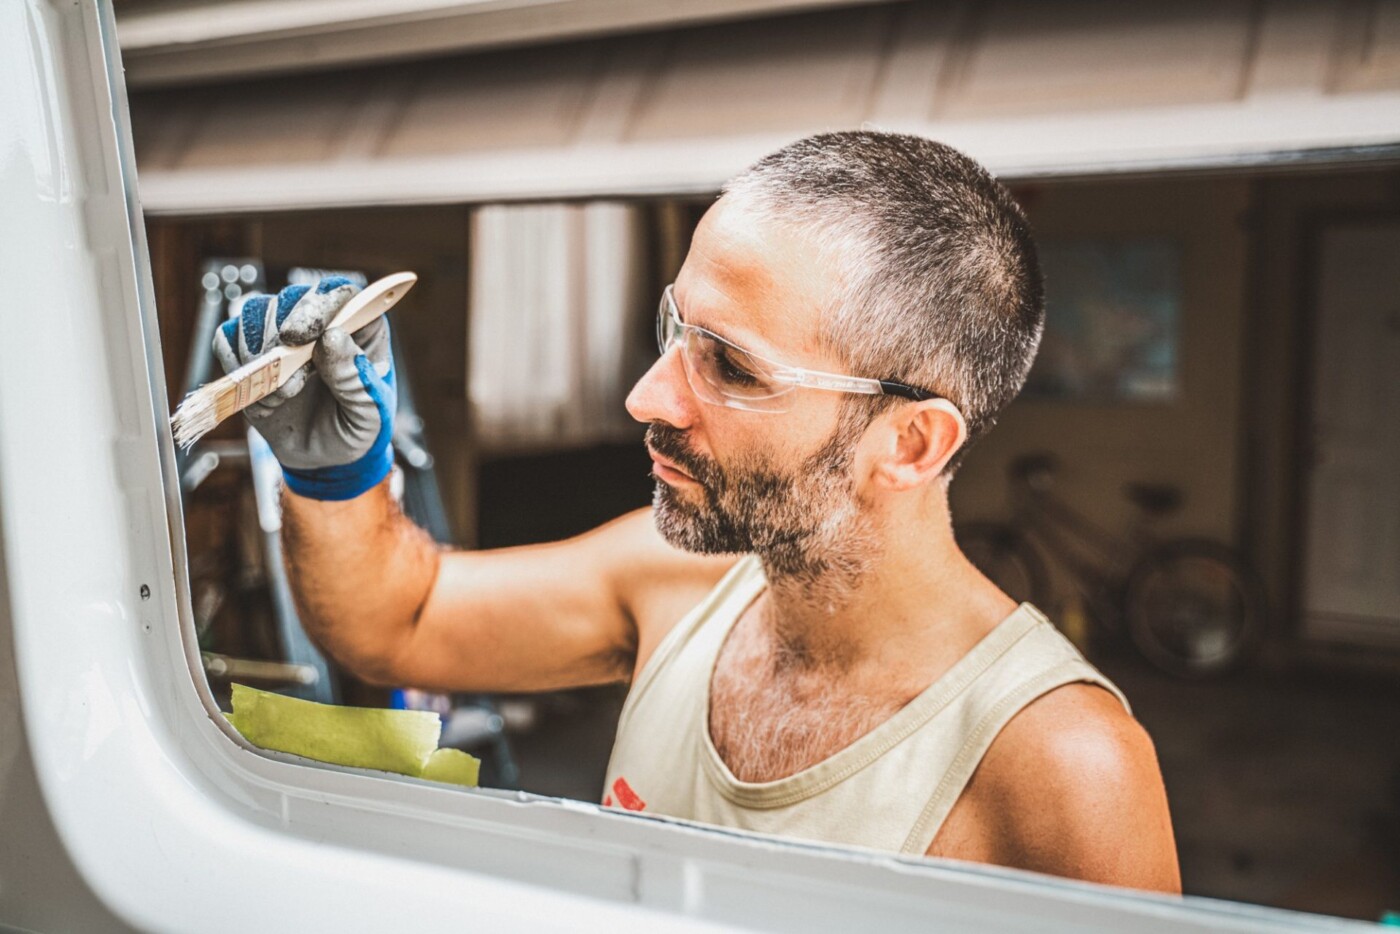
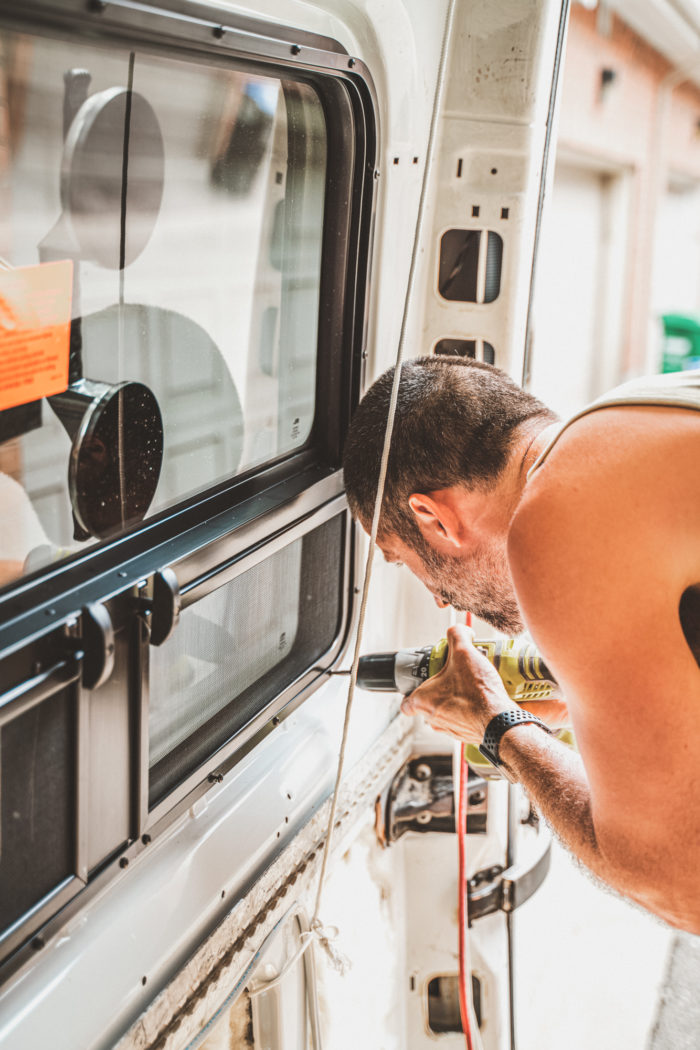
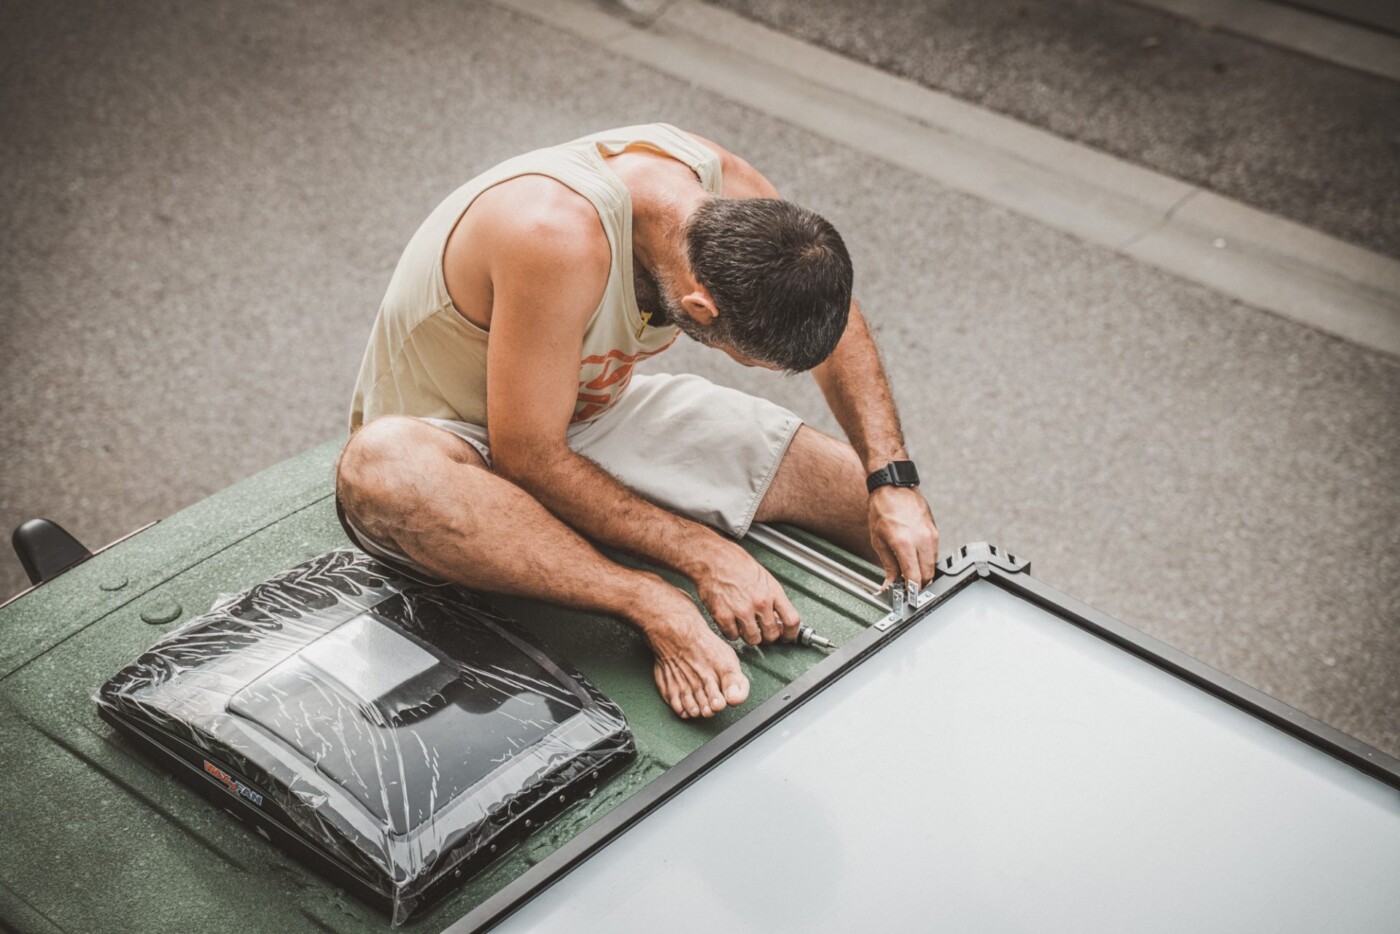
Windows
Time Spent: 3 days
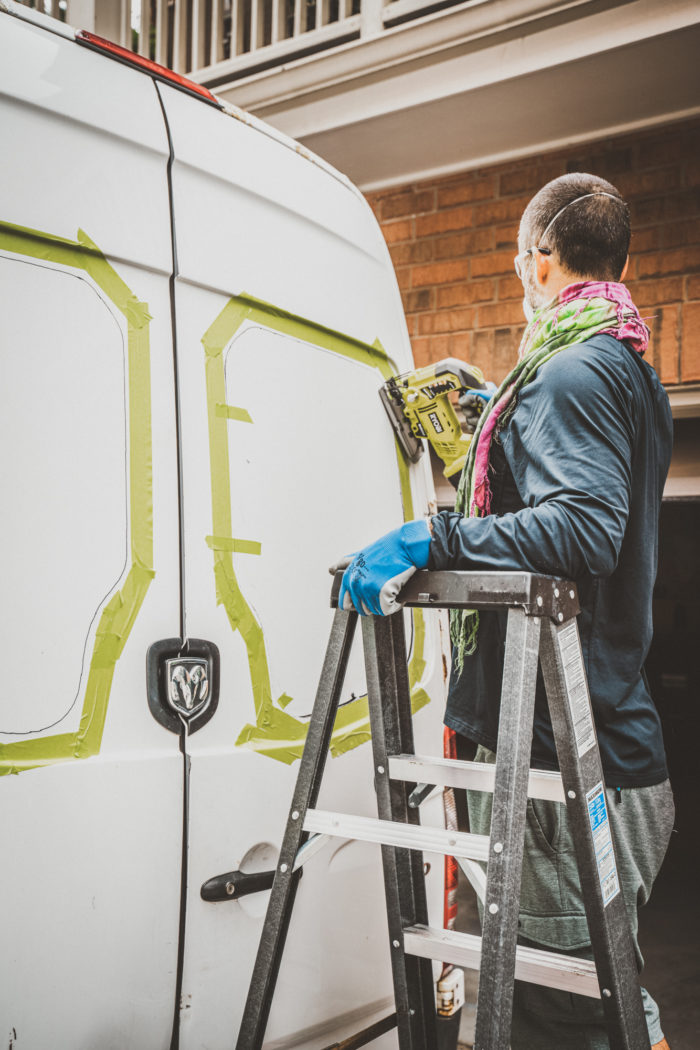
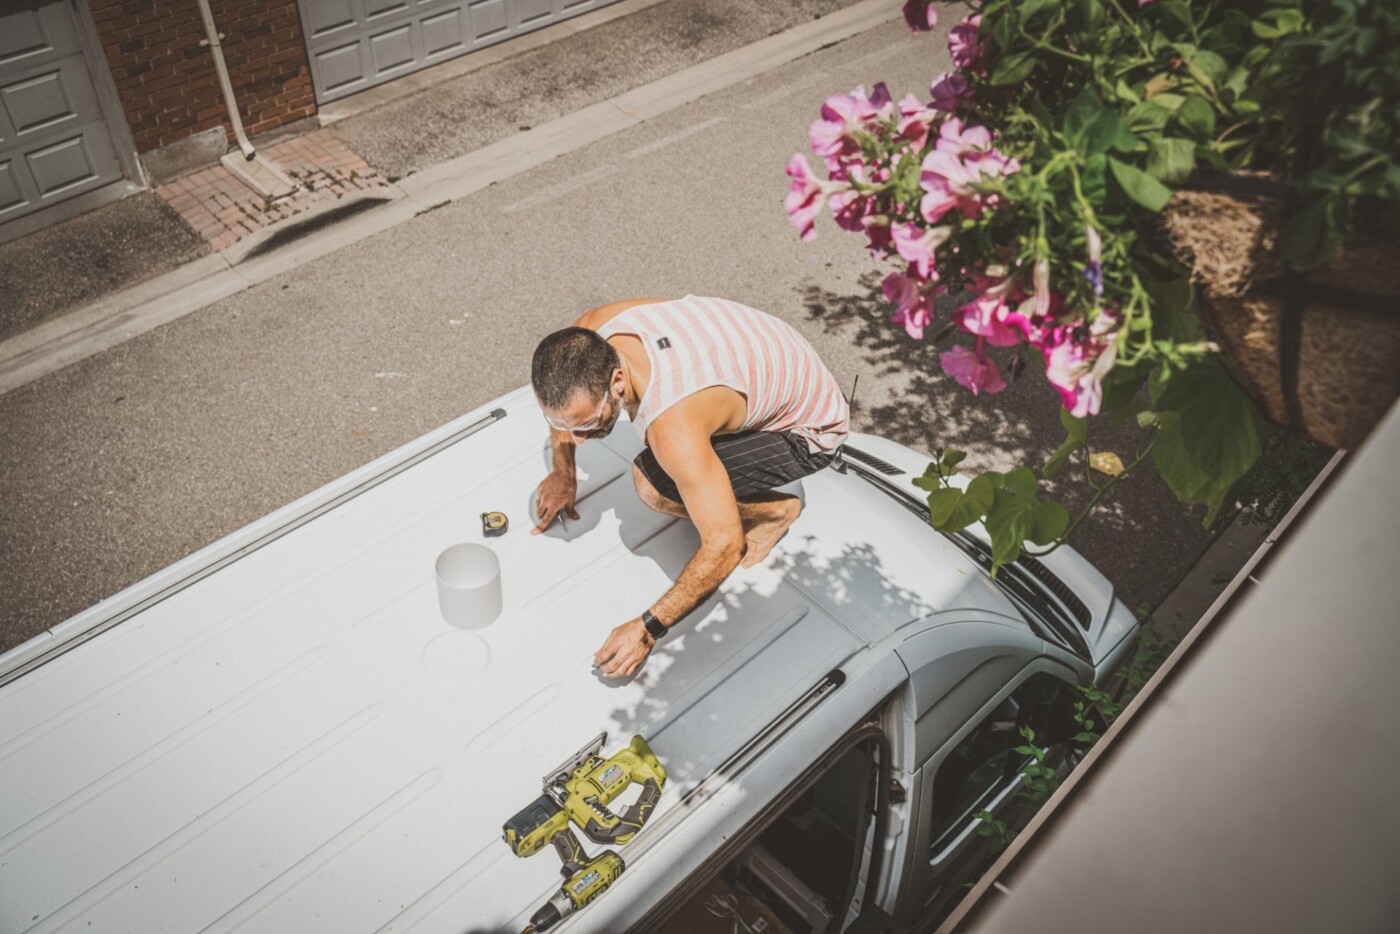
Our camper van build did not come with any manufacturer-installed windows.So, we installed a few aftermarket windows to help us get a 180-degree view from inside the van.
We added:
– 2 x CR Lawrence T Vent windows for the sides
- 2 x CR Lawrence Back windows for the back

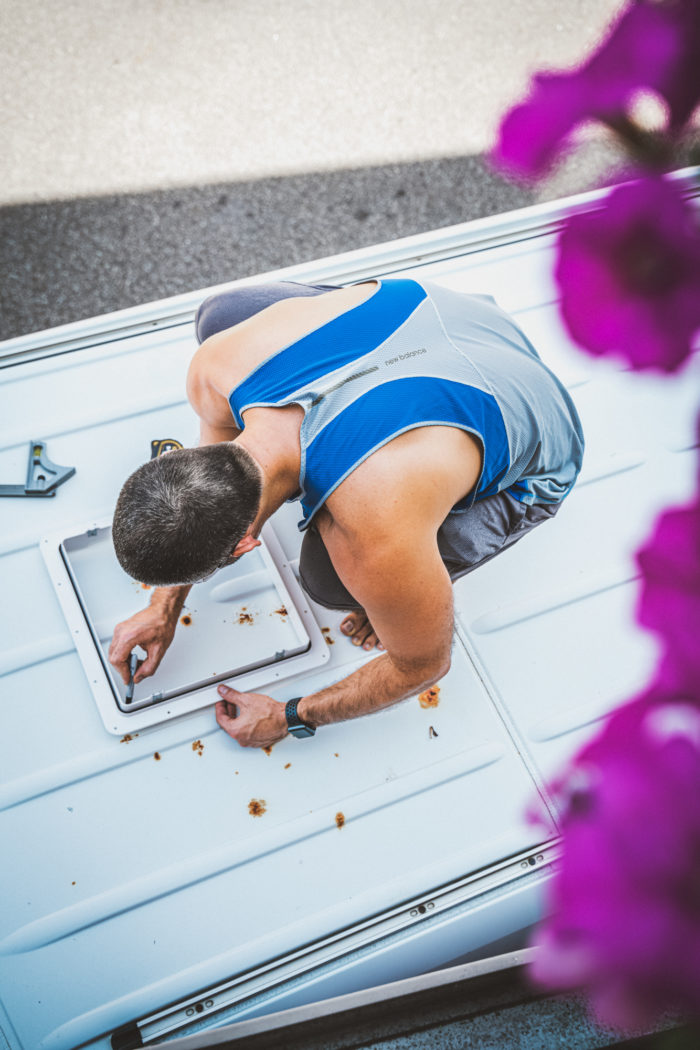
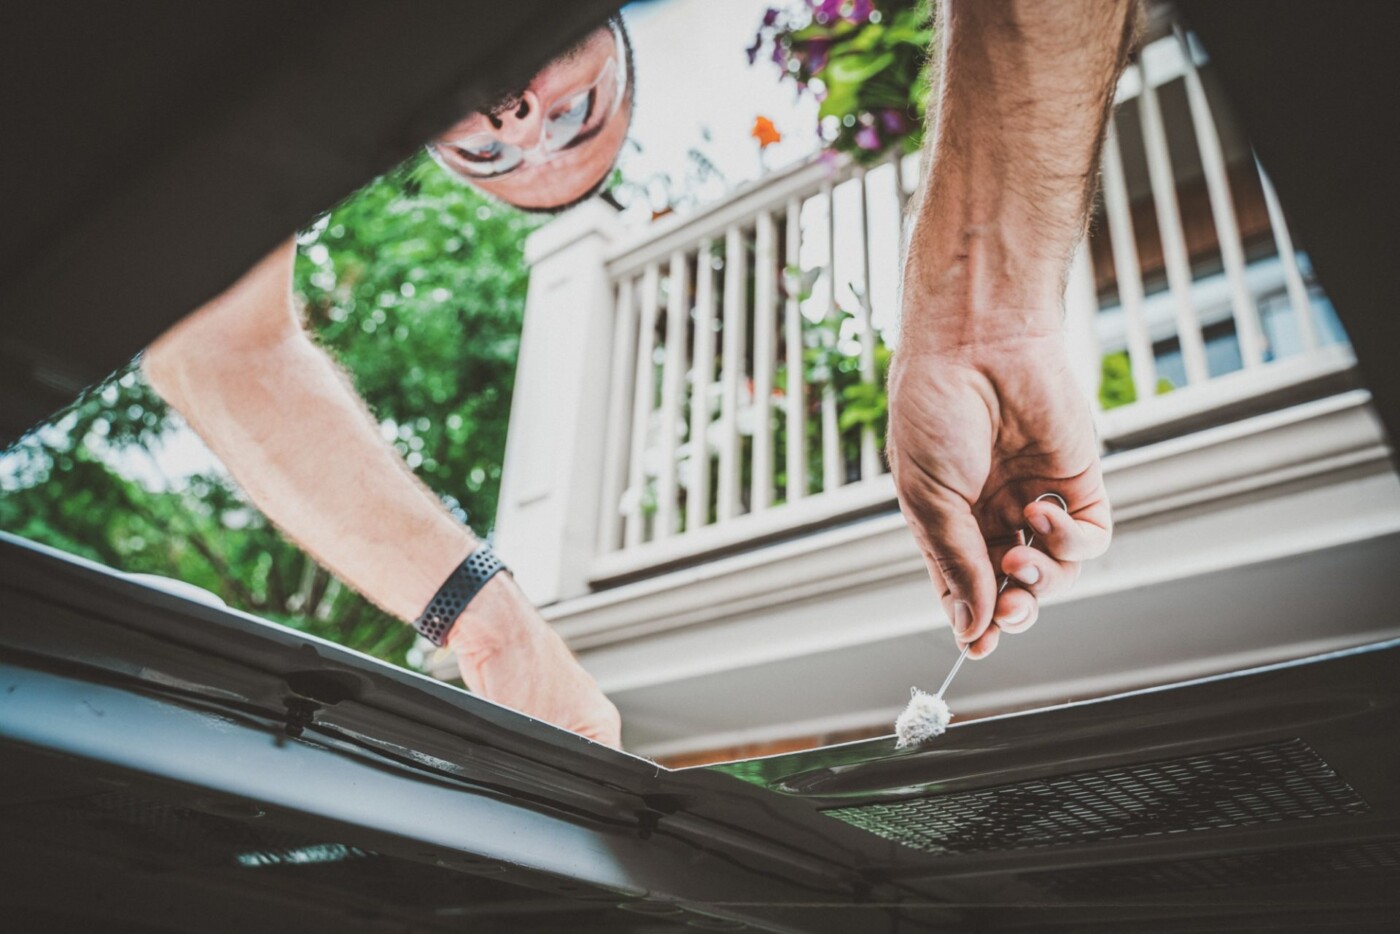
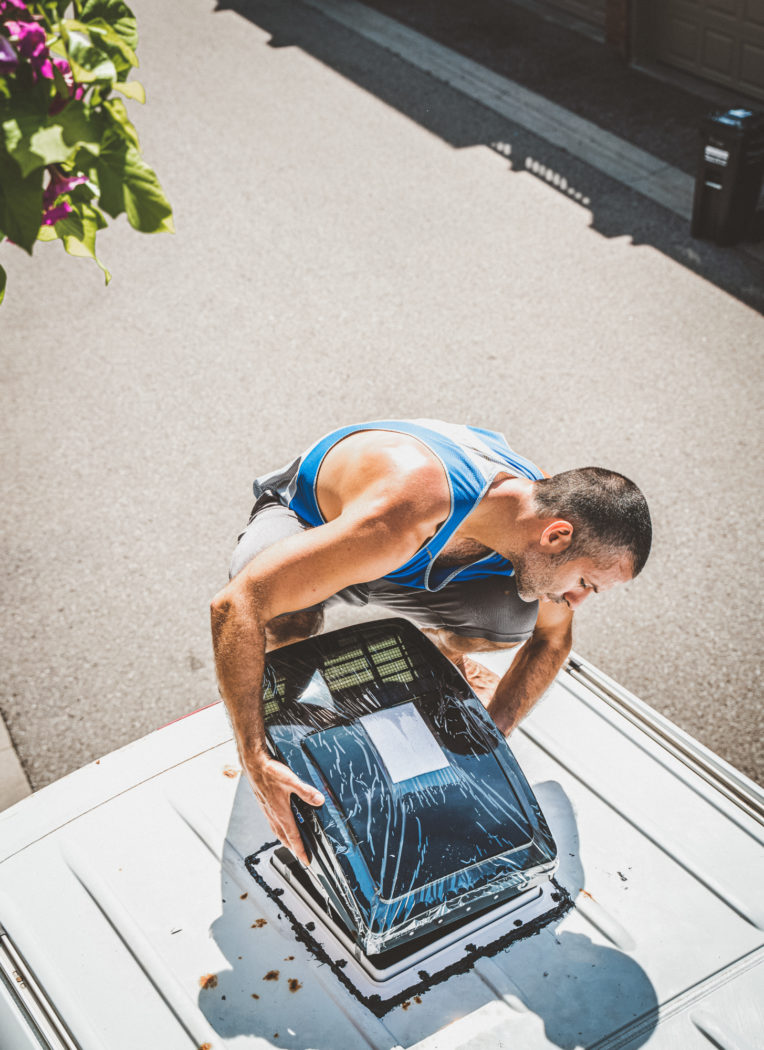
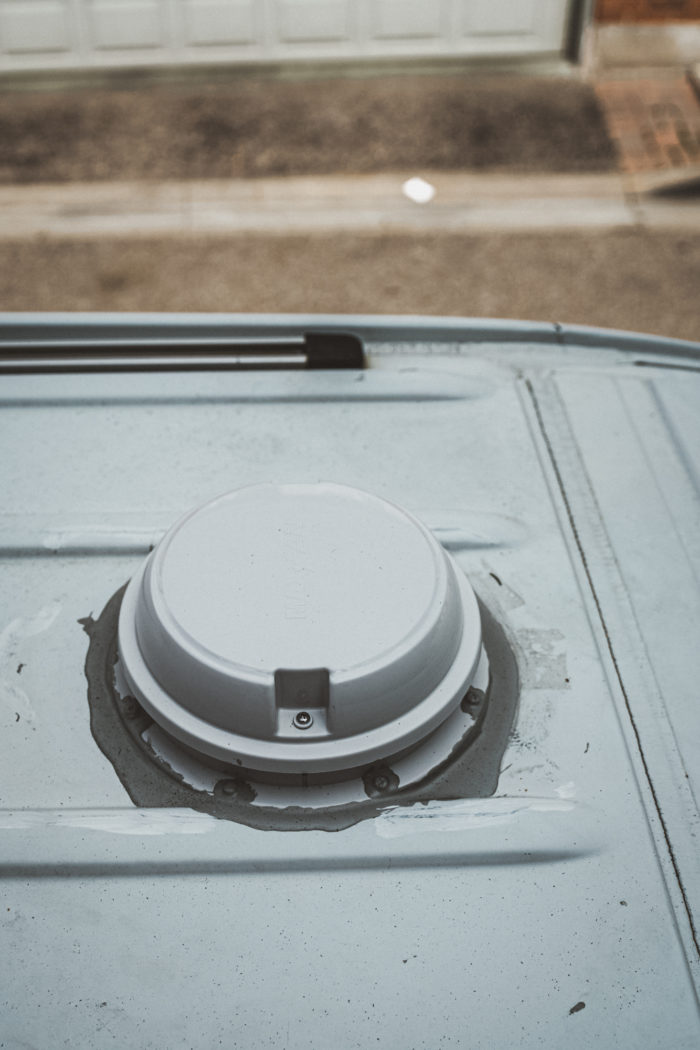
Fans
Time Spent: 1.5 days
To improve airflow and circulation in our van, we installed 3 fans:
- 2 x Deluxe MaxxAir Fans – one in the back, above our bed, and one in the front, in the kitchen area
- 1 x MaxxFan Dome Bathroom Fan – to add an exhaust to our bathroom while doubling as a light.
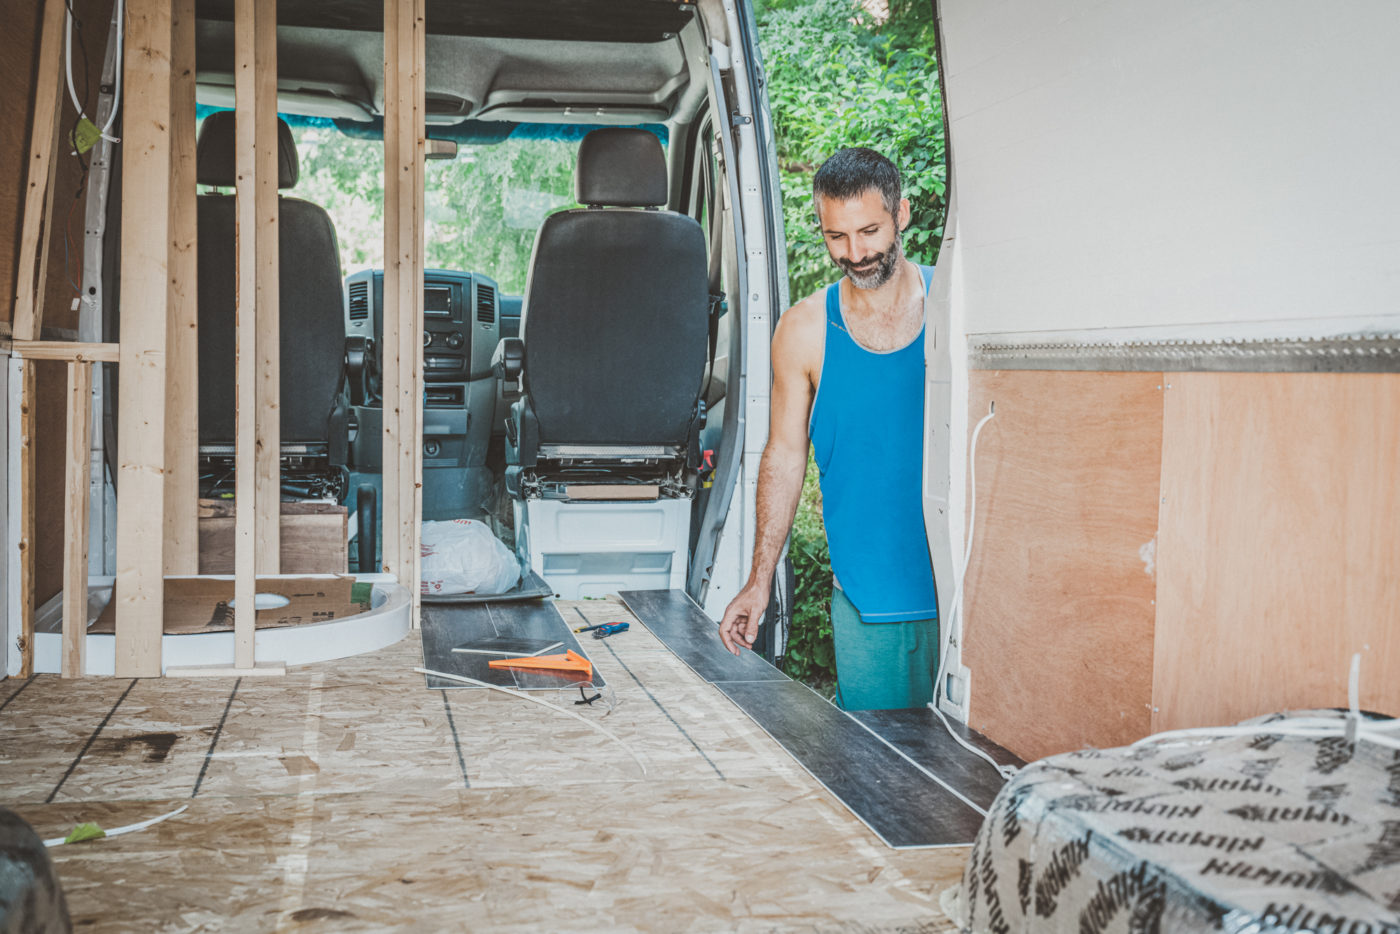
Flooring
Time Spent: 1 day
We installed EVP (Engineered Vinyl Planks) flooring in our van and have been very pleased with its durability and look so far. The tongue and groove mechanism was super easy to install and is really easy to take care of on a day to day basis. It’s waterproof and scratch resistant.
The only thing we don’t love about our flooring is that it does get quite cold in the winter, despite all the insulation we put under it. In hindsight, we should have considered adding heated flooring to the van, but now we made do with wearing socks or slippers.
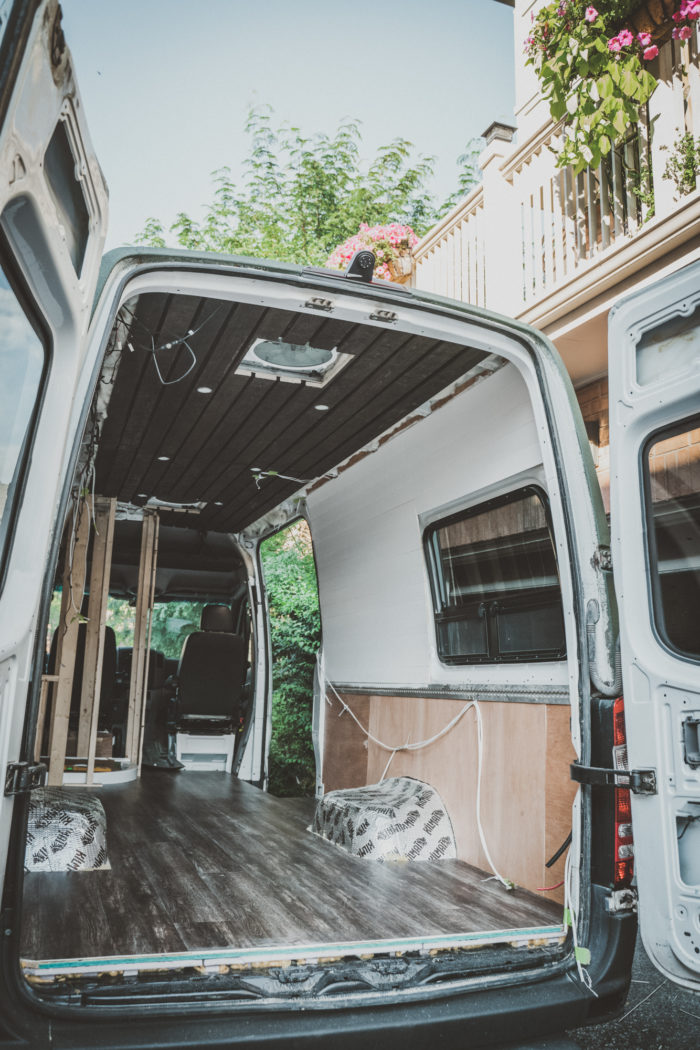
Ceiling
Time Spent: 4 days
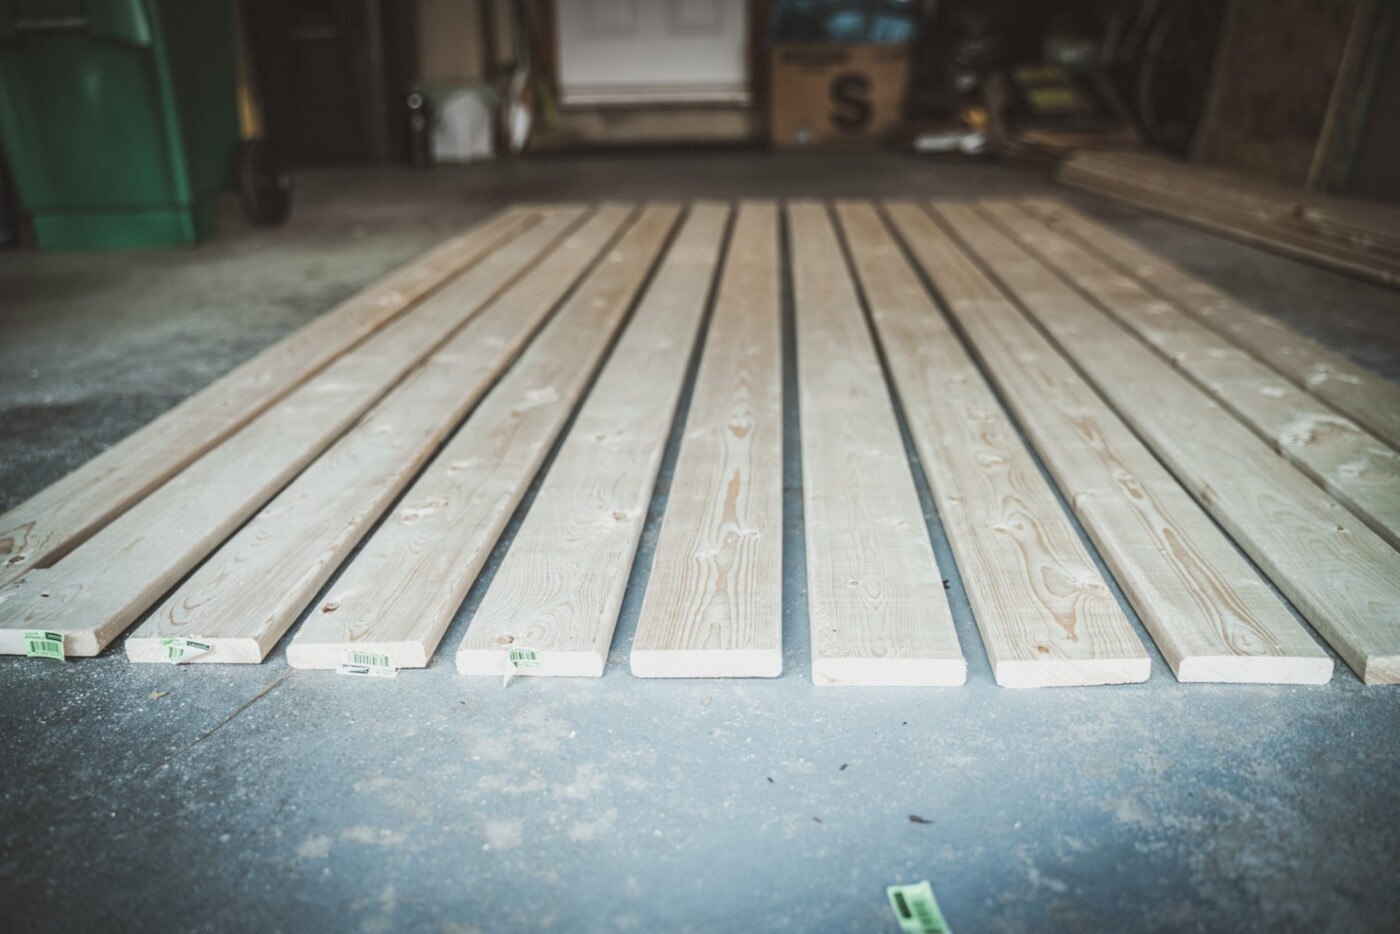
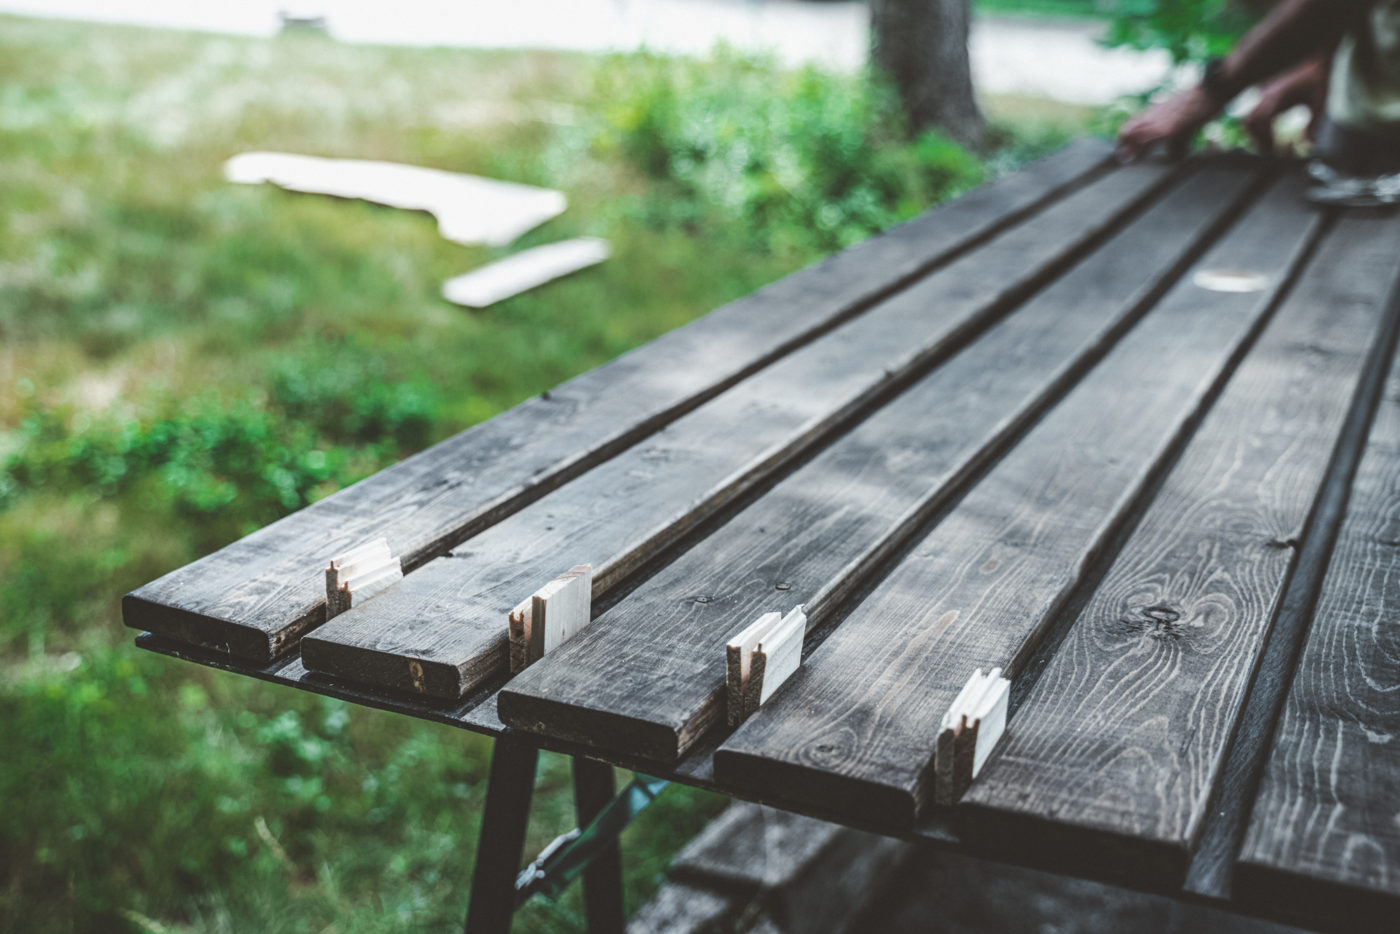
For our ceiling, we used the design inspiration from fellow van lifers, Vanlife Sagas. We used 1” Wood Planks stained with Wood Stain that we attached to a piece of stained Lauan Plywood.
Also, we attached the ceiling to the body of the van using self-tapping screws.
We had to create 2 ceilings. One that was attached to the ceiling of our van and the other one that we attached under our elevator bed. So, the same ceiling style would continue when our elevator bed was up.

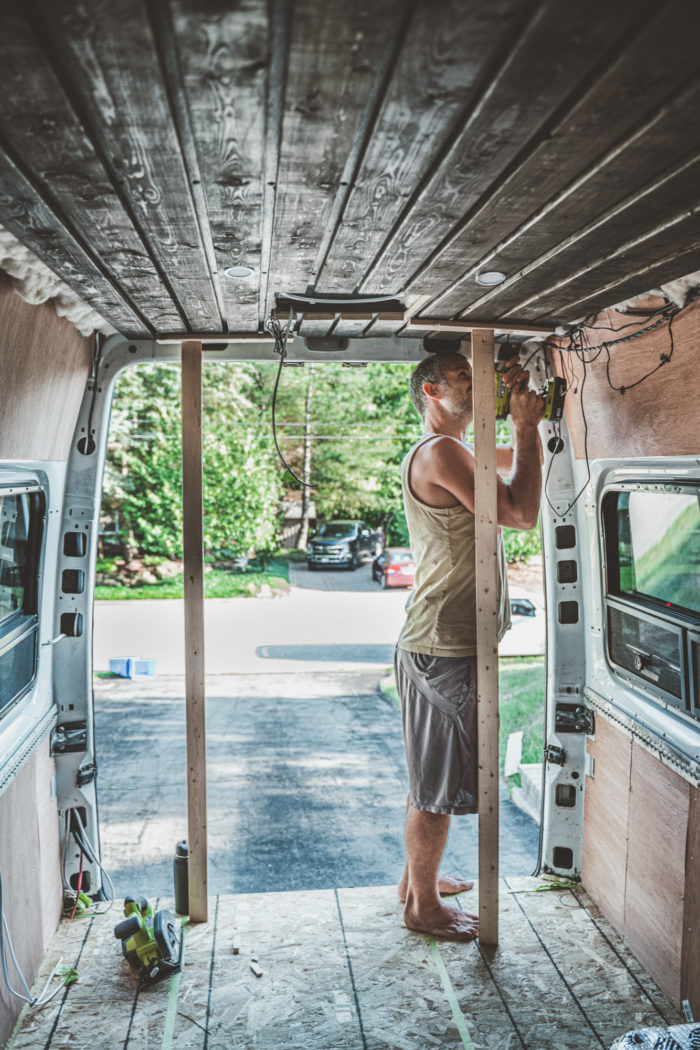
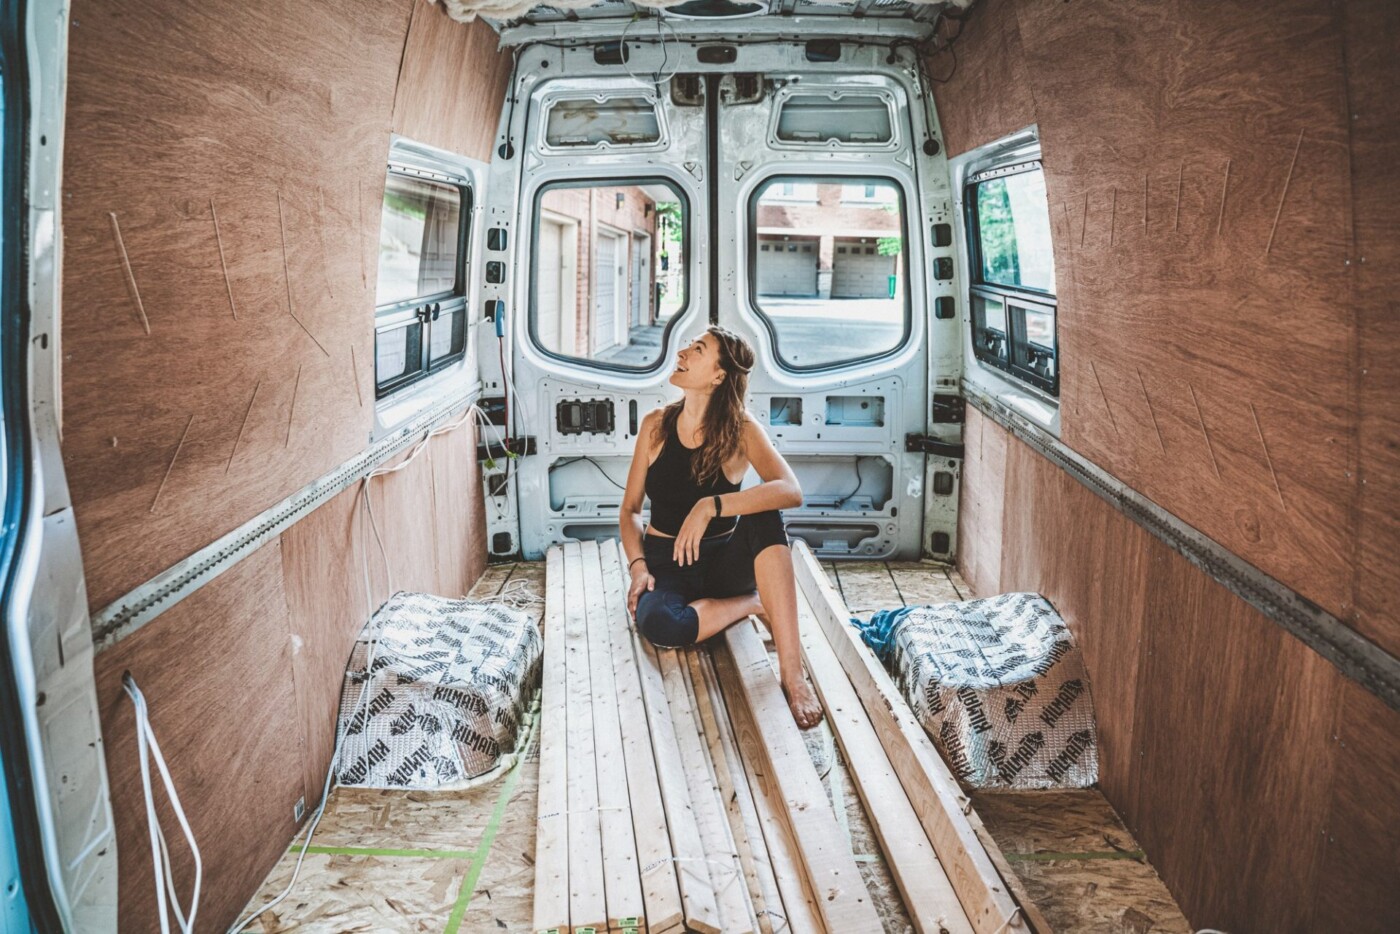
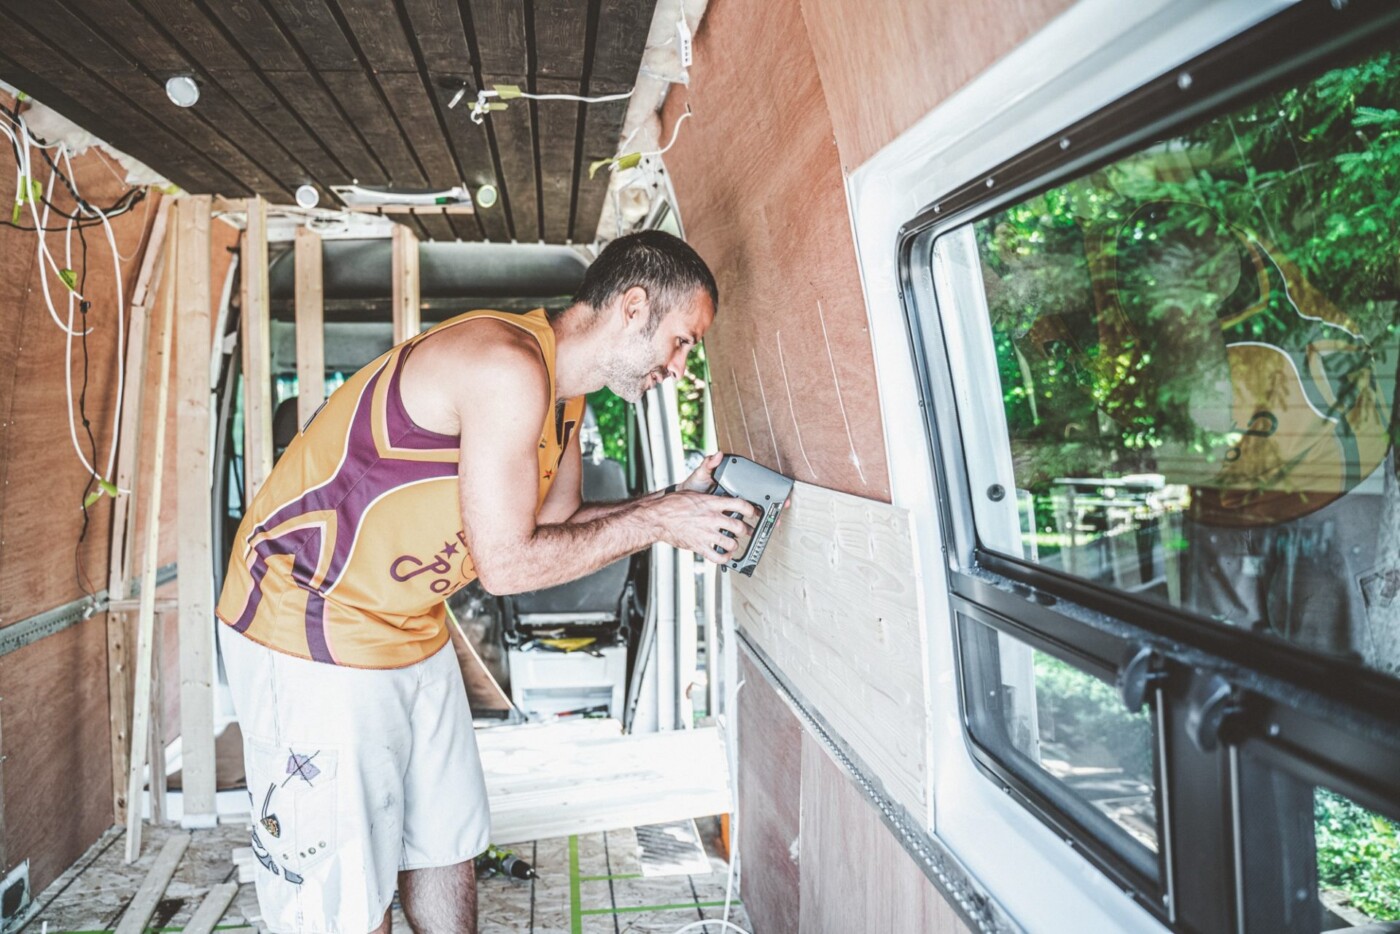
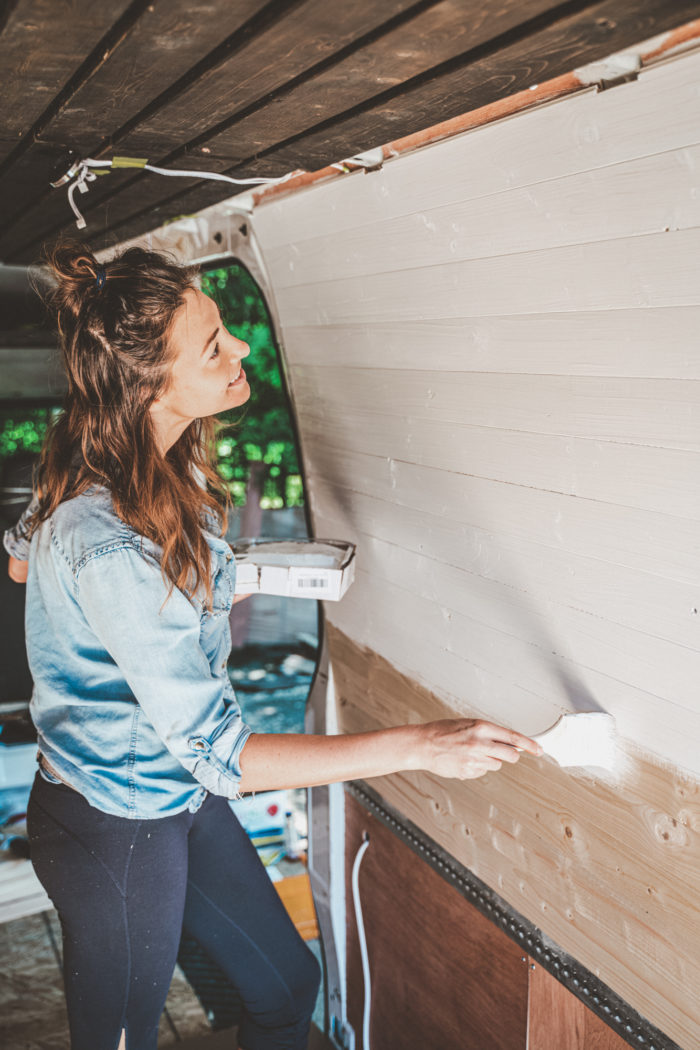
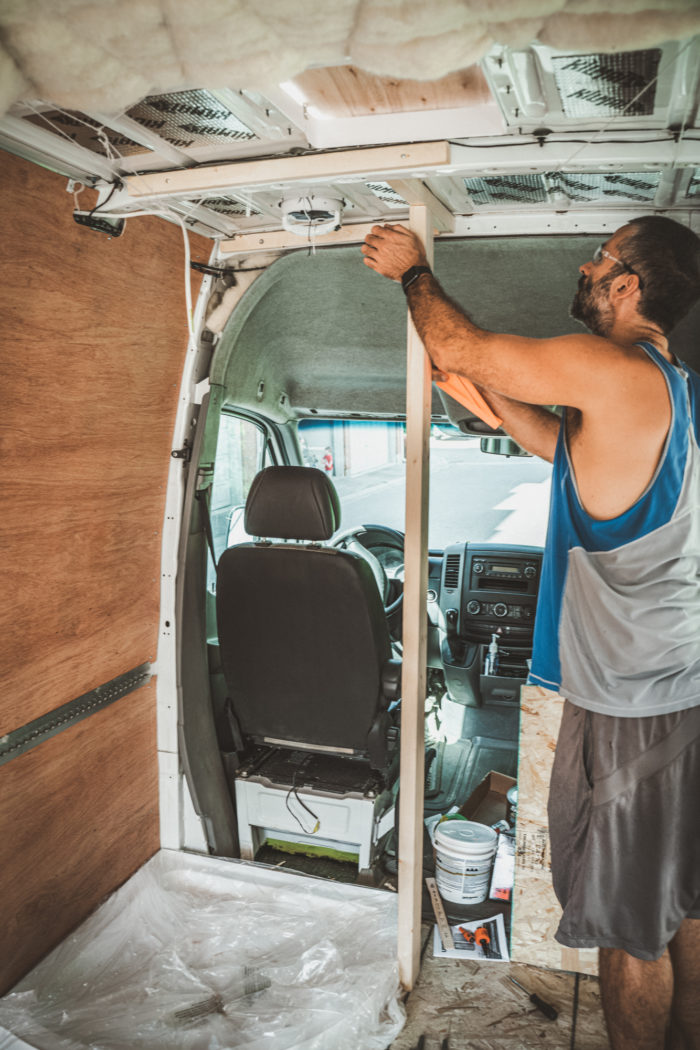
Walls
Time Spent: 2 days
We used 7/16” Lauan Plywood to cover the Havelock Wool insulation on the walls and used 7/16” Tongue & Groove Shiplap Slats for the wall decor. We painted the shiplap with Flat White Exterior Paint.
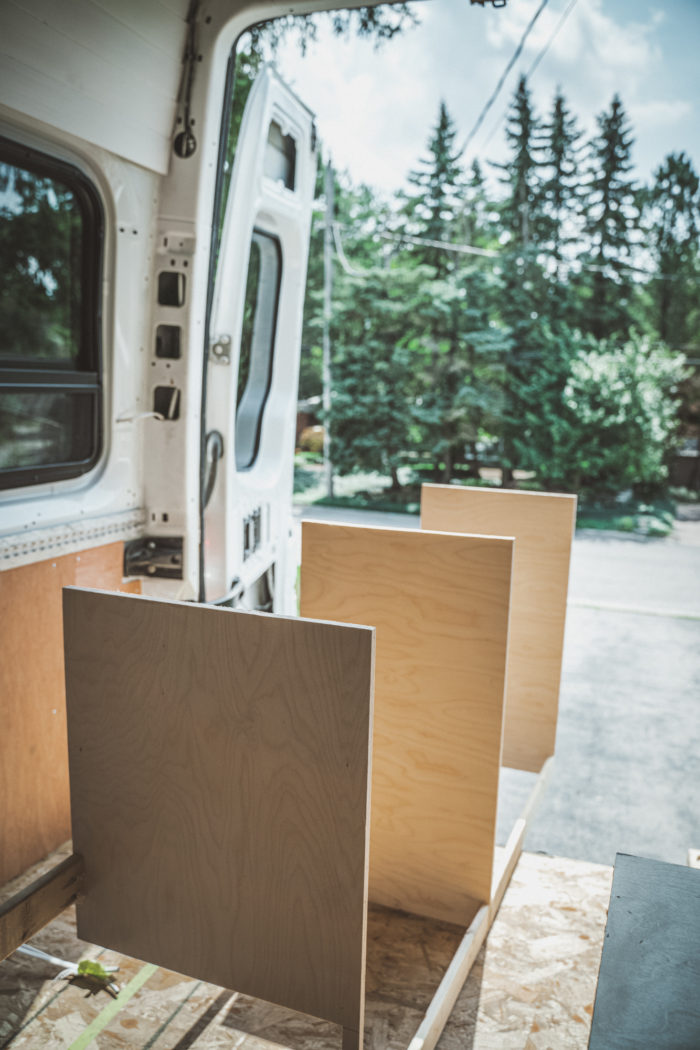
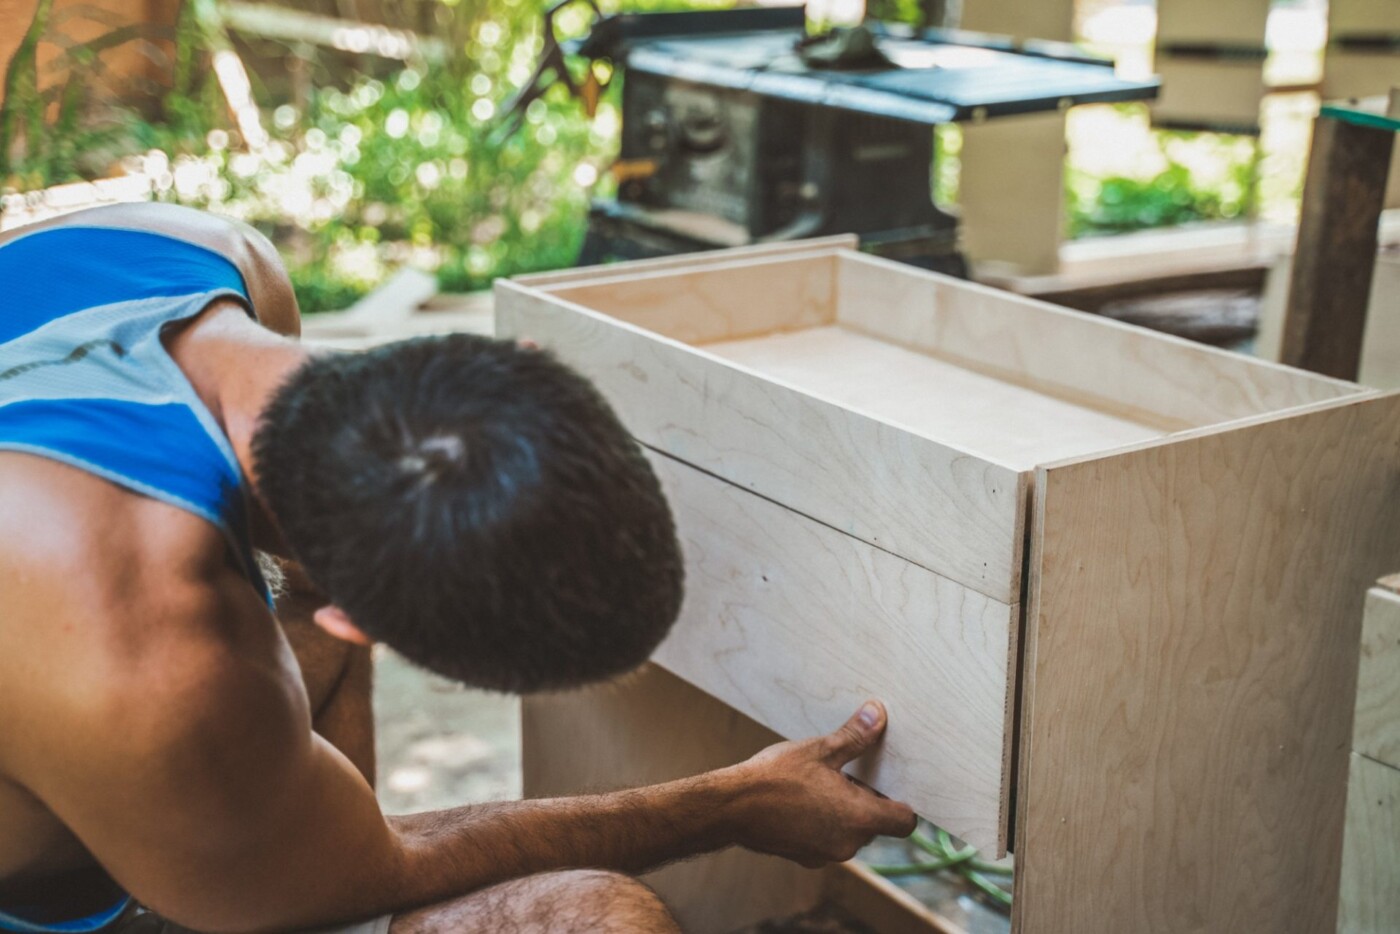
Cabinets
Time Spent: 2 weeks
We built 4 sets of cabinets for our van.
- 52”x 16” 8-drawer dresser that lives under our desk and houses most of our clothes and shoes,
- 60” x 16” kitchen cabinet that includes 4 drawers, storage cabinets, a pull-out pantry, and 2 dedicated drawers for our electronics
- 53”x 24” kitchen cabinet that houses our fridge and sink set up, and
- 53” x 12” overhead cabinet that is used for our control centre, our toiletries and other storage
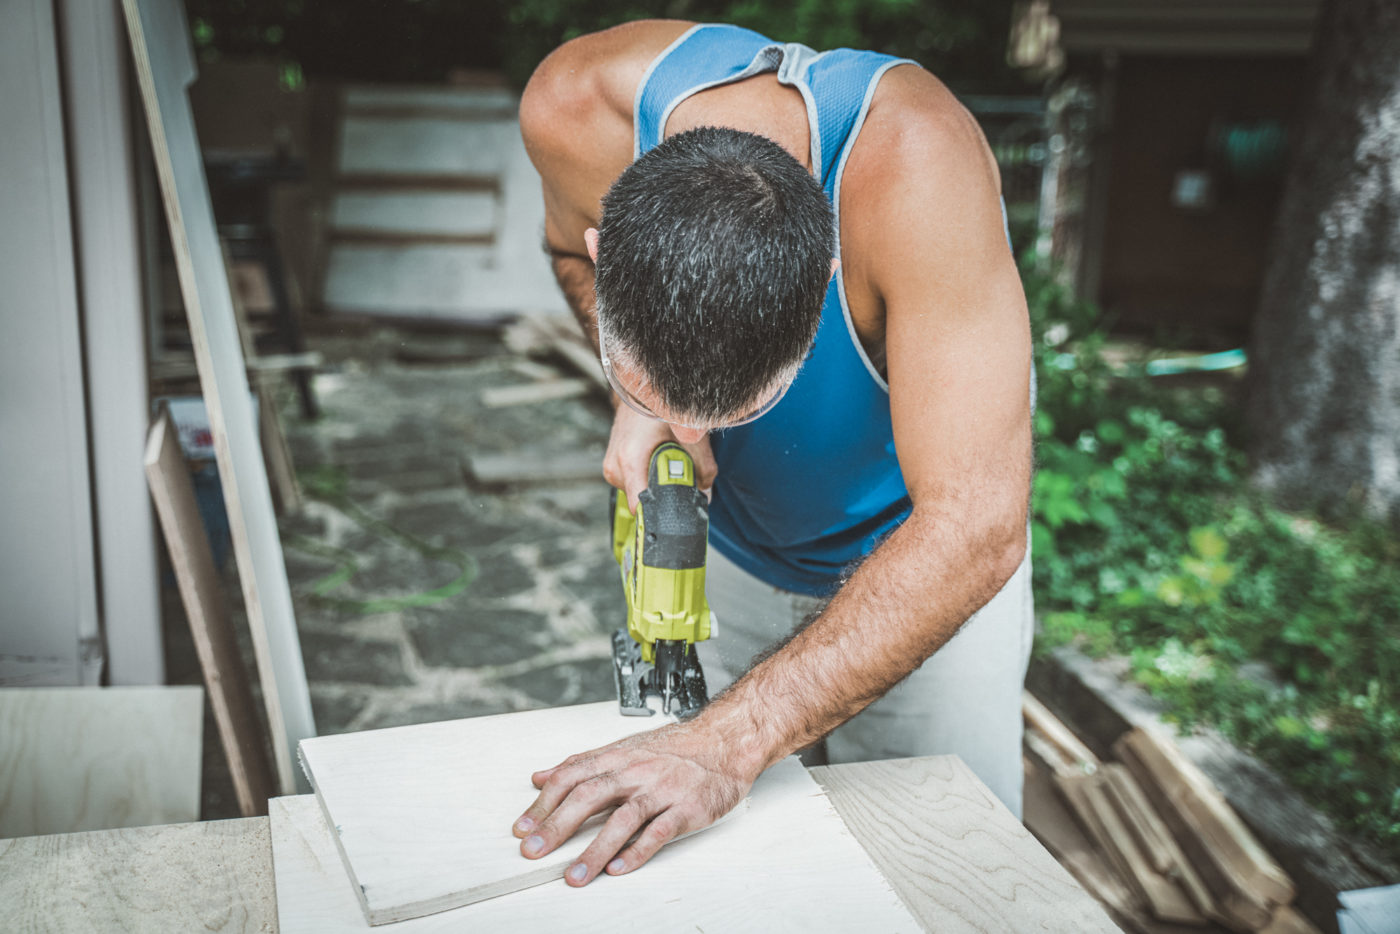
We built all cabinets from the ground up, using 3/8” Baltic Birch plywood, glue and pocket screws. The initial build took only a few days, but the finishing touches took forever.
In hindsight, we should have built the cabinets using ½ “ plywood instead of ⅜” plywood, as we were not able to find ⅜” wood screws to match the plywood and working with longer screws proved to be more challenging.
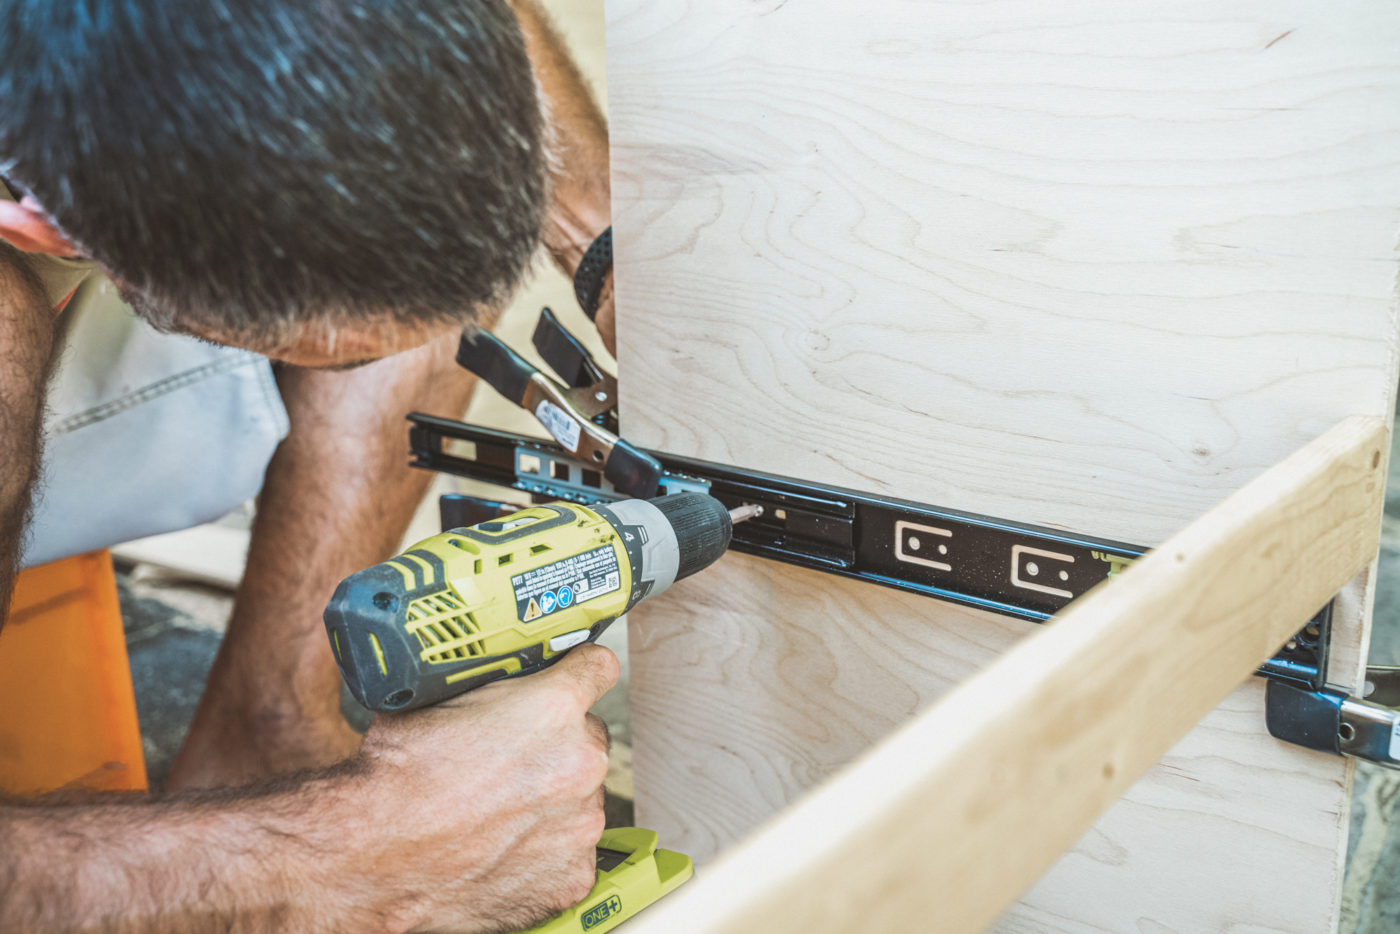
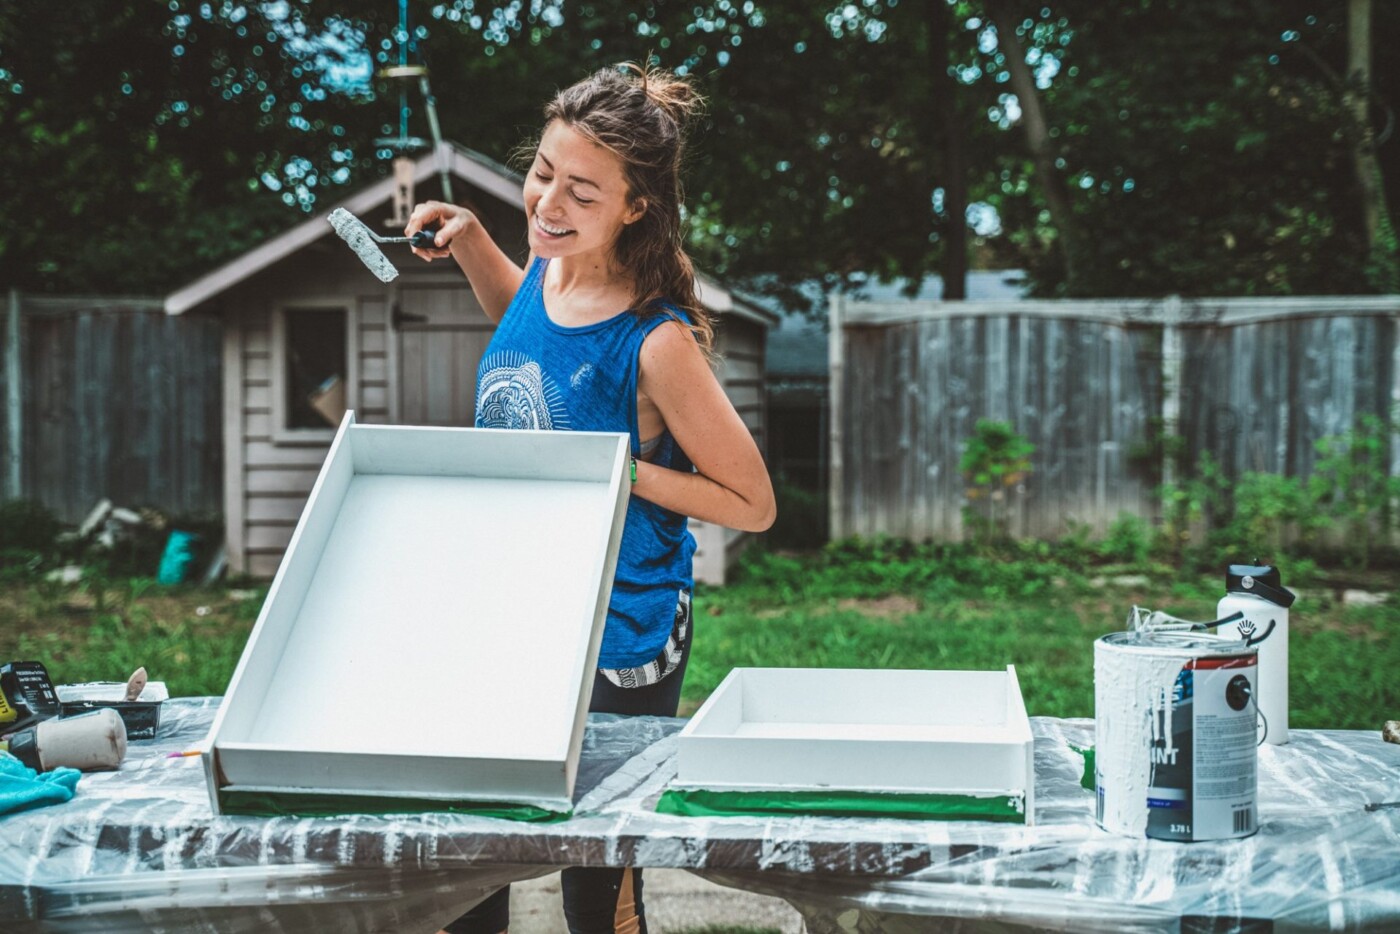
Once the frame was built, Max built 10 individual drawers that would slide into the frame. Also, he built 2 shelves that would sit inside some of the cabinets and cut the fronts for the cabinet doors. I then sanded and painted the frame, the doors, and each individual drawer with Acrylic Semi Gloss White Cabinets Paint. It took 3 coats and a few days of work to get that glossy brilliant white finish we wanted.
The biggest challenge with our cabinets was with the slides for the drawers. We originally wanted to have push-to-open slides that would replace the need for magnets and/or other latches. But after a few days of trying to fit them in, we realized that these slides were simply not suitable for drawers inside a van.
We ended up replacing all the push-to-open slides with regular slides and install cabinet door magnets and latches to help stop the drawers from opening while driving.
We used soft close hinges to attach doors to the cabinets and added 3-3/4″ (96mm) Simple Chamfered Kitchen handles to all drawers and doors.
Also, we installed a headliner shelf above the cab to give us a bit more storage space in the front of the van. We used ½” Pine Plywood and the Vancillary DIY Sprinter Van Headliner Shelf Kit to fit the shelf into the cab. It was one of the easier steps in our van build-out.
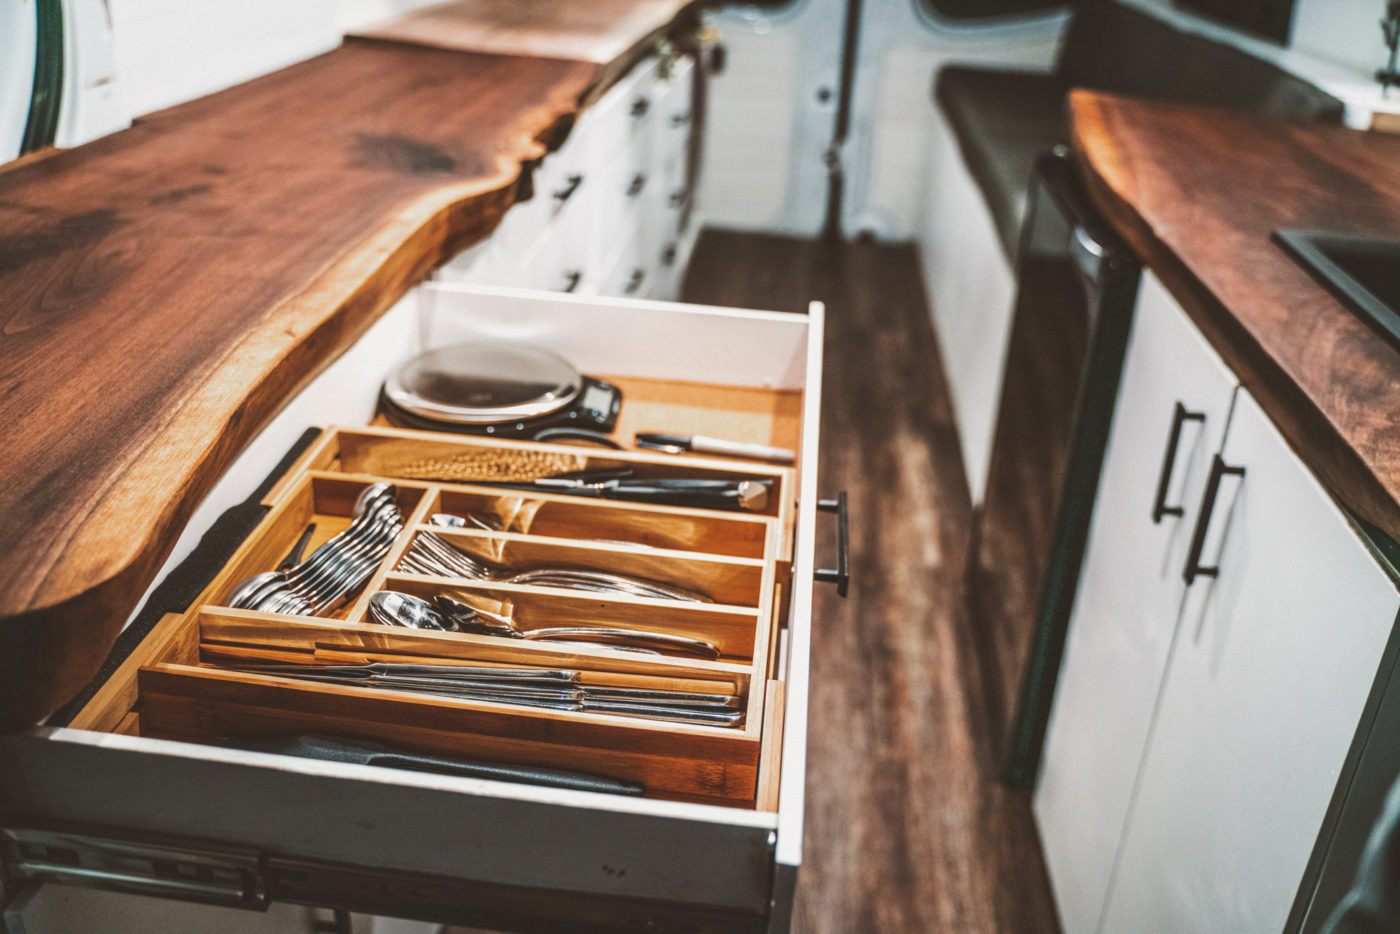
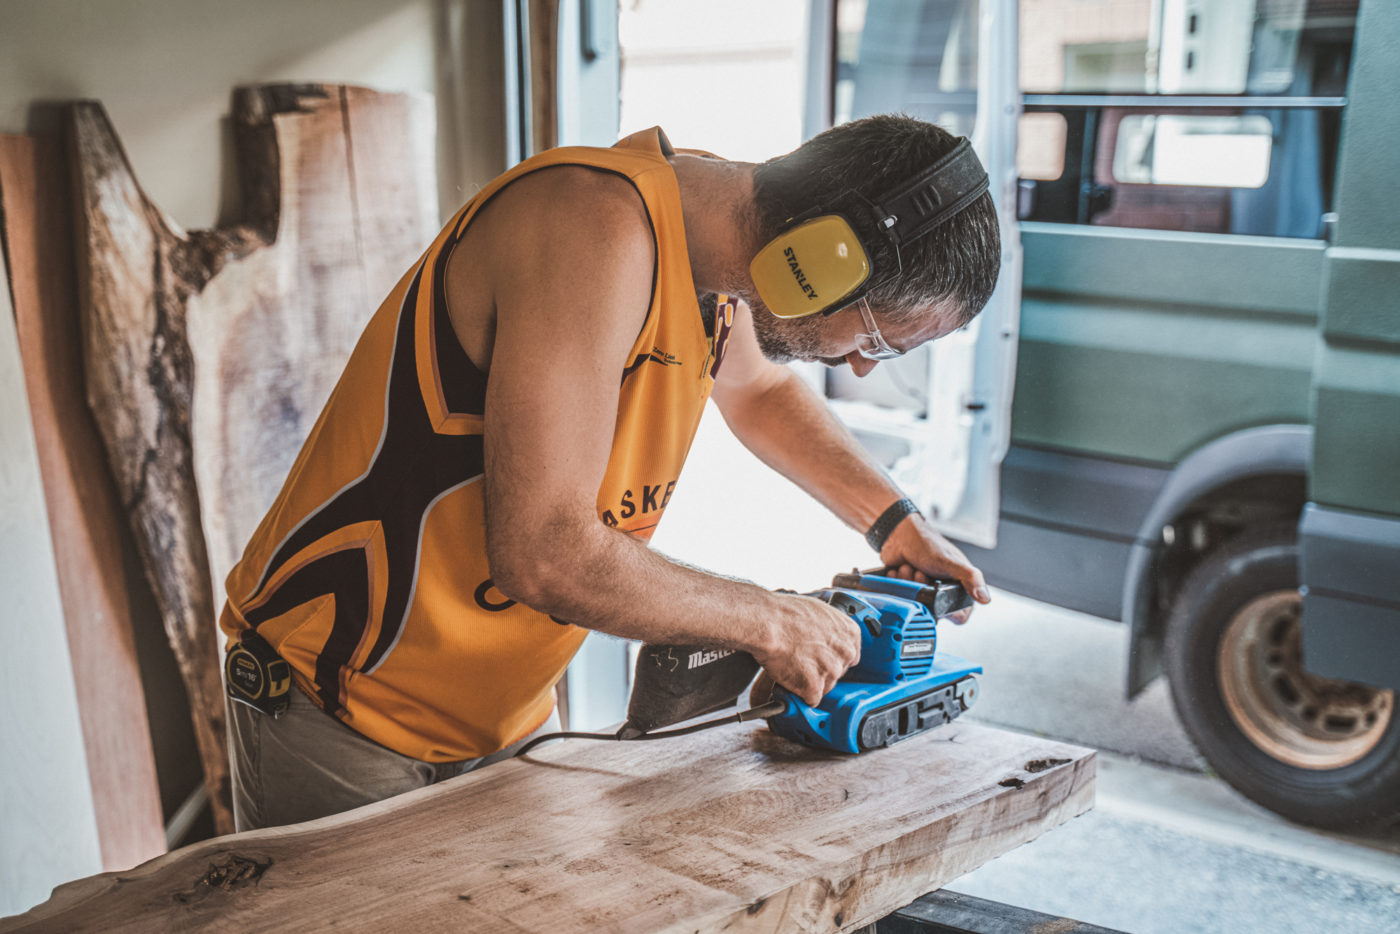
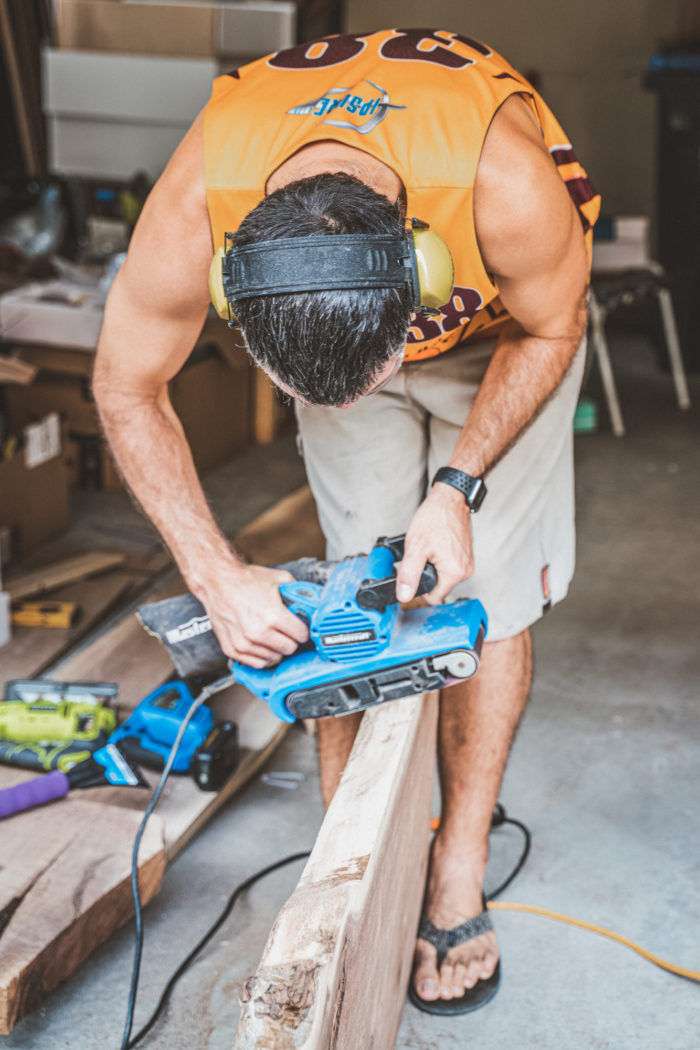
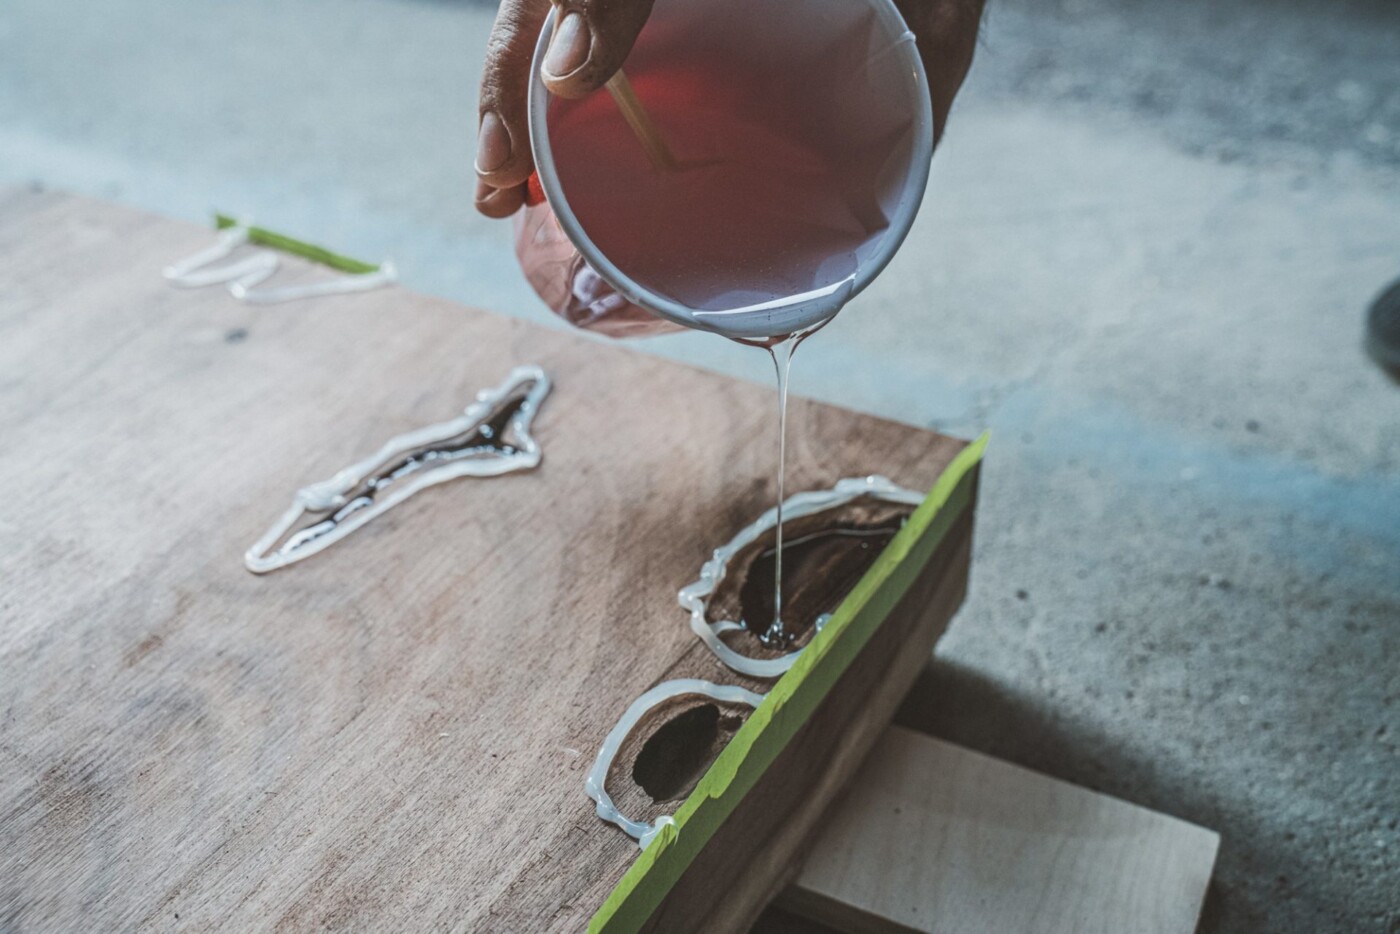
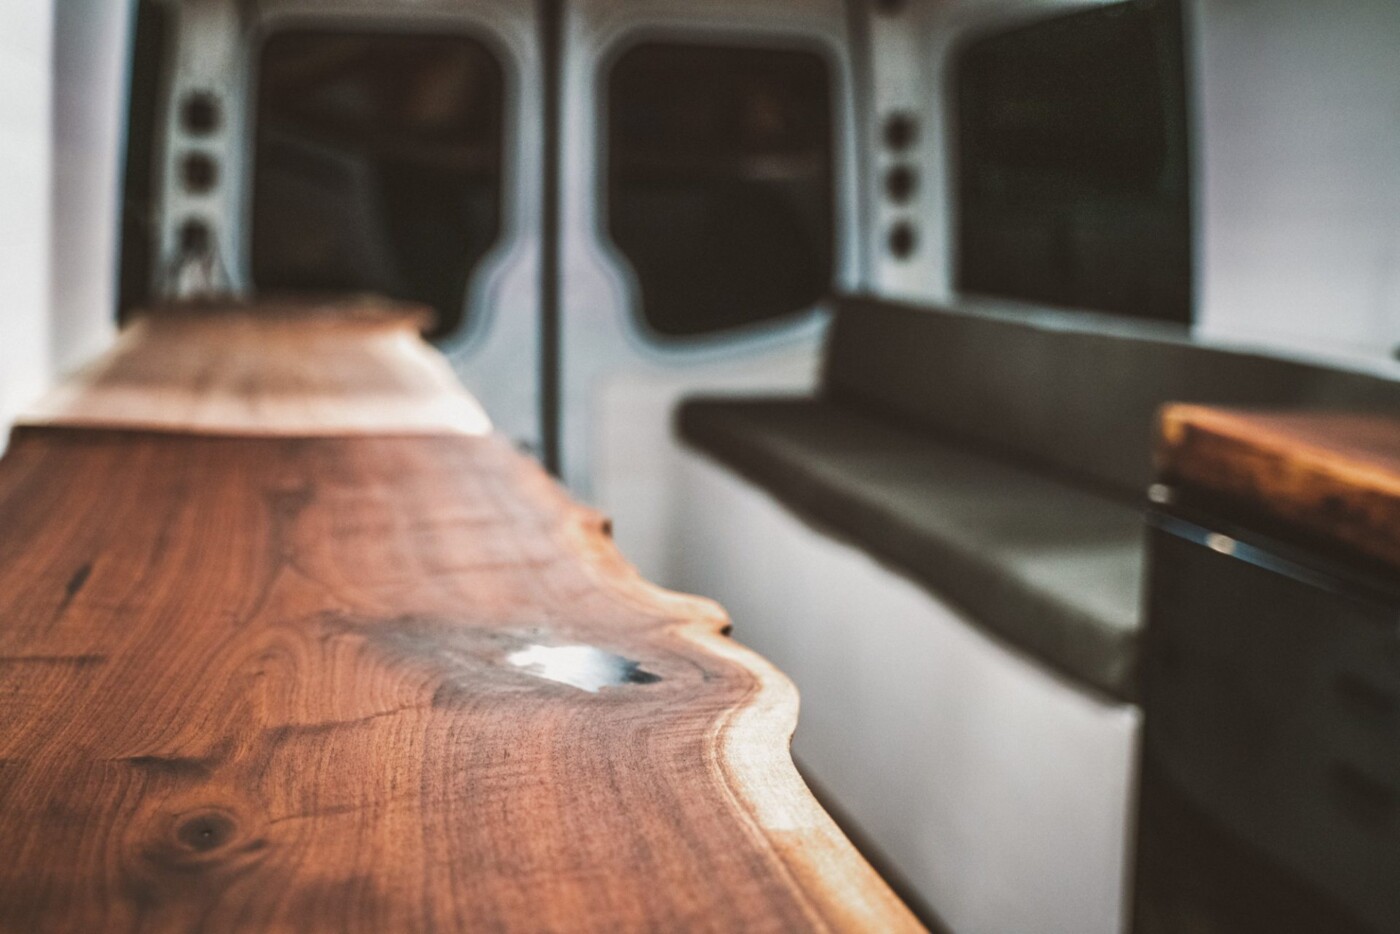
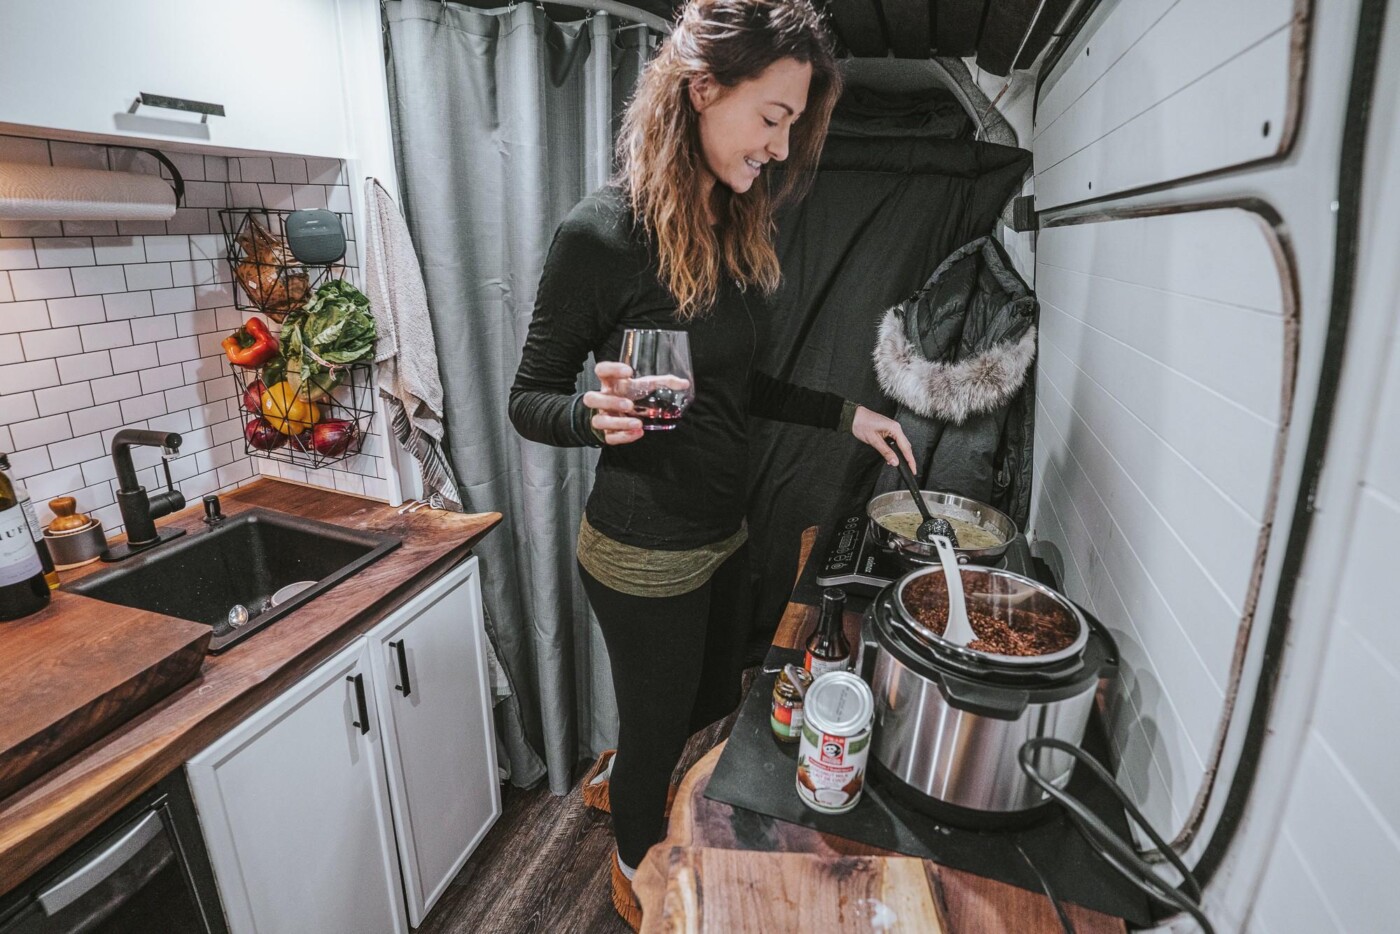
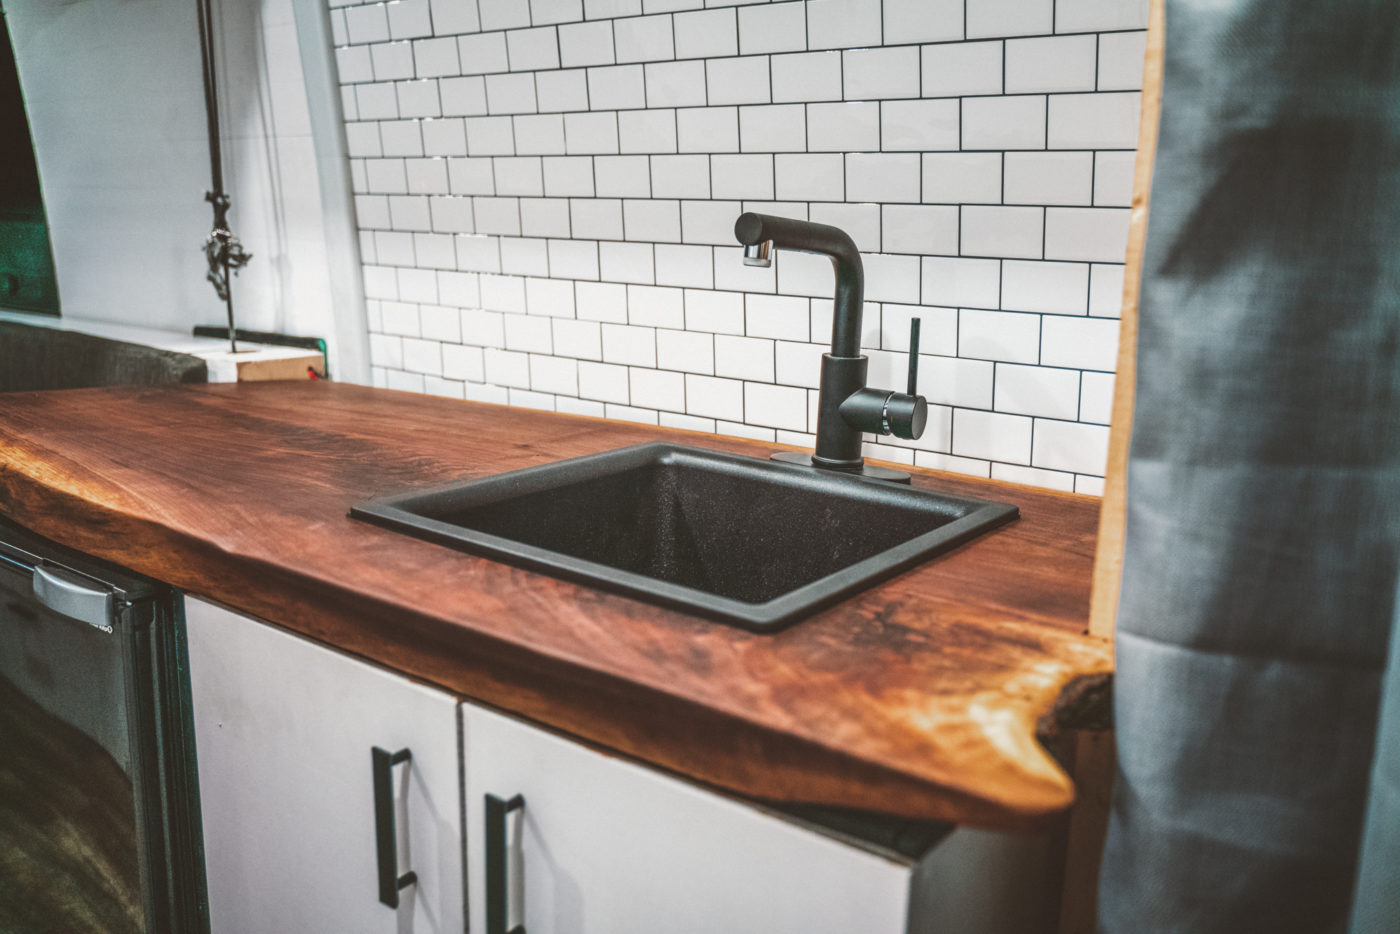
Countertops
Time Spent: 5 days
For our countertops, we used live edge black walnut wood that Max picked up at a local lumber yard. There were 3 slabs that we sanded down, cut and shaped into the right size and shape to fit our counters.
We then used clear epoxy resin to fill any gaps, cracks, and tiny holes in the wood. After letting the epoxy harden for 48 hours, we sanded it down and sealed the countertops with Rubio Monocoat Wood Stain Oil. This provided the countertops with excellent protection and waterproofing.
Couch
Time Spent: 2 days
A big couch was one of our camper van build must-haves. We opted for a spacious 80”x24” couch, which we built using the same 3/8” Baltic Birch plywood that we used for the cabinets.
The couch was built to go right overtop of the wheel well and consisted of 2 sections. Additionally, we built a 6”x13” backrest that added a little bit of extra storage space.
For cushions, we cut up a 4” Zinus Memory Foam Mattress (it was cheaper than buying regular foam) and grey outdoor upholstery fabric from a local store called, FabricLand. Oksana’s mom then helped us sew the fabric into a cushion cover, for both the bottom of the seat and for the backrest. We used velcro tape to keep the cushions from sliding off the couch.
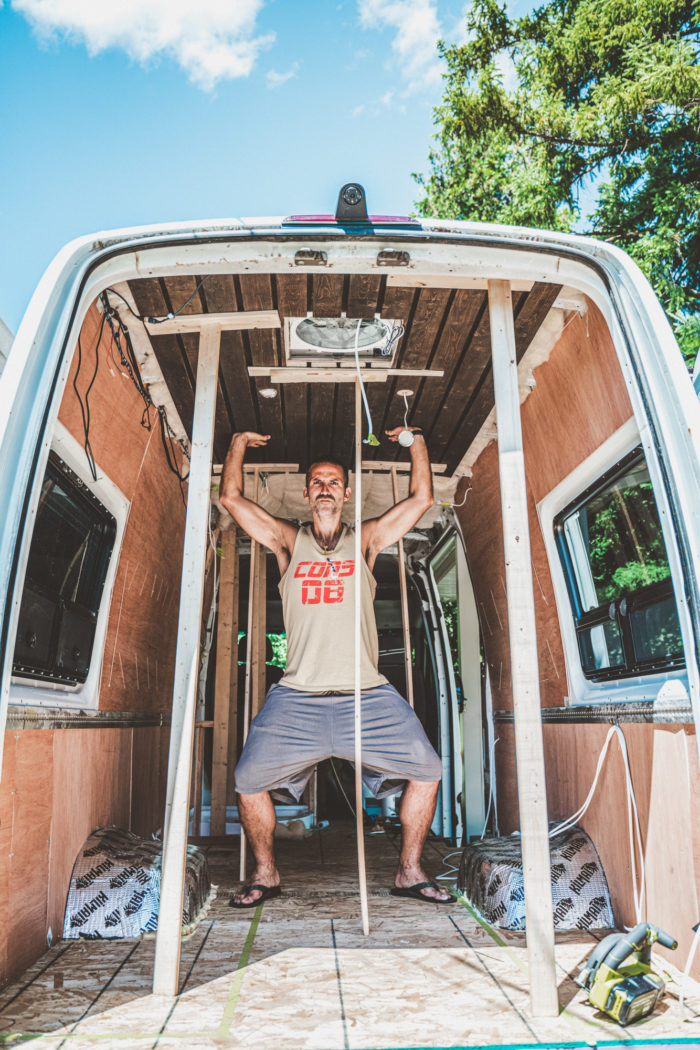
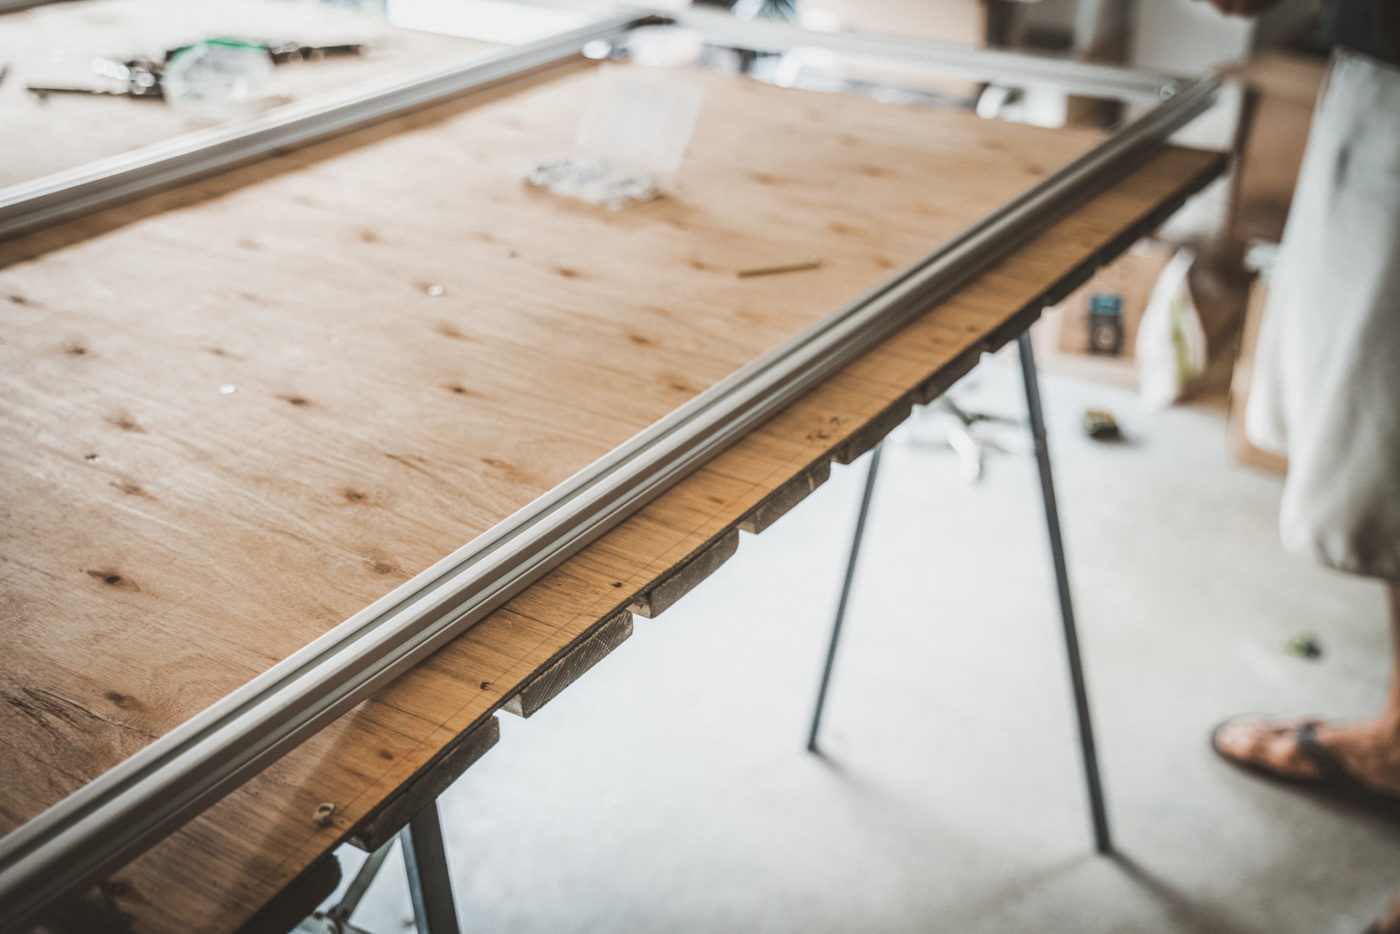
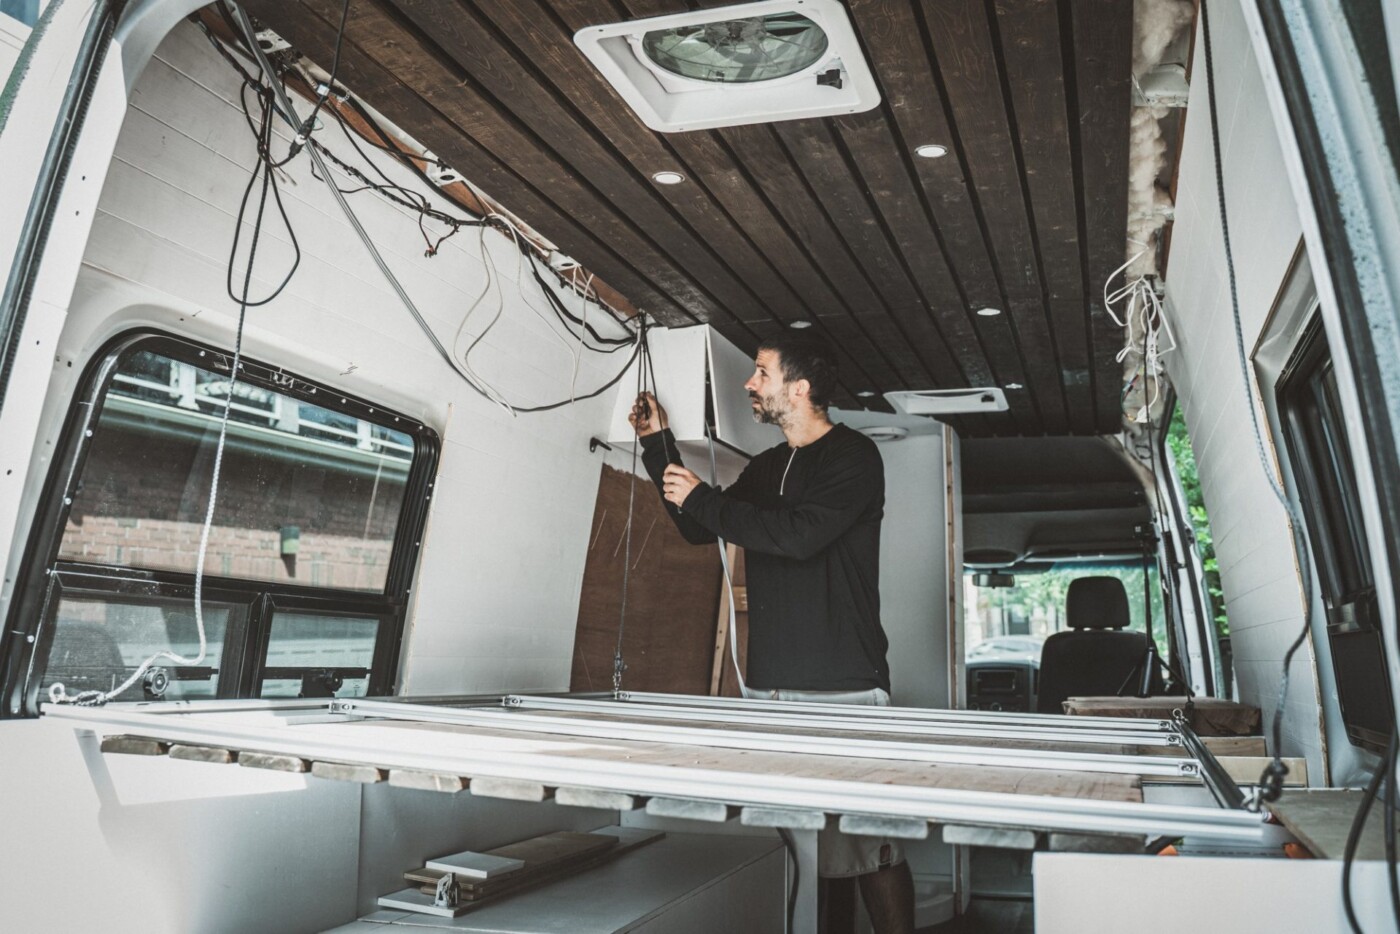
Elevator Bed
Time Spent: 5 days
Our elevator bed is probably the most unique item in our self converted Sprinter van. We loved the idea of not having to make our bed every night and every morning. So, Max worked hard to come up with a unique bed design that would allow us to do just that.
Our elevator bed is built using a piece of ⅜” lauan plywood and 1” Wood Planks stained with Wood Stain. The bottom of the bed is designed exactly like our ceiling. We attached the plywood and the wood planks to an 80/20 aluminum extrusion frame, put a piece of pegboard on top for good air circulation and laid our 4” Zinus Green Tea Memory Foam Mattress and 100% Natural Latex Mattress Topper on top.
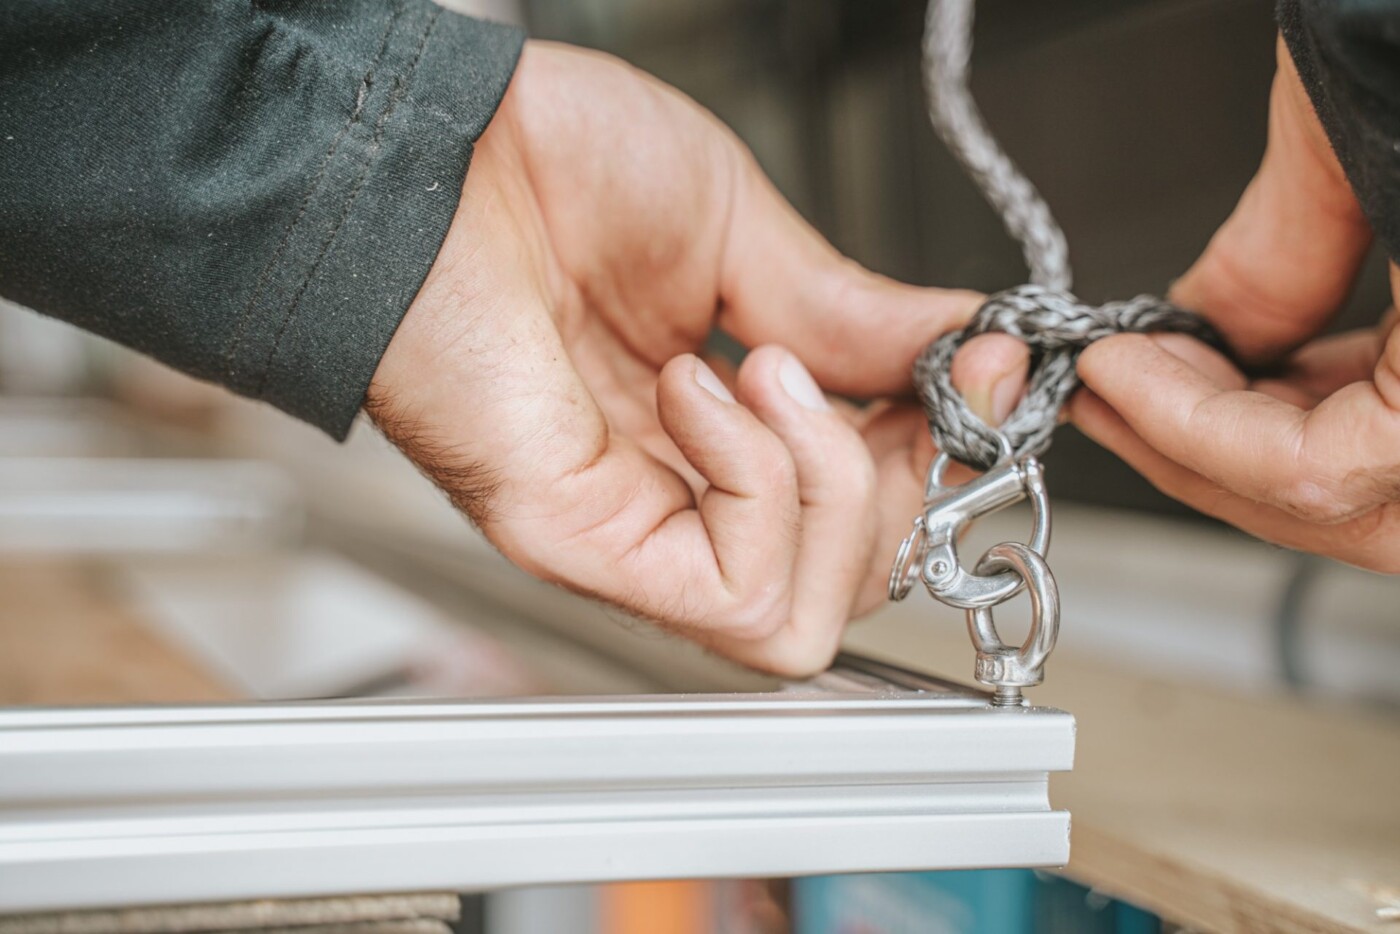
The bed is held up by an ATV winch with synthetic winch rope. The rope is threaded through marine-grade pulleys that are bolted to the ceiling of the van. During the day, the bed hangs just below the ceiling and is held in place by the ATV winch and 2 safety ropes with carabiners.
At night, we lower the bed and have it resting on our counter and the couch backrest.
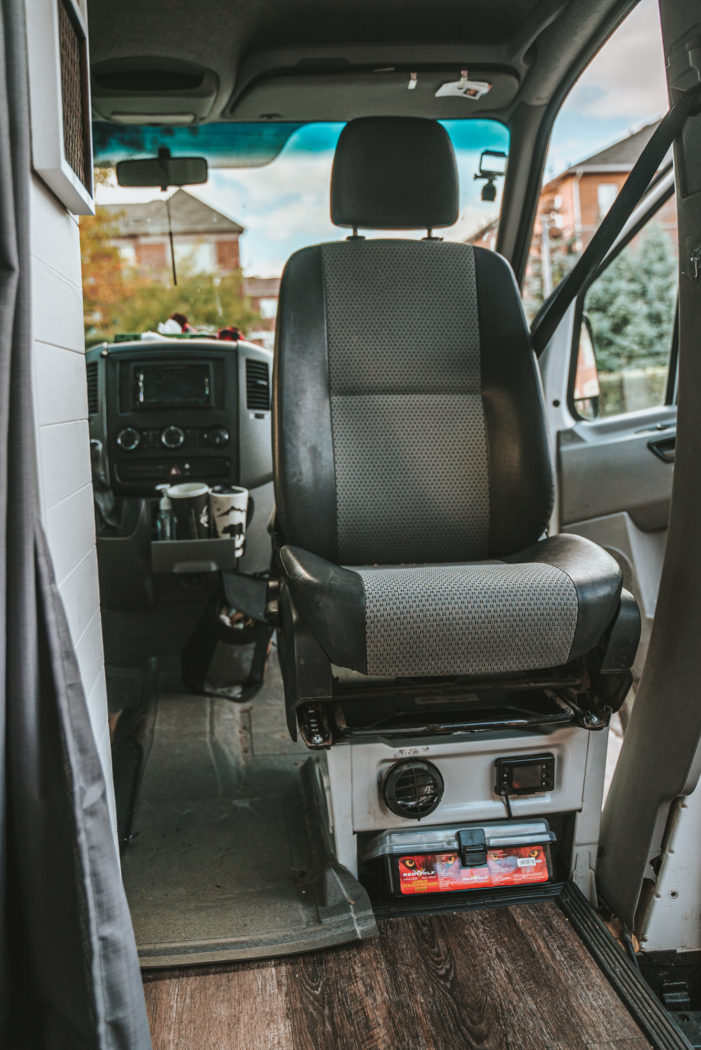
Swivel Seat
To get the most of our space and layout, we also installed a Scopema Swivel Seat on the passenger side. The Swivel Seat rotates the passenger seat and allows the seat to face the inside. of the van … aka our living space when the van is not in motion. Installing a Scopema Swivel Seat in our Sprinter was a GAME CHANGER, as it allowed us to create additional seating space inside the van when our elevator bed was down. We got a passenger-side Scopema swivel seat designed specifically for our 2008 Sprinter from The Swivel Shop. Getting the right swivel for our van made for super easy installation and ease of use.
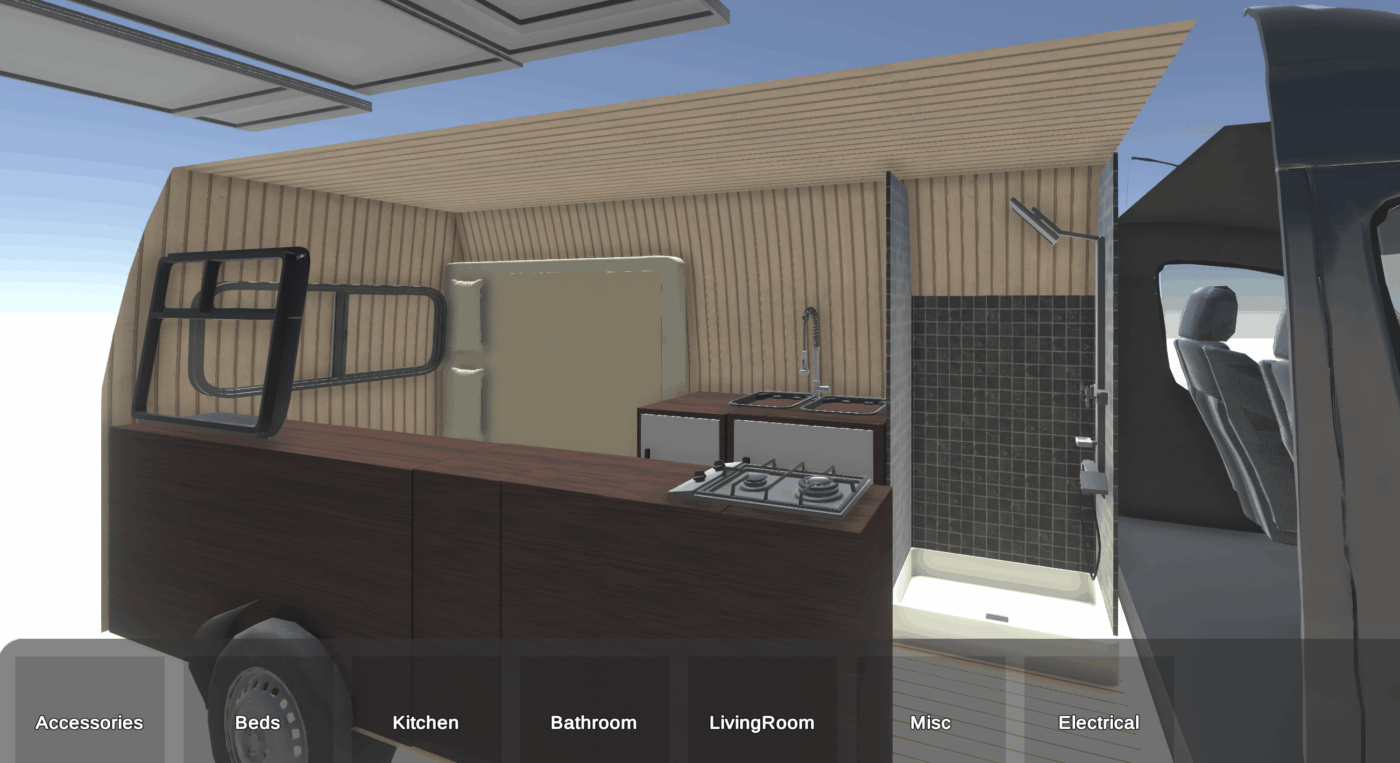
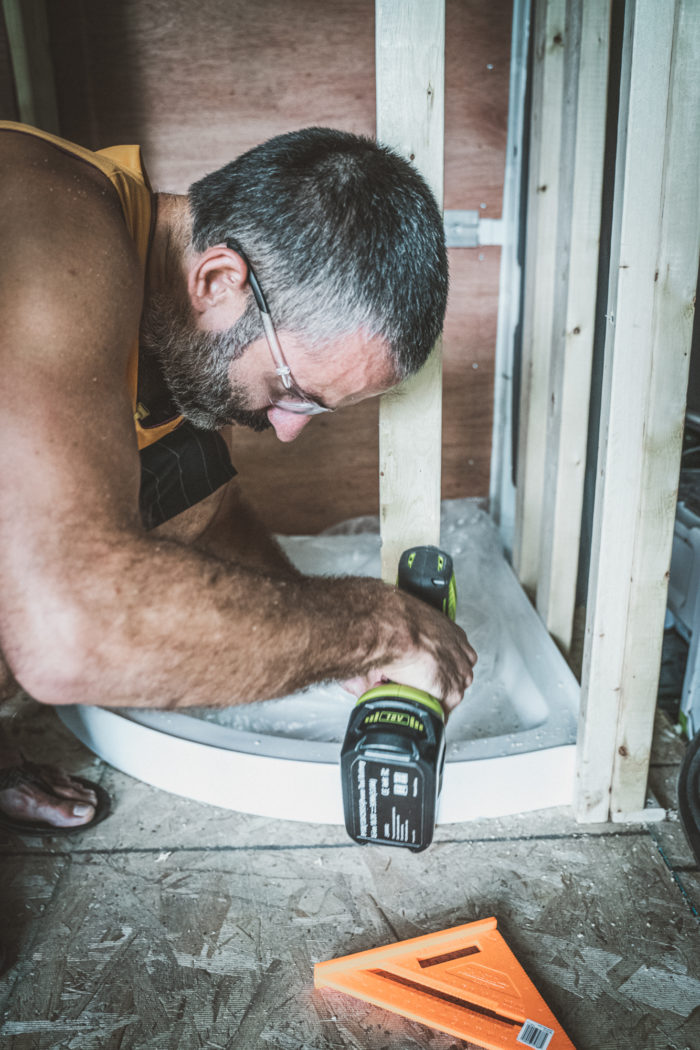
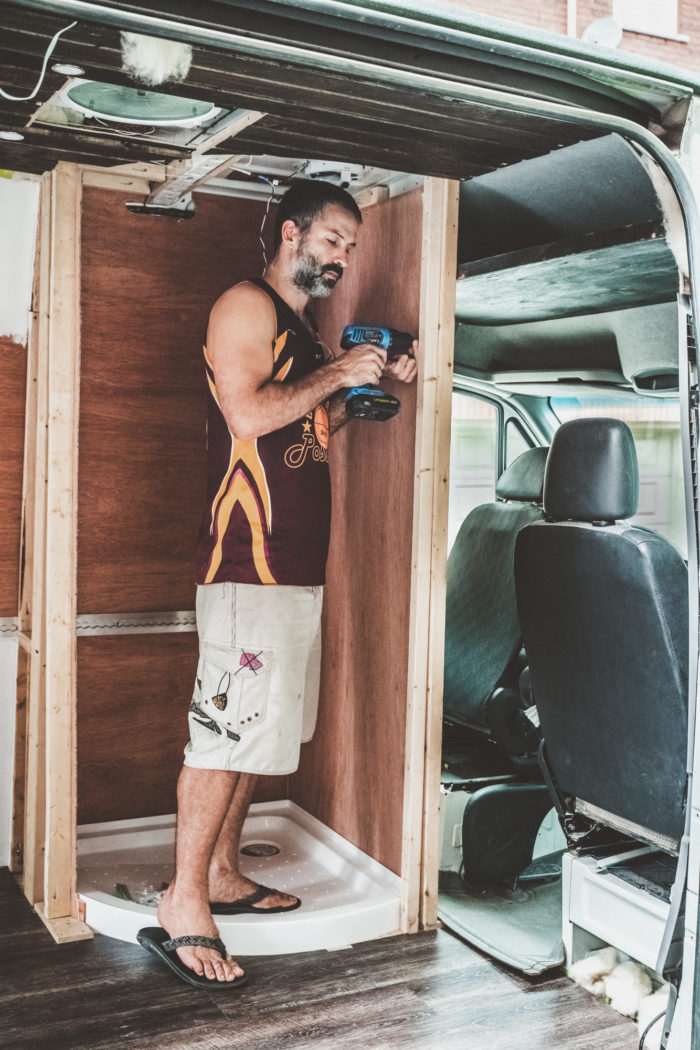
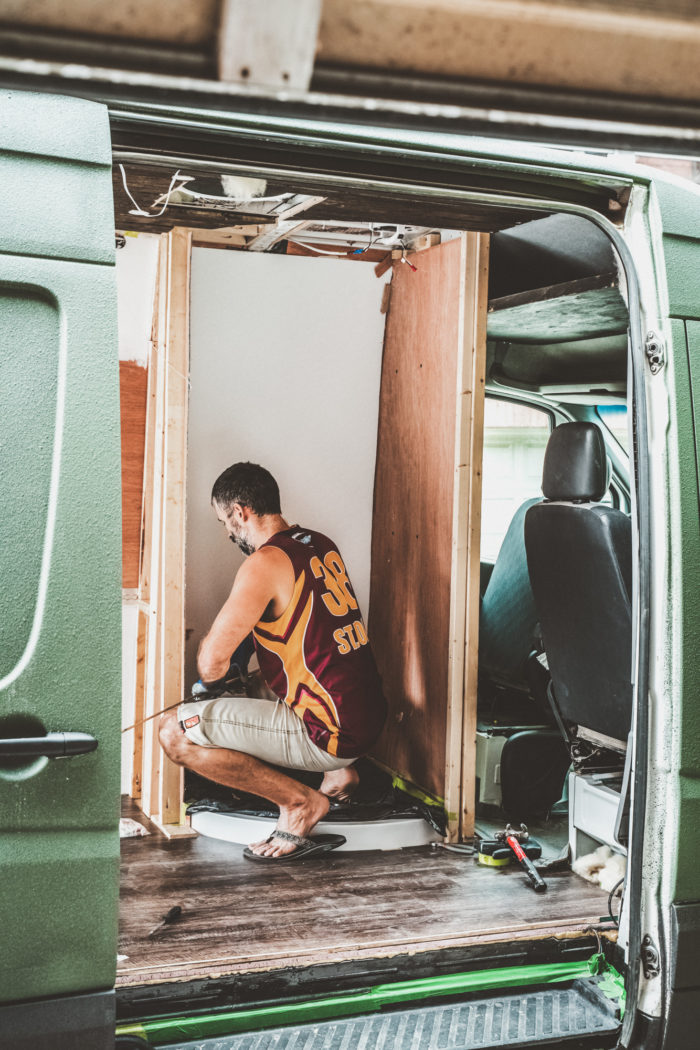
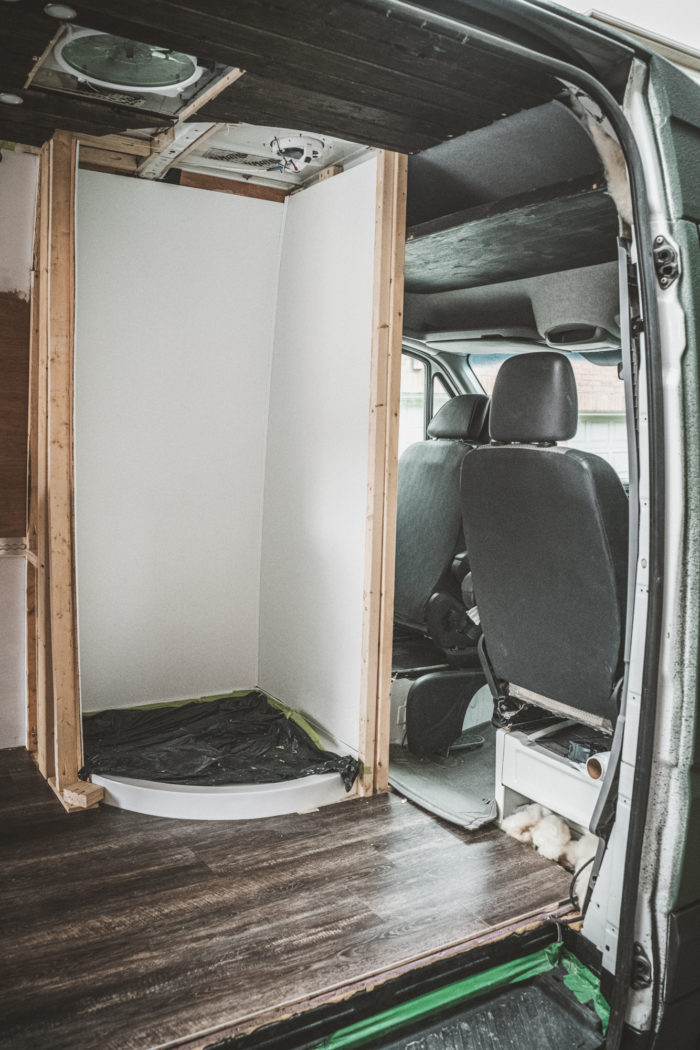
Shower/Bathroom
Time Spent: 3-4 days
We wanted to have all the comforts of home in our tiny home of wheels. So, installing a full bathroom and shower in our DIY camper van build was a must.
We opted for a unique 31”x31” round corner shower design to maximize the size of our shower and its layout inside the van. Additionally, we purchased the shower pan at a local bathroom shop and built the shower frame using 2 x4 framing wood. We then attached ⅜” lauan plywood to the framing wood and attached waterproof FRP Boards from Home Depot on all sides using Titebond FPR adhesive.
We covered the edges and corners with white PVC Moulding and sealed the cracks using waterproof Kitchen & Bath Silicone.
Instead of a shower door, we installed a flexible shower curtain track and hung a 2-layer waterproof shower curtain.

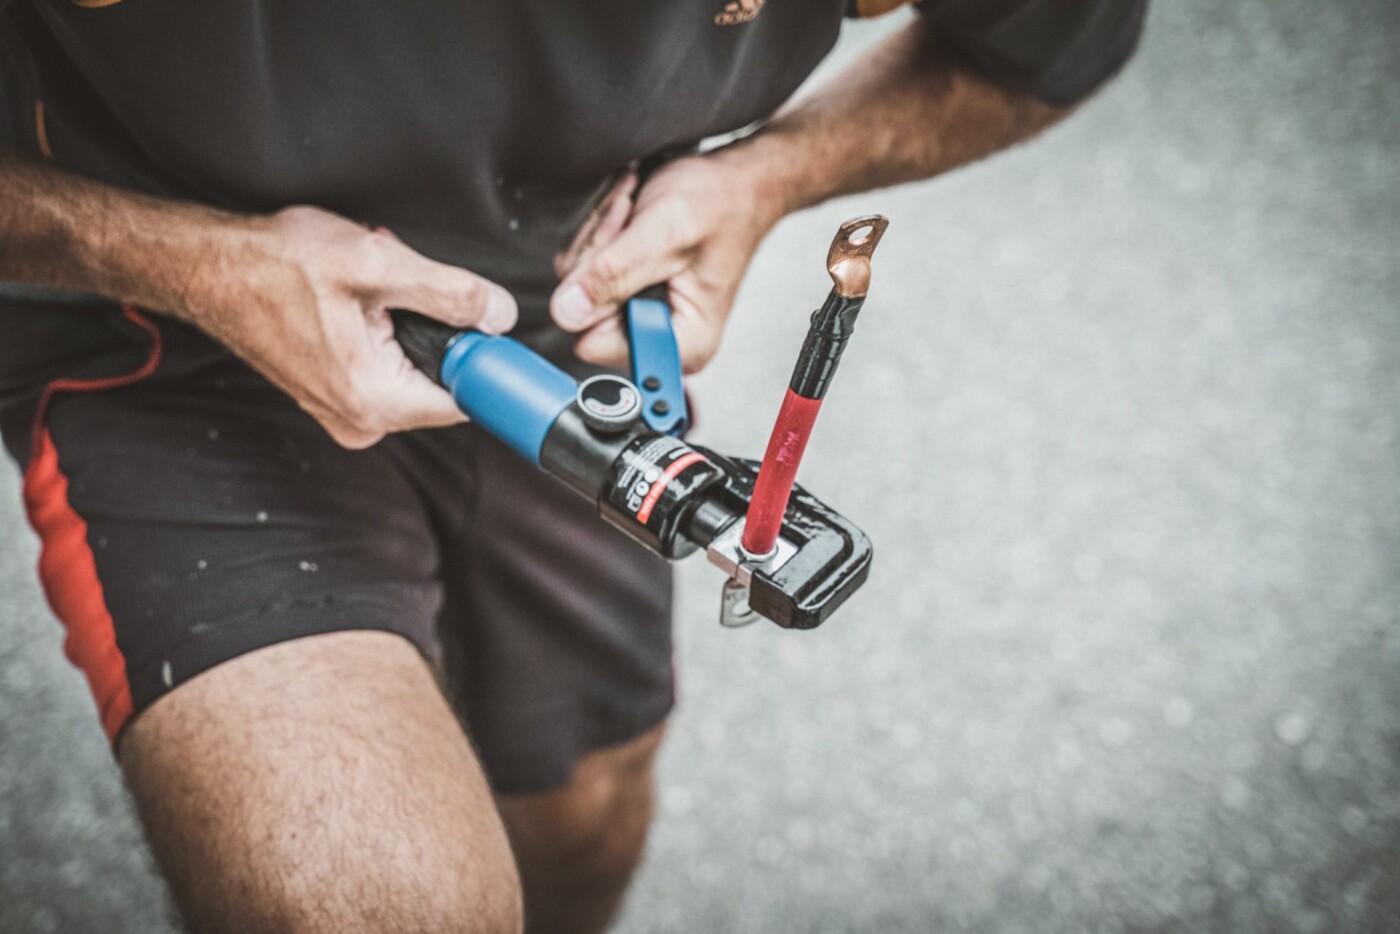
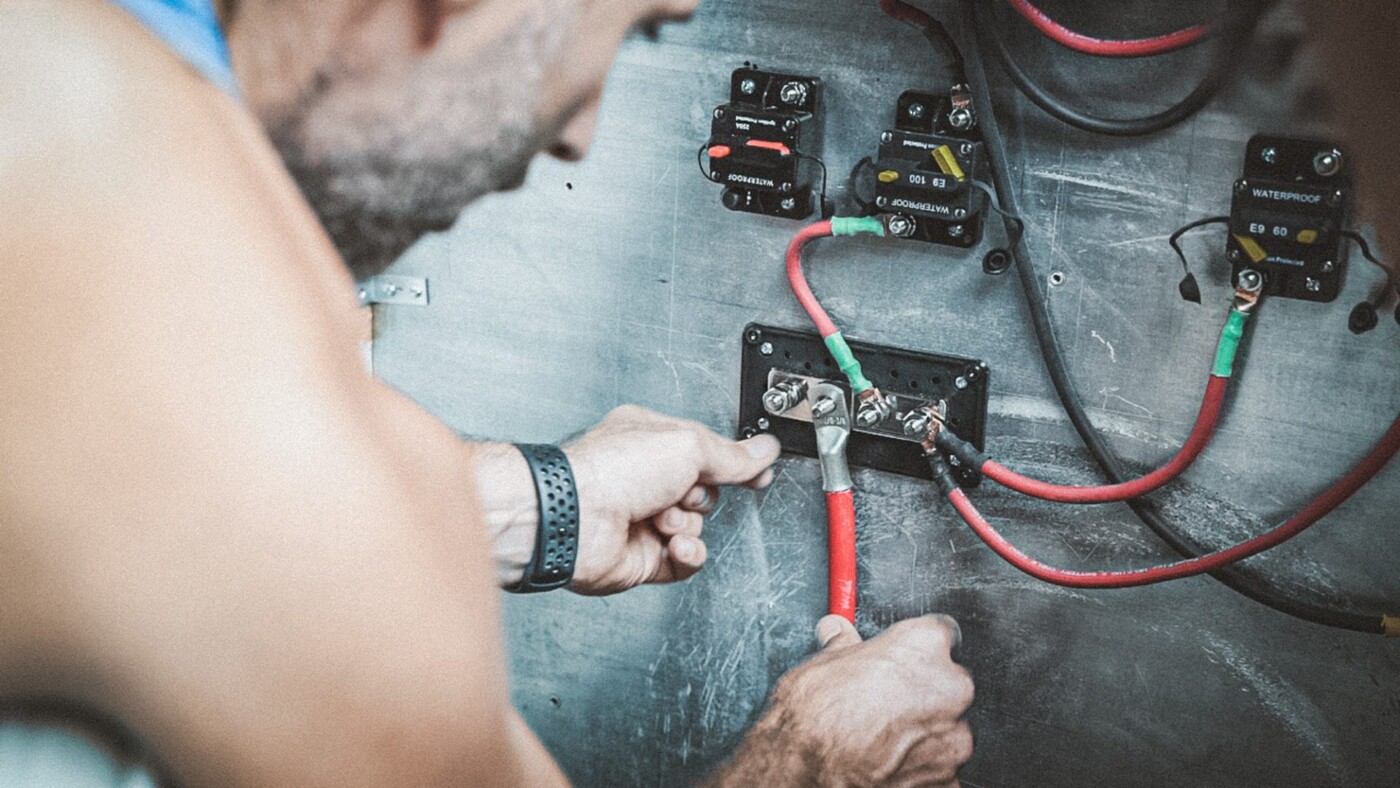
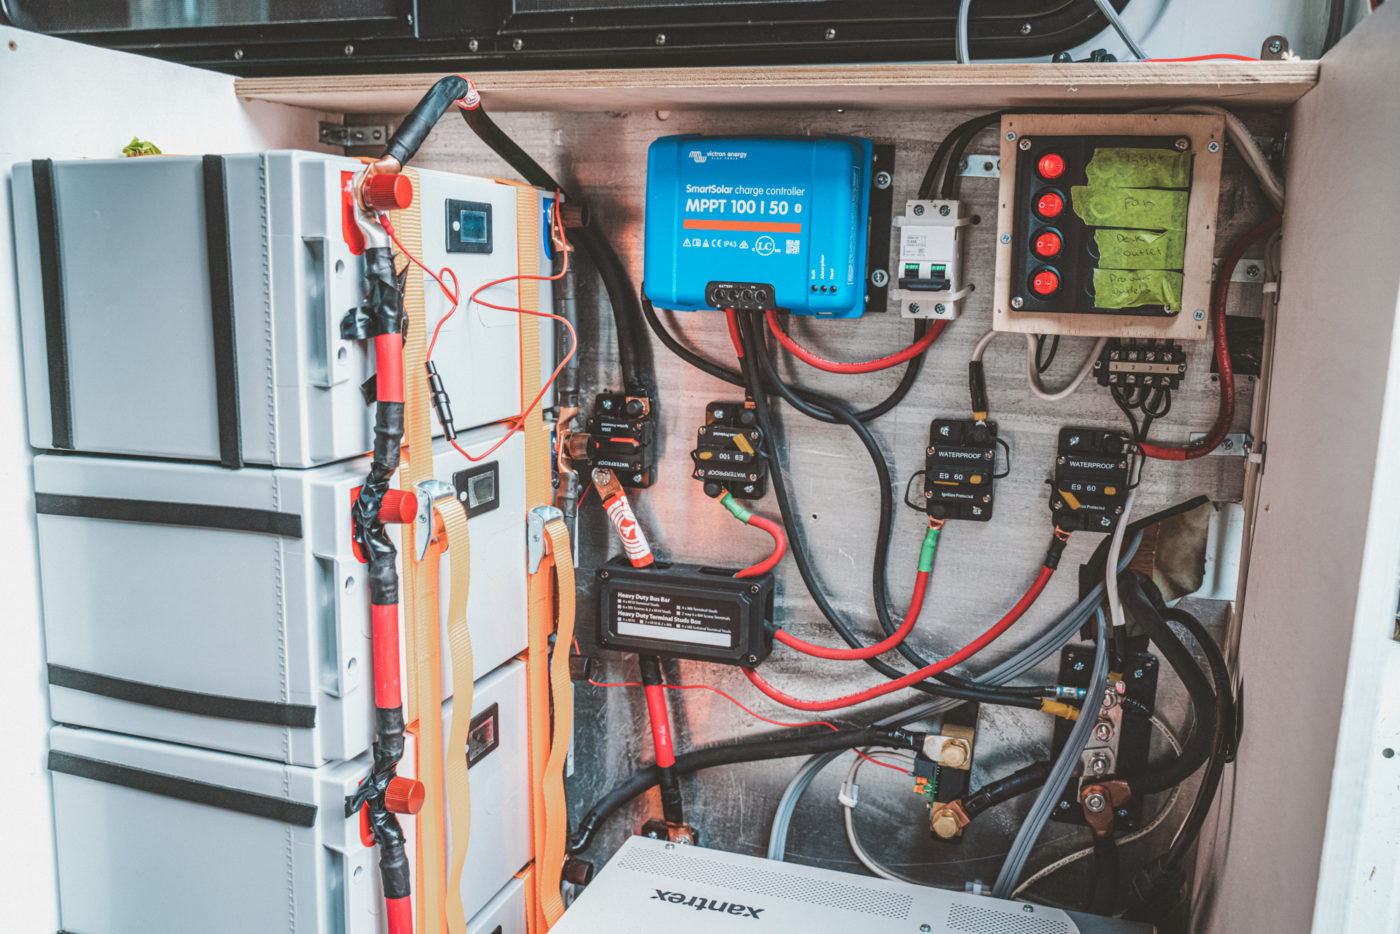
Electrical Set Up
Time Spent: 1 week
This was by far the most challenging part of converting a van to a campervan. We had no previous experience or knowledge of running electrical or had any understanding of how to set this up for our camper van build.
Power Audit
We started by doing a power audit, using this resource from Nate at Explorist. We talked through all of the appliances we will want to run in the van and discussed our overall needs for the system. Since we decided early on that we did not want to use any propane in our van, we knew that our power needs were going to be higher than the more common Sprinter Van conversion plans.
Through the audit, we identified that we would need a 400 Amp Hour – 600 Watt Camper Van Solar Kit to satisfy all of our power needs in the van.
We then used information in this post and to create our own electrical diagram. Once the diagram is complete, we booked a Wiring Diagram Review call with Nate to make sure that our set up was correct. Since we are far from experts, we felt that it was important to get an expert to check out work.
Our Electrical Diagram
Below you’ll find our final electrical diagram, which we then followed to install all the elements of the electrical system in our DIY van camper.
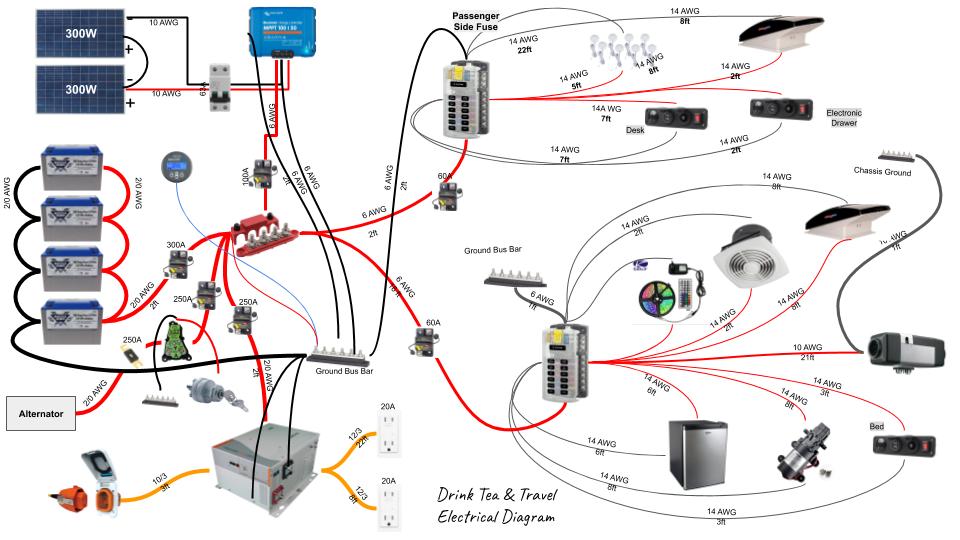
Our set up includes the following:
- 2 x 300W solar panels
- The solar panels are positioned sideways on our roof and attached to the roof slide using aluminum corner brackets, bolts and washers.
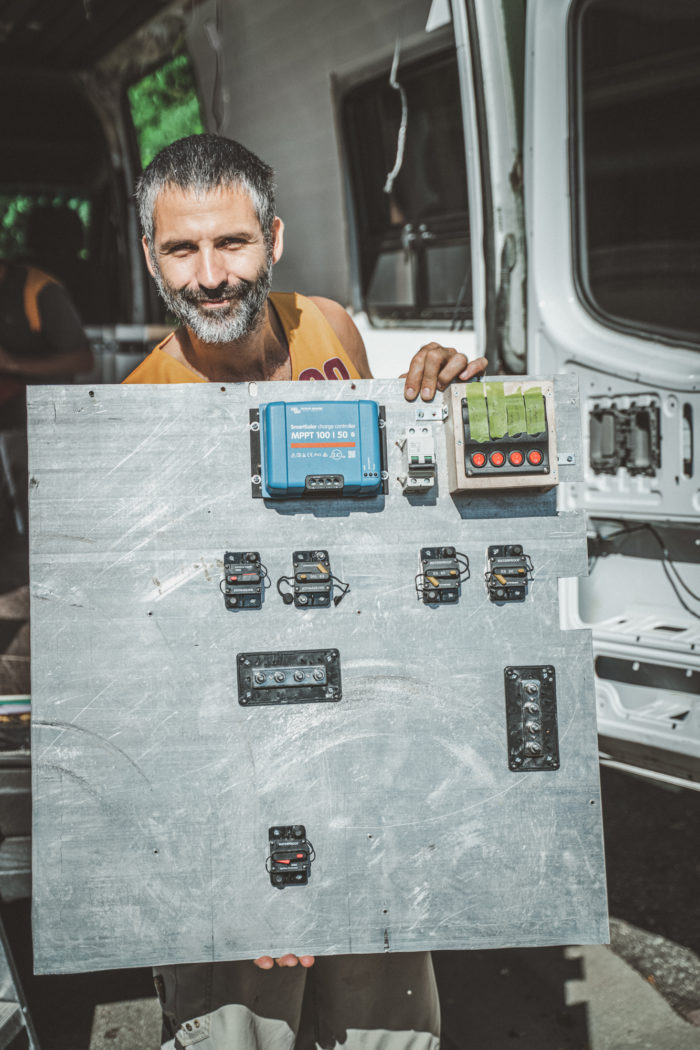
- MPPT 100/50 Solar Charge Controller by Victron
- This charger gathers energy from our solar panels and stores it in our batteries. It is said to maximize the energy-harvest and achieve full charge in the shortest possible time. It works great. So, we won’t dive into any more detail on that.
- 4 x Lithium LiFePO4 Battery 100Ah 12V
- These are Deep Cycle Lithium Iron Phosphate batteries that store all of our power, regardless of whether it’s generated through solar, through an alternator charger, or an outside 15amp plug.
- Xantrex Freedom XC 2000 Inverter Charger
- This inverter/charger allows us to charge our batteries from our alternator, using the Lithium Battery Isolation Manager, as well as to charge from an outside power source, including a typical household plug found at all campgrounds.
- This inverter allows us to run a number of appliances (up to 1800W) at the same, including our InstaPot, induction Cooktop, Toaster Oven, De’Longhi Nespresso Machine or Bosch Electric Water Heater
- 2000W 12V Pure Sine Wave Battery Converter
- Yes, you read that right. We have 2 inverters in our van. This was not intentional, but unfortunately something we had to do. Our Xantrex inverter/charger was damaged during the build and does not function as intended. It still inverts and allows us to use 110W appliances when we are plugged into an outlet. It also charges our batteries, but it does not allow us to use appliances while running off of batteries.
- 2 x Fuse Panels
-
- Since we have a lot of electronics and appliances, we split our wiring into 2 main fuse centres. One is located at the back of the van and another one, in our control centre above the sink. This allowed us to simplify our wiring and allow for a cleaner and easier setup.
-
Having now lived in our DIY Sprinter Conversion Van for a few months, we can confidently say that our electrical setup is fantastic. On average, we use about 20% of our batteries power daily. It effectively allows us to be stationary and off-grid for 5 days in a row. But since we are always on the move (and thus charging our batteries), or are usually parked up at campgrounds with power hookups, we have never run out of power or had our battery banks decline to below 40%.

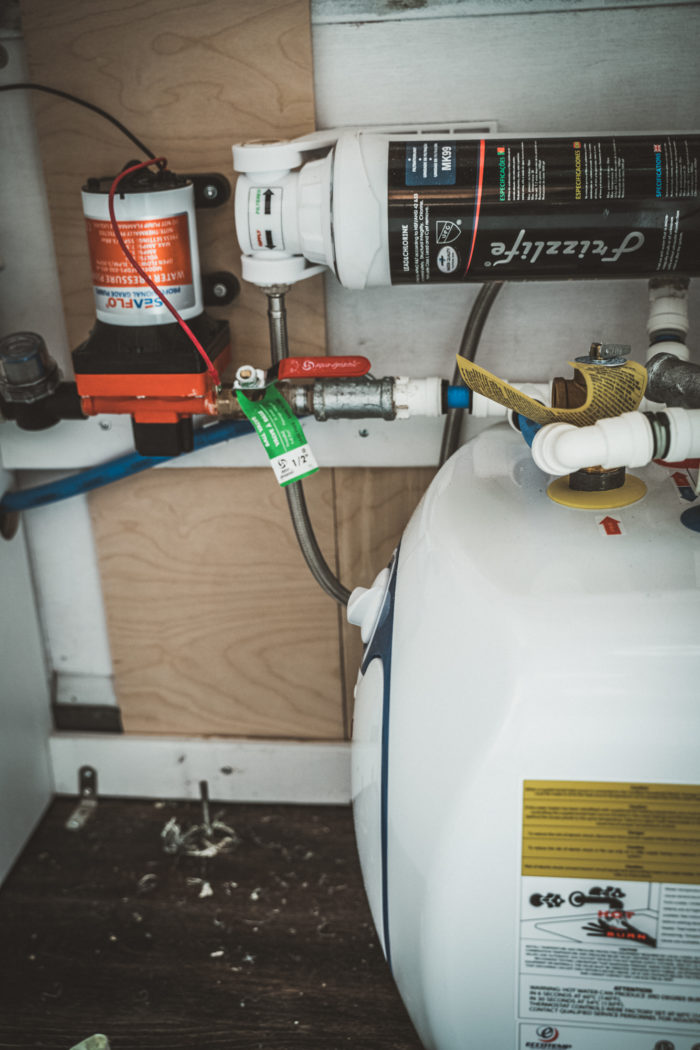
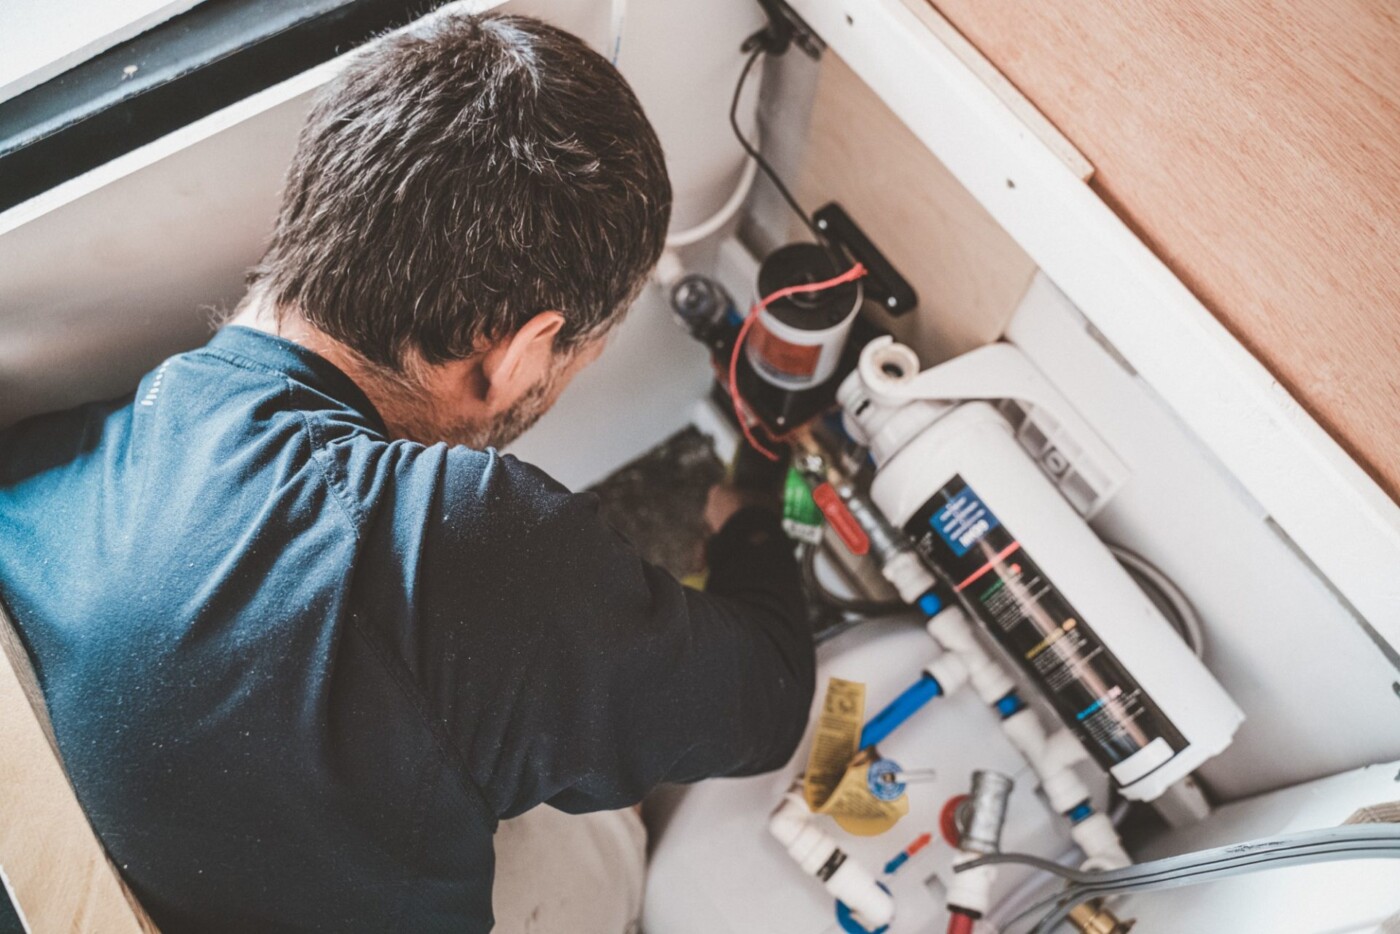
Plumbing
Time Spent: 3-4 days
Our plumbing system is pretty straight forward for our camper van build. Although, the installation included a lot of tinkering to fit everything in such a small space while avoiding any leaks.
We have:
- Fresh Water Tank (25 gallon), stored under our couch
- Grey Water Tank (25 gallon), attached under the chassis of our van. We have installed a heater pad on the tank to protect the grey water from freezing in below zero temperatures.
- SAILFLO 12 Volt Water Pump, mounted under our sink
- Under Sink Water Filter System, that purifies all the water coming out of our tap
- Bosch Electric Water Heater, that heats up water for our shower and tap
We ran PEX tubes from our fresh water tank to our pump, and onwards to our water heater and tap/shower. Also, used quick connects and valves for all connections.
We built our shower right next to the sink, to simplify the hot and cold water plumbing systems.
Aside from a few leaks during the installation process, and our minor grey water tank freezing incident in the Rockies (when the overnight temp went down to -15°C), we have not encountered any issues with our plumbing. We have found that our water heater uses quite a bit of power (20% of our battery reserve). So, we do not use it daily. Only when we want to take a shower or have a big load of dishes to clean up.
Lighting
Time Spent: 1 day
When converting a van to a camper, we decided on a 2 piece lighting solution. We have installed overhead 12V Dimmable LED Puck Lights on the ceiling of our van and under our bed (which acts as a ceiling during the day). The lights are controlled with a remote. We have one mounted at the entrance in the front. Then, another one at the back of the van for easy access at night.
In addition to the puck lights, we also ran an LED Light Strip around the perimeter of the van. Also, under the overhead cabinets. The strip light gives us additional light over the sink/kitchen area. It gives us more lighting when we are working but also serves as great mood lighting for evening hangouts. It’s programmable via an app to turn on and off at certain times of the day. Additionally, it can also be controlled via a remote, which we keep near our control panel.
Heating
Time Spent: 1 day
Thanks to all the insulation, our camper van build stays warm and cozy in temps down to +10°C. We installed a Diesel Air Heater to keep us warm on days when the temp dips below that. The heater taps into our existing van diesel tank and is installed under the passenger seat in our van.
You can control the heater via a control panel located beside the heater or via a remote. It can be programmed to turn on and off at specific times and is super easy to operate.
With the heater on, we can warm up our van to any temperature we want. We’ve occasionally accidentally let it go above 25°C and made a sauna out of our van. In winter weather, we’ve been keeping the heater on all day but most of the time. Then, turn it off at night.
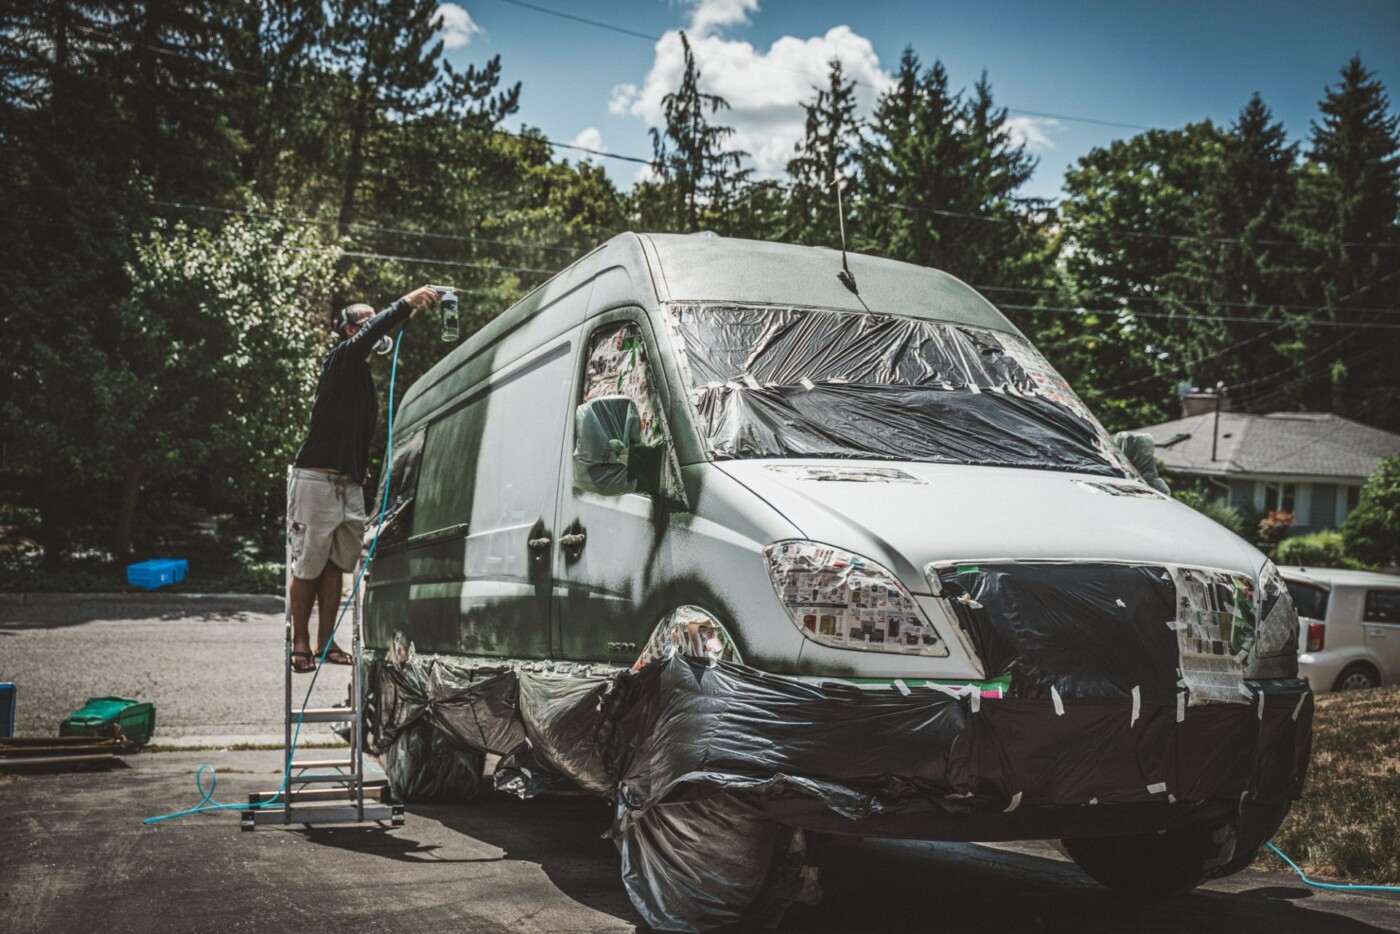
Paint Job
Time Spent: 4-5 days
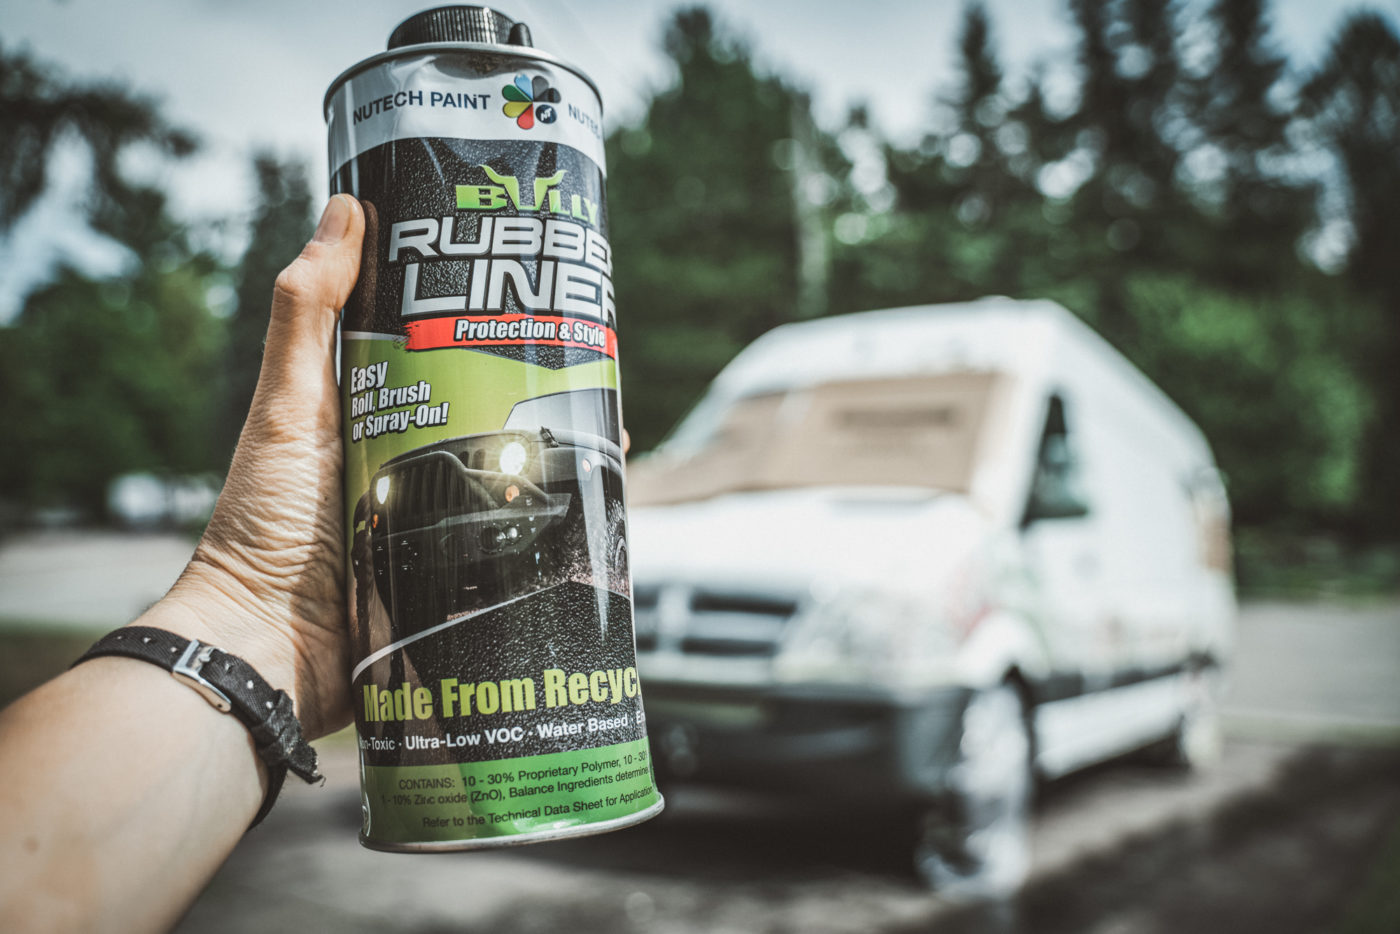
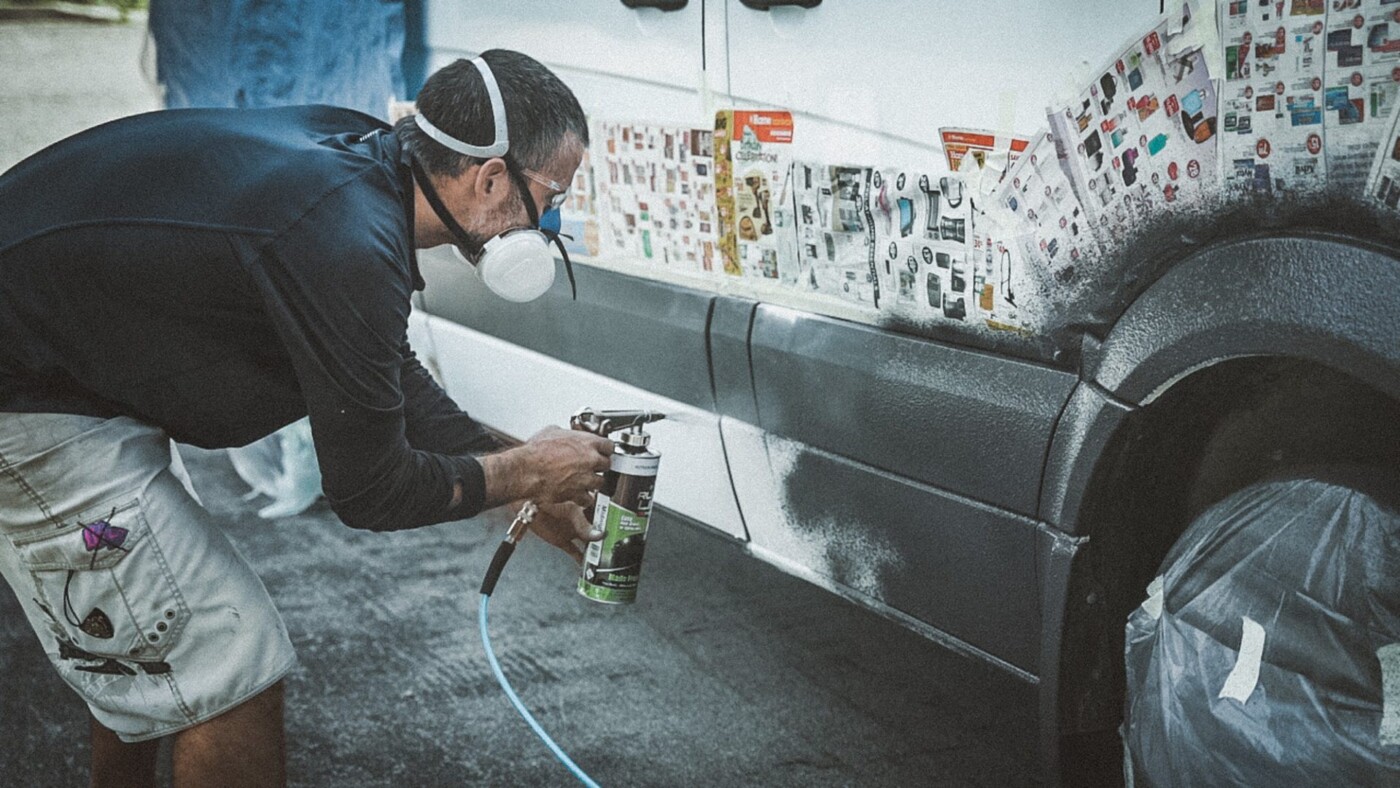
One of the first things people ask about our diy campervan conversion is our beautiful paint job. Since we purchased a slightly older model (2008), our van had quite a bit of surface rust. That made it look a bit old and unappealing. So, in order to spruce him up and protect him from further potential rust, we choose to paint the van with green and black Bully Liner Paint (link to similar product). We painted the top of the van green, and the bottom – black. Bully Liner brand, in particular, offers paint made out of recycled tires, making it a low VOC, environmentally friendly option.
The paint job offered lots of benefits:
- abrasion and stain resistance
- protection against rust, corrosion, salt, and damp & extreme temperatures
- waterproofness and additional sound deadening
We applied the paint with a spray gun, using a 90PSI Air compressor that we borrowed from a neighbour.

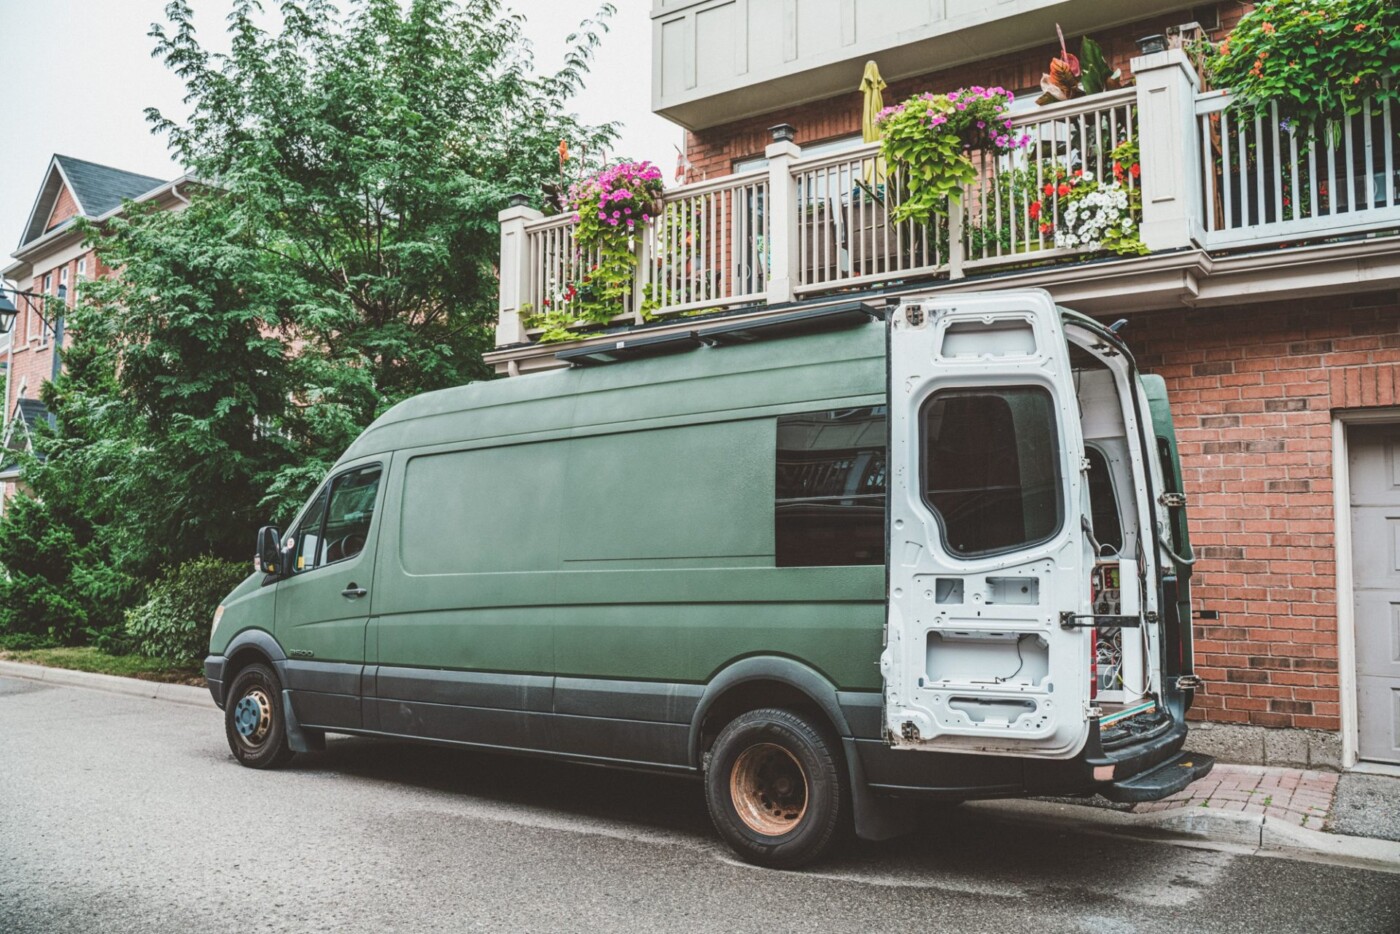
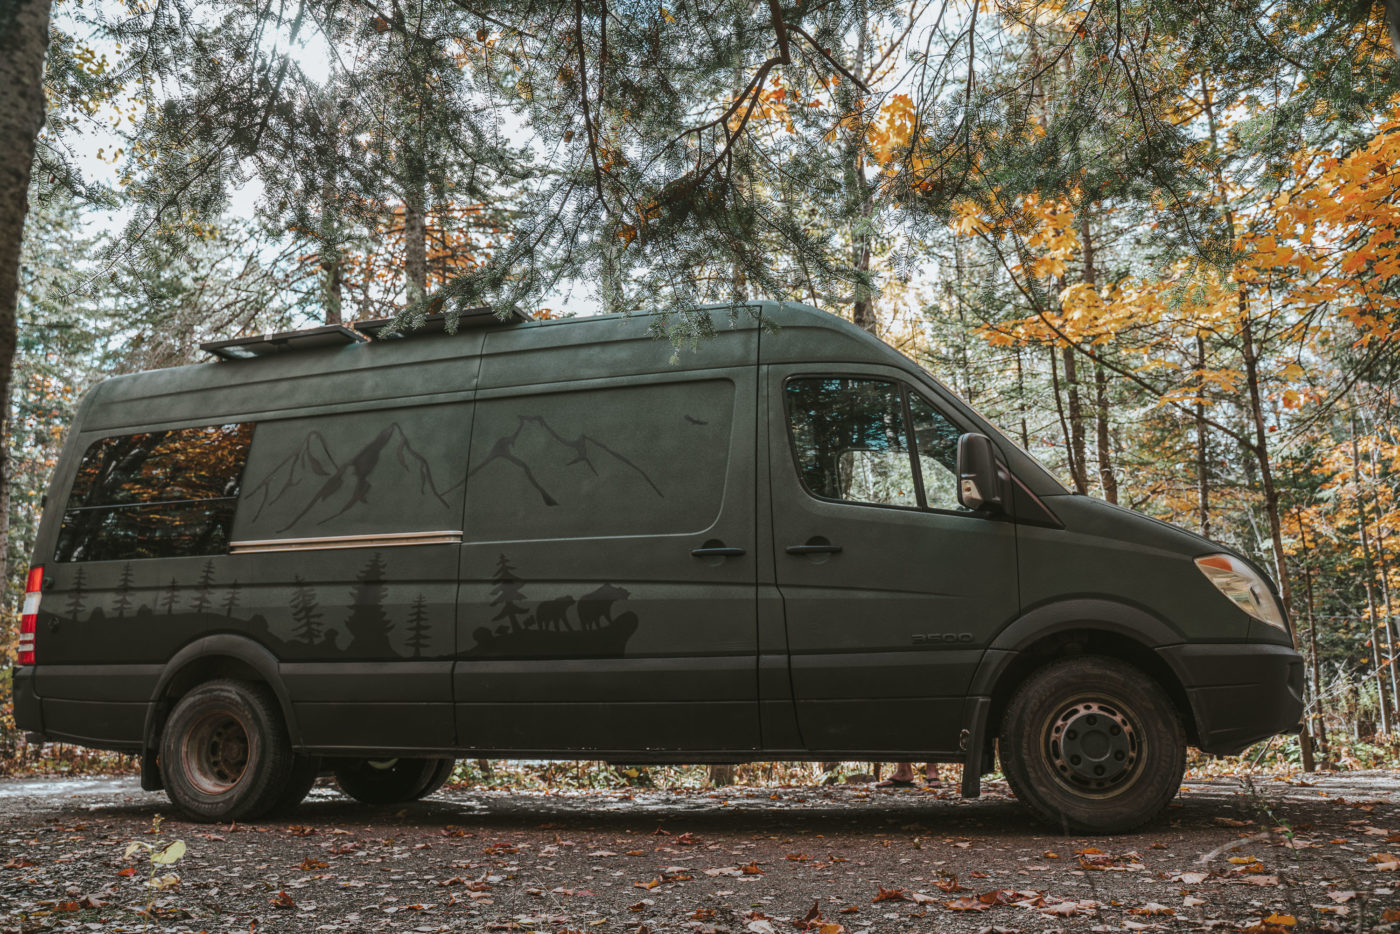
The Mural Design
And because painting the van green wasn’t enough, we took it to another level. Oksana’s brother, a talented artist, created a very cool mural of mountains, forest and wildlife. We applied these on the van using black bed liner paint.
READ NEXT: 10 Beautiful Sprinter Van Conversions To Inspire Your Build
Finishing Touches
The finishing touches we added in the last few weeks of our camper van build. These helped us take it to the next level and make it feel like home. These include:
- Tiles – instead of tiling our kitchen with real tiles, we use this great White Subway Tiles Peel as a backsplash behind our sink counter.
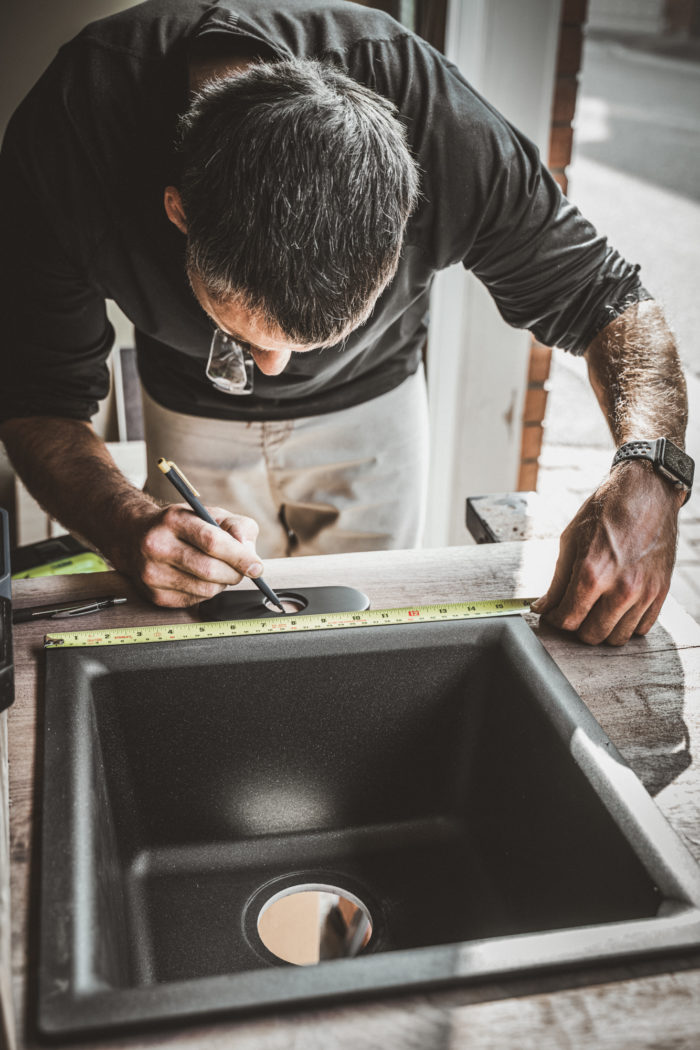
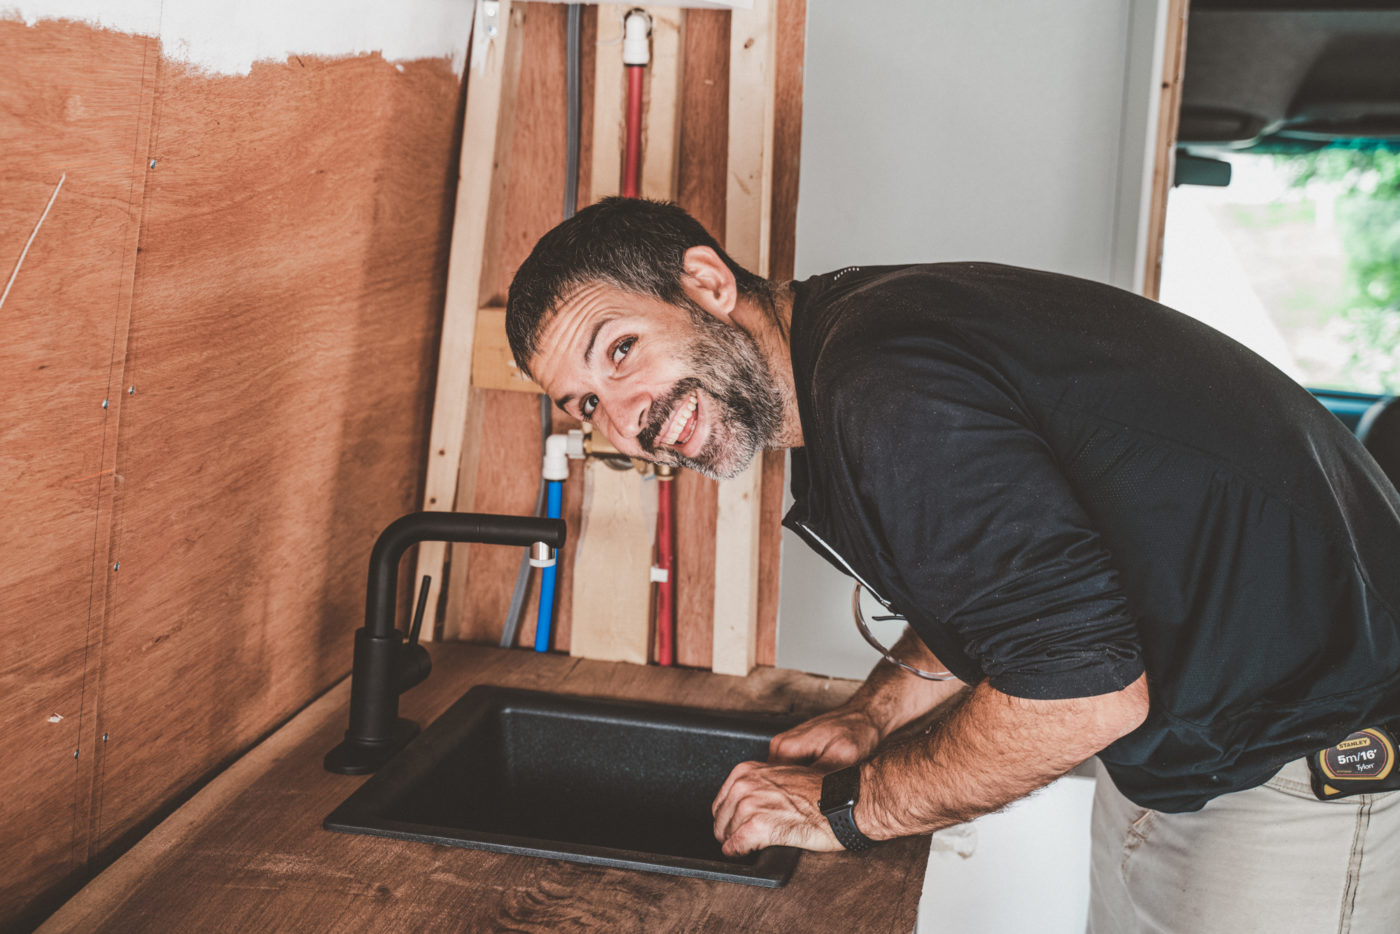
- Sink/Faucet – we installed a Black quartz sink and a pull-out sink faucet in our kitchen to give our kitchen a modern look.
- Spice Rack – we added a metal sheet under the overhead cabinets and attached 12 magnet spice containers to the sheet. The magnets on these weren’t very strong, so we added an extra rare earth magnet to each container to keep it in place even during bumpy rides.
- Tea Shelf – we added these floating storage shelves to the kitchen wall and used them to store our tea collection. We bought the tins at IKEA.
- Plants – we installed these beautiful indoor planters with fresh herbs inside, adding a bit of life and greenery into the van.
- Baskets & Other Storage – we also bought a number of baskets to keep our van organized. We purchased most of them from IKEA. We use them to store our toiletries/Oksana’s make up, as well as some electronics, some food, towels, etc. In addition, we have this 3 Drawer Mini Desktop Unit under our sink that we use as our medicine cabinet, junk drawer and toiletries storage.
- Jars & Other Containers – most of the dry food and pantry items in our van are kept in our pull out pantry and storage cabinets and are organized using glass jars and bottles. As we aim to live a low waste lifestyle, we prefer to shop at bulk grocers like Bulk Barn. It allow us to bring our own containers and reduce our use of plastic bags. Unfortunately, this has been harder to do during the pandemic. However, storing dry goods in jars is still much better than keeping them in disorganized plastic/paper bags. I used a label maker to label all the jars. It makes it easy to keep things organized inside the van.
- Hooks – surprisingly, we only have a couple of hooks in the van. A few for our big winter jackets in the front cab, a few for our kitchen and face towels. And, another big one inside our shower for our big towels.
- Mirror – we have a small mirror at the entrance into the van. It’s not full size, but it’s enough.
- Bedding – we have a bamboo bedding set which we absolutely love, a warm down duvet that we picked up on Kijiji, and 4 down pillows. Also, we have this cozy Herringbone Blanket in grey that we use for lounging on our bed.
- Additionally, we have a set of small down pillows on our couch. We picked it up at Value Village and a beautiful sustainably woven 100% cotton throw from our friends at Harlow Henry
Check out the photo gallery to get the feel for the final product of our own camper van build!
What do you think of our DIY campervan conversion? If you have any questions about our van build, leave them in the comments section below!

You mention the floor is only R-7. Yet you have inches of insulation. Did you consider using Polyisocyurante insulation? R7.5 per INCH. And/or a spray foam with a similar R-Value (I do remember the walls and the spray foam debate.
Green is nice, but sometimes a burden.
We only have 1″ of the insulation itself on the floor, 1/2″ between the ridges, and then a whole large half-sheet on top. There would be areas that maybe have 1/4 inch more, but because these would create thermal bridges, we assume it’s the lowest possible which is 1″ XPS which would be R5-R5, and then we have the 3/8 plywood and EVP which we assumed would add another R1 or so.
We read up on Polysio but the new consensus with the industry and builders is that it doesn’t hold up in the winter. When the temperature starts to get below 15c it actually worsens its thermal value, and by the time it goes down to -10 to -20c it’s nowhere close to its reported R-value. Considering we are in Canada, and already experienced a -18c night in November, we thought it wouldn’t be good to install it. Heres a quote from Eco Home “Polyiso Foam Panel Insulation Conclusion: In real terms, using polyiso foam insulation panels is probably a poor choice if your winter temperatures dip below 50°F or 10°C. To put that statement into perspective, a wall or roof assembly in Chicago was tested for the whole of December then averaged out. The first assembly using 2″ Polyisocyanurate foam panels was compared to the same assembly using 2″ of EPS foam and was found to be losing 30% more heat in this study”
This is the best layout I have ever seen! I love it
Thank you for sharing your secrets and your hard work! Congratulations
Very nice conversion. Did you stay on budget of $25K? or what was the final tally?
I’m in the GTA would love to see it! The electrical & plumbing scares me as I’m a novice however the solar I’ve dabbled with. Supplier links for all the electrical, solar and batteries would be helpful.
I will like to know I did you do your elevator bed winch ….
Thanks Lucie
J’ai un promaster 1500 136 wb et j’aimerais installer un lit qui monte jusq’au plafond durant le jour et qu’on peux le descendre le soir.
Ta méthode semble bien fonctionner.. pourriez vous m’expliquer comment vous installer les cordes synthétiques pour que le winch lève le tout et le winch est il au plafond ou en dessous du sofa près de la roue, je veux faire la conversion de ma van donc j’apprend ….
Merci, Lucie
Hey! How is the lifted bed holding up!? Would you do it any different?
Working great! We have a video on YouTube about a few things we would change with this set up. You can check it out here: https://youtu.be/sBxUxBLBVj4
Hi I was wondering how you’re liking the bullyliner on the exterior and how it’s holding up so far? I’m considering doing the same on my 159 PM but have some hesitations, any input or second thoughts on your behalf would be appreciated!
I would love it if you could provide a link to the slides you used for your desk.
Thank you,
Anna
We got them from a brand called Accuride. Here is a link to their Amazon shop: https://amzn.to/3BQWG0T
Not sure if they still stock them or not, but ours are rated for 600lbs.
Thank you for the link and all the great info you provide on your bog and in your videos!
Hi, thanks for your sharing, you guys did a great job even in details. since it’s 2008, I wonder how many miles on it? Is the mechanical work sound?
Hi, thanks for your sharing, you guys did a great job even in details. since it’s 2008, I wonder how many miles on it?
Sitting at 150,000 kms after a year on the road.
This is a great step by step process on what to expect and it’s awesome you put in all the work. But those of who are not as gifted in converting or don’t have the time, any recommendations on businesses that do this for you or places to look particular that have van’s and campers that are easy to convert?
Yes, we have an article about campervan conversion companies that might be of interest to you. Building your own is a lot of work and we wouldn’t really recommend it to everyone. Here is the link: https://drinkteatravel.com/best-van-conversion-companies/
Hi
Please save my sanity and tell me how you got the top of the partition out! I’m going to take a blowtorch to mine soon….
Did you manage to get it off yet? Ours was attached to the floor by a couple of very stubborn screws. Took a while to take it off as well. Just gotta keep at them! Good luck!
Hey guys- great build! Would love to see how you routed the lines for the elevator bed. Sorry if I missed that somewhere, just want to understand how they run, because I want to do this to my van!
Thanks, Josh! We have a dedicated article on the bed build. You can find it here: https://drinkteatravel.com/cheap-diy-elevator-bed-van-conversion/
Hi, I was wondering what is the height of your couch area and what size is the tank underneath it?
Thanks and great design!
Hi! Great work — and thank you for sharing your process & resources in great detail. I’m currently in the middle of remodeling a vintage Class-C motorhome…Thinking about using Bully Liner for the paint job as well (which is how I found your post). I’m curious whether you’ve been happy with that decision after having it out for awhile…Any concerns around cleaning/heat/adhesion/etc.? I’d much appreciate your perspective. Thanks!
Love our Bully Liner! 2 years in and lots of driving through thick forests and bushes, etc and our paint job still look brand new. We barely clean the van too, because we used dark paint it rarely looks so dirty that it needs frequent washes. We didn’t do an amazing job applying the paint, there are some streaks etc that can be seen in a certain light, but that’s because we didn’t apply it evenly enough and no nothing to do with the quality of the product. Would highly recommend it, still!
That kitchen counter is gorgeous